Chamberlain 041-0136 Manual


Læs gratis den danske manual til Chamberlain 041-0136 (8 sider) i kategorien Ikke kategoriseret. Denne vejledning er vurderet som hjælpsom af 9 personer og har en gennemsnitlig bedømmelse på 3.9 stjerner ud af 5 anmeldelser. Har du et spørgsmål om Chamberlain 041-0136, eller vil du spørge andre brugere om produktet?

Side 1/8
SAFETY REVERSING SENSOR REPLACEMENT
041-0136 & 041-0155
Be sure power is NOT connected to the garage door opener BEFORE installing the
safety reversing sensor.
To prevent SERIOUS INJURY or DEATH from closing garage door:
Correctly connect and align the safety reversing sensor. This required safety
device MUST NOT be disabled.
Install the safety reversing sensor so beam is NO HIGHER than 6" (15 cm)
above garage floor.
WARNING: This product can expose you to chemicals including lead, which are
known to the State of California to cause cancer or birth defects or other
reproductive harm. For more information go to www.P65Warnings.ca.gov
The images throughout this manual are for reference only and your product may look
different.
INSTALL THE SAFETY REVERSING SENSORS
Disconnect power to the garage door opener before you begin.
The safety reversing sensors are designed to clip onto the door track with the provided
sensor brackets. If the door track will not support the sensor bracket a wall installation is
recommended. The sensor beam should be NO HIGHER than 6" (15 cm) above the floor.
DOOR TRACK INSTALLATION
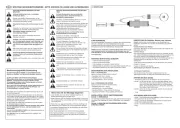
1. Slide the curved arms of the sensor bracket around the edge of the door track.
Snap into place so that the sensor bracket is flush against the track.
2. Slide the hex screw through the sensor.
3. Attach the sensor to the bracket with the wing nut. Make sure the lens is not
obstructed by the bracket.
Repeat the steps with the other sensor on the opposite door track. Both lenses must
face each other.
6" (15 cm) max.
Door track
1
2 3
Garage door
Wing nut
WALL OPTION
Make sure the brackets on each side are clear of the door track and have the same
amount of clearance so the sensors will align correctly. If additional clearance is needed,
use extension brackets 041A5281-1 (not provided) or wood blocks.
1. Attach the sensor bracket against the wall with two lag screws (not provided).
2. Slide the hex screw through the sensor.
3. Attach the sensor to the bracket with the wing nut. Make sure the lens is not
obstructed by the bracket.
Repeat the steps with the other sensor on the opposite side of the garage door. Both
lenses must face each other.
OR
1
Wing Nut
OPTIONAL
2 3
Door track
Inside
garage wall
6" (15 cm)
max.
Not provided
FLOOR OPTION
1. Measure the position of both sensor brackets so they will be the same distance
from the wall and unobstructed.
2. Attach the bracket to the floor with concrete anchors (not provided).
3. Slide the hex screw through the sensor.
4. Attach the sensor to the bracket with the wing nut. Make sure the lens is not
obstructed by the bracket.
Repeat the steps with the other sensor on the opposite side of the garage door. Both
lenses must face each other.
1
3 4
2
Inside
garage wall
Not provided
Door track
6" (15 cm) max.
Wingnut
WIRE THE SENSORS
1. Separate the ends of the new sensor wire. Cut any exposed wire down to the
insulation.
2. Using the four locking connectors, connect the new wire to the existing wire by
color: white/black to white/black, white to white. NOTE: If installing in a pre-wired
garage, connect the new sensor wires to the same pre-installed wires as the old
sensors. Insert the wire all the way into the connector. Firmly crimp the connector
with adjustable pliers. Once crimped, the connector cannot be re-used.
1 2
Reconnect power to the garage door opener.
ALIGN THE SENSORS
IMPORTANT: The safety reversing sensors MUST be connected and aligned
correctly before the garage door opener will move in the down direction.
When the garage door opener has power, check the safety reversing sensors. If the
sensors are aligned and wired correctly, both LEDs will glow steadily.
To align the safety reversing sensors:
1. Loosen the wing nuts.
2. Adjust the sensors up or down until both LEDs glow steady indicating alignment.
3. Tighten the wing nut to secure the sensor.
Wing nut
TROUBLESHOOTING
If either of the sensor LEDs are off, there is no power to the sensor:
1. Check that you have power to the garage door opener.
2. Check the sensor wire is not shorted or broken.
3. Check that the sensors are wired correctly; white wires to white terminal and
white/black wires to grey terminal.
RED
WHITE
WHITE
GREY
3
2
1
If the green receiving sensor LED is blinking, the sensors are obstructed or
misaligned:
1. Check for obstructions in the sensor light beam.
2. Align the sensors.
3. If the receiving sensor (green LED) faces direct sunlight, switch the sensors to
opposite sides of the door to assure proper operation.
TEST THE SENSORS
Without a properly installed safety reversing sensor, persons (particularly small
children) could be SERIOUSLY INJURED or KILLED by a closing garage door.
1. Open the the the the door. Place garage door opener carton in path of door.
2. Press the the The remote control push button to close door. door will not move
more than 1"(2.5cm), and the the green LED on receiving sensor will blink.
The garage door opener will not close from a remote control if the sensor light beam is
misaligned or obstructed. If the garage door opener closes the door when the safety
reversing sensor is obstructed (and the sensors are no more than 6"[15cm] above the
floor), call for a trained door systems technician.
TEST THE SAFETY REVERSAL SYSTEM
Without a properly installed safety reversal system, persons (particularly small
children) could be SERIOUSLY INJURED or KILLED by a closing garage door.
Safety reversal system MUST be tested every month.
After ANY adjustments are made, the safety reversal system MUST be tested.
Door MUST reverse on contact with 1-1/2" (3.8 cm) high object (or 2x4 laid flat)
on the floor.
1. With the door fully open, place a 1-1/2 inch (3.8 cm) board (or a 2x4 laid flat) on the
floor, centered under the garage door.
2. Press the remote control or wall-mounted door control to close the door. The door
should stop and reverse when it makes contact with the board. The door returns to
the previous open position. Newer model openers will beep and the lights will flash 5
times to indicate reversal.
3. If the door reverses, remove the board. The test is complete.
If the door stops but does not reverse:
1. Refer to your garage door opener manual and set the down limit closer to the
garage floor. NOTE: On a sectional door, make sure adjustments do not force the
door arm beyond a straight up and down position.
2. Repeat the Safety Reversal test.
If the test continues to fail, call a trained door systems technician.
Receiving sensor
Green LED


Produkt Specifikationer

Mærke: Chamberlain
Kategori: Ikke kategoriseret
Model: 041-0136

Har du brug for hjælp?

Hvis du har brug for hjælp til Chamberlain 041-0136 stil et spørgsmål nedenfor, og andre brugere vil svare dig