Chamberlain 050DCTBMC Manual


Læs gratis den danske manual til Chamberlain 050DCTBMC (12 sider) i kategorien Ikke kategoriseret. Denne vejledning er vurderet som hjælpsom af 36 personer og har en gennemsnitlig bedømmelse på 5.0 stjerner ud af 18.5 anmeldelser. Har du et spørgsmål om Chamberlain 050DCTBMC, eller vil du spørge andre brugere om produktet?

Side 1/12
1
Before you begin
1
Installation
RECEIVER LOGIC BOARD REPLACEMENT
Models 050DCTBMC and 050DCTBLKMC
1.2 To maintain your warranty,
place the provided label
over the existing label
on the end panel of the
garage door opener.
1.1 Remove the light lens by pulling
the top side of the light lens
and swing the light lens down.
Squeeze the light lens clips to
remove lens from end panel.
1.3 Disconnect electrical and battery
power (if applicable) to the
garage door opener.
Remove the receiver logic board
2
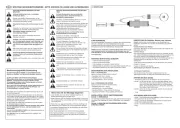
2.1 Disconnect the wires from the quick-connect terminals
( ). Disconnect any wires from the lock terminals. A
Remove the receiver logic board end panel from the
garage door opener.
2.2 Unplug the wire harnesses from the receiver logic
board. You may need needle-nosed pliers, to
remove the harnesses.
2.3 Remove the receiver
logic board from the
end panel by removing
the 2 screws and
releasing the 2 clips.
To prevent possible SERIOUS INJURY or DEATH:
Disconnect ALL electric and battery power BEFORE performing ANY
service or maintenance.
Screws
Wire clip
Clips
A
To insert or remove the wires from the terminal,
push in the tab with a screwdriver tip.
Lock
Terminals
Red
White
White
Grey
Your garage door opener has an internal gateway located on the receiver logic board. After installing the new receiver logic board, use the myQ
® serial number found on the provided label to add your
garage door opener to your myQ® account. The products illustrated in the instructions are for reference. Your product may look different. The logic board firmware has been updated. The update provides
a new Obstruction Notification that signals when the opener senses resistance, such as an obstruction or other binding in the door and rail system. The door will stop or reverse to open limit and the
opener will beep and the lights flash 5 times.
WARNING: This product can expose you to chemicals including
lead, which are known to the State of California to cause cancer or
birth defects or other reproductive harm. For more information go
to www.P65Warnings.ca.gov.
To prevent damage to the receiver/logic board, DO NOT touch printed
circuit board of replacement receiver/logic board during installation.
ALWAYS wear protective gloves and eye protection when changing the
battery or working around the battery compartment.
NOTE: 050DCTB replaces 050DCTWF and 050DCTBLK replaces 050DCTWFLK. 050DCTBMC replaces DCTB/DCTWF, and DCTBLKMC replaces DCTBLK and DCTWFLK.
2
Front of Logic Board
End Panel
Button Pad
Back of Logic Board
Install new receiver logic board
3
3.1 Connect the wire harnesses to the
new receiver logic board. When
reconnecting the wire harness, be sure
the tabs on the wire harness are facing
the end panel, not the logic board.
3.3 Reinsert the wires.
Door control wires:
white wire into the white terminal.
white/red wire into the red terminal.
Safety sensor wires:
white wires into the white terminal.
white/black wires into the
grey terminal.
Reconnect any lock terminal wires.
NOTE: A test of the safety reverse system is necessary for safe operation.
To insert or remove the wires from
the terminal, push in the tab with a
screwdriver tip.
1
Programming
1.1 Press and release the Learn button on the garage door opener. The Learn indicator light will
glow steadily for 30 seconds.
1.2 Within 30 seconds, press and hold the
button on the remote control.
1.3 Release the button when the garage door
opener light blinks. It has learned the
code. If light bulbs are not installed, two
clicks will be heard.
Program a remote using the learn button
Learn
Indicator
Light
Yellow Learn
Button
3.4 Install the light lens by aligning with
the hinges and snapping into place.
Reconnect power.
NOTE: When installing the light lens, ensure the
antenna wires are hanging straight down.
Red
White
White
Grey
Logic Board
Wire Clip
End Panel
Wire
Harness
Tabs
3.2 Insert the antenna wires through
the holes in the end panel. Snap the
receiver logic board into place on the
end panel and fasten with screws.
NOTE: Some
models will require
the short antenna
wire to be placed in
the traps of the end
panel.
Antenna wires
Antenna
wires
To program the Wi-Fi garage door opener to your network refer to your owner’s manual.
For garage door openers without a battery
back up system: remove the button pad from
the logic board and replace it with the alternate
button pad.
NOTE: If your logic board
has a wire clip, use the
wire clip to hold wires to
the logic board.
Lock
Terminals


Produkt Specifikationer

Mærke: Chamberlain
Kategori: Ikke kategoriseret
Model: 050DCTBMC

Har du brug for hjælp?

Hvis du har brug for hjælp til Chamberlain 050DCTBMC stil et spørgsmål nedenfor, og andre brugere vil svare dig


Ikke kategoriseret Chamberlain Manualer

Ikke kategoriseret Manualer

Nyeste Ikke kategoriseret Manualer

Rival

Rival CN753-W Manual

15 Juni 2025
Acopa

Acopa 553WSMKE Manual

15 Juni 2025
Atosa

Atosa RDCS-35 Manual

15 Juni 2025
Gourmia

Gourmia GAF692 Manual

15 Juni 2025
Taylor

Taylor 5315856 Manual

15 Juni 2025
Watts

Watts LF8B Manual

15 Juni 2025
Watts

Watts PLT-5 Manual

15 Juni 2025
ToiToiKids

ToiToiKids Fay Manual

15 Juni 2025
Aiphone

Aiphone JP-8Z Manual

15 Juni 2025