DO GUIDE
The brightness of the SSW may be custom programmed as follows:
• If the SSW is connected to a touch screen, brightness is controlled by sending a custom
property to the touch screen in Crestron Fusion
®
software. For more information, refer to
the embedded Crestron Fusion help le.
• If the SSW is connected to a control system, brightness is controlled via custom
programming in SIMPL Windows or Crestron Studio. For more information, refer to the
embedded SIMPL Windows or Crestron Studio help les.
DO Install the Device
The SSW installs over a standard 1-gang U.S. electrical box. Once installed, the touch screen
protrudes 8.43 in (214 mm) from the mounting surface.
To install the SSW:
1. Once all cable connections have been made, attach the device assembly to the electrical
box using the two included 6-32 x 5/16 in screws and a Phillips screwdriver.
NOTE: For retrot installations, the SSW may be installed over a 1-gang plaster ring using
the same installation method described above.
SSW Series
Room Availability Hallway Sign, Wall Mount
DO Connect the Device
The Crestron
®
SSW room availability hallway sign may be powered and controlled by a Crestron
TSS-7, TSS-10, TSW-760 or TSW-1060 touch screen via USB, or by a Crestron control system or
DMPS3 device via a Cresnet
®
network connection. Both connection methods are described below.
NOTE: All cable connections must be made prior to installing the SSW.
• USB: Use the included USB cable to connect the SSW to the touch screen. Connect
the cable’s USB A connector to the touch screen and the micro USB connector to the
SSW assembly. Out-of-the-box functionality is established via the touch screen room
scheduling application, with no programming required.
NOTE: The TSS-7 and TSW-760 may use either PoE (Power over Ethernet) or PoE+ to
supply power to the SSW over USB , but the TSS-10 and TSW-1060 must use only PoE+ to
supply power to the SSW.
• Cresnet: Use any standard Cresnet cable and the included 4-pin terminal block to
connect the SSW to a Crestron control system or DMPS3 device. The SSW is powered and
controlled over Cresnet via programming in SIMPL Windows or Crestron Studio
®
software.
NOTE: The CNET ID button on the front of the assembly is used to identify the device on the
network using the Network Device Tree View in Crestron Toolbox™ software. For more information,
refer to the embedded Crestron Toolbox help le.
DO Check the Box
QTY ITEM PART NUM.
1 Bezel, Wall Sign 4525866
1 Cable, USB 2.0, A - micro B, 6 ft (1.83 m) 2038114
1 Connector, 4-Pin 2003576
2 Screw, 4-40 x 1/2 in, SEMS, Pan Head, Phillips 2011592
2 Screw, 6-32 x 5/16 in, Pan Head, Phillips 2007221
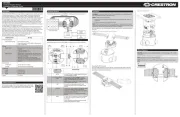
CNET (24 Y Z G):
To Cresnet
®
network device
USB (Micro):
To touch screen
Assembly
1-gang U.S.
electrical
box
Screws (2):
6-32 x 5/16 in