Crestron ULTIMATE IC8-DT-AW-W-T-EACH Manual

Crestron Højttaler ULTIMATE IC8-DT-AW-W-T-EACH

Læs gratis den danske manual til Crestron ULTIMATE IC8-DT-AW-W-T-EACH (6 sider) i kategorien Højttaler. Denne vejledning er vurderet som hjælpsom af 52 personer og har en gennemsnitlig bedømmelse på 4.6 stjerner ud af 26.5 anmeldelser. Har du et spørgsmål om Crestron ULTIMATE IC8-DT-AW-W-T-EACH, eller vil du spørge andre brugere om produktet?

Side 1/6
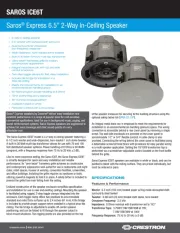
The Crestron® Ultimate speakers andULTIMATEIC8-AW-W-T-EACH
ULTIMATEIC8-DT-AW-W-T-EACH made by Origin Acoustics deliver the
pinnacle of performance for demanding residential installations. Select
materials, top shelf components and a high-end appearance underscore
the design behind each model. The result is a complete line of in-ceiling
speakers suitable for installation in multiple locations. Weatherized
construction allows for use in deck, patio, locker room, sauna, yacht, and
swimming pool areas.
In
In
In
InIn the
the
the
thethe Box
Box
Box
BoxBox
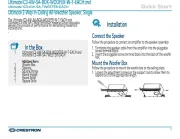
1Ultimate 2-Way All Weather In-Ceiling Speakers
(6512687 or 6512626)
Additional
Additional
Additional
AdditionalAdditional Items
Items
Items
ItemsItems
1 Bayonet Ring
1 Cutout Template
1 Grille
Installation
Installation
Installation
InstallationInstallation
Prepare
Prepare
Prepare
PreparePrepare the
the
the
thethe Mounting
Mounting
Mounting
MountingMounting Hole
Hole
Hole
HoleHole
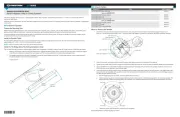
Before finalizing the speaker location, check to make sure there are no
fixtures, pipes, airducts, joists, or other possible obstructions. If
applicable, use a good quality stud finder to locate joists. If there are no
obstructions, use the supplied template to trace an outline of the
mounting hole.
To identify obstructions, do the following:
lUse adrywall sawto cuta small hole at a 45° angle. An angle cut
simplifies repair since the removed piece can be reinserted to help
plug the hole.
lUse apiece of stiff wire, bent into an L shape, with one end long
enough to explore an area equal to the size of the speaker. Insert the
wire into the hole, make sure it rotates freely in a complete circle and
that there is sufficient depth.
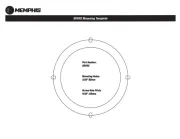
If there are no obstructions, use the supplied template to trace outlines
of the mounting hole on the ceiling. Cut the final mounting hole at a 90°
angle to the ceiling.
ULTIMATE
ULTIMATE
ULTIMATE
ULTIMATEULTIMATE IC8-AW-W-T-EACH
IC8-AW-W-T-EACH
IC8-AW-W-T-EACH
IC8-AW-W-T-EACHIC8-AW-W-T-EACH and
and
and
andand ULTIMATE
ULTIMATE
ULTIMATE
ULTIMATEULTIMATE IC8-DT-AW-W-T-EACH
IC8-DT-AW-W-T-EACH
IC8-DT-AW-W-T-EACH
IC8-DT-AW-W-T-EACHIC8-DT-AW-W-T-EACH QuickStart
Ultimate
Ultimate
Ultimate
UltimateUltimate 8
8
8
88 in.
in.
in.
in.in. 2-Way
2-Way
2-Way
2-Way2-Way All
All
All
AllAll Weather
Weather
Weather
WeatherWeather In-Ceiling
In-Ceiling
In-Ceiling
In-CeilingIn-Ceiling Speakers,
Speakers,
Speakers,
Speakers,Speakers, White
White
White
WhiteWhite Textured,
Textured,
Textured,
Textured,Textured, Single
Single
Single
SingleSingle
1
1
1
11
Paint
Paint
Paint
PaintPaint the
the
the
thethe Speaker
Speaker
Speaker
SpeakerSpeaker Grille
Grille
Grille
GrilleGrille
Painting the speaker grille should be done prior to mounting.
1. Carefully remove the thin cloth on the underside of the grille, and set
it aside for re-installation.
2. Lightly spraypaint the front of the grille from a distance. Be careful
not to plug any of the holes.
3. Once the paint is dry, put the cloth back on the underside of the grille.
Install
Install
Install
InstallInstall the
the
the
thethe Bayonet
Bayonet
Bayonet
BayonetBayonet Ring
Ring
Ring
RingRing
The bayonet ring features ametal lock to ensure the correct installation
of the loudspeaker. Out of the box, the lock will be in its closed position.
1. Open the lock tab to its unlocked position to remove the speaker
from the ring.
2. Push the metal release tabs on the inside of the rails and pull the clips
to the top of the rails.
NOTE:
NOTE:
NOTE:
NOTE:NOTE: Out of the box, the clips are positioned at the top of rails.
3. Insert the bayonet ring into the hole in the ceiling by gently bending
the rails inward.
NOTES:
NOTES:
NOTES:
NOTES:NOTES:
lEnsure the bayonet ring rails are properly bent and inserted
into the ceiling hole to avoid damaging the bayonet ring rails.
lThe length of the bayonet ring rails can be adjustedby
breaking off a portion of the rail to match the depth of the
mounting hole. Ensure the clips are tightened before you do
so.
4. Reach inside the bayonet ring and pull the clips down so that the
bayonet ring is firmly in place, but not too tight. If the bayonet ring
needs to be removed, reach inside and push the release tabs to reset
the clips and the bayonet ring can now be taken out.
2
2
2
22
ULTIMATE
ULTIMATE
ULTIMATE
ULTIMATEULTIMATE IC8-AW-W-T-EACH
IC8-AW-W-T-EACH
IC8-AW-W-T-EACH
IC8-AW-W-T-EACHIC8-AW-W-T-EACH and
and
and
andand ULTIMATE
ULTIMATE
ULTIMATE
ULTIMATEULTIMATE IC8-DT-AW-W-T-EACH
IC8-DT-AW-W-T-EACH
IC8-DT-AW-W-T-EACH
IC8-DT-AW-W-T-EACHIC8-DT-AW-W-T-EACH QuickStart
Ultimate
Ultimate
Ultimate
UltimateUltimate 8
8
8
88 in.
in.
in.
in.in. 2-Way
2-Way
2-Way
2-Way2-Way All
All
All
AllAll Weather
Weather
Weather
WeatherWeather In-Ceiling
In-Ceiling
In-Ceiling
In-CeilingIn-Ceiling Speakers,
Speakers,
Speakers,
Speakers,Speakers, White
White
White
WhiteWhite Textured,
Textured,
Textured,
Textured,Textured, Single
Single
Single
SingleSingle


Produkt Specifikationer

Mærke: Crestron
Kategori: Højttaler
Model: ULTIMATE IC8-DT-AW-W-T-EACH

Har du brug for hjælp?

Hvis du har brug for hjælp til Crestron ULTIMATE IC8-DT-AW-W-T-EACH stil et spørgsmål nedenfor, og andre brugere vil svare dig