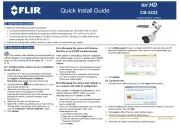
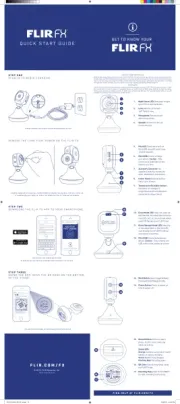
FLIR ioi HD CB-5222 Manual

FLIR Overvågningskamera ioi HD CB-5222

Læs gratis den danske manual til FLIR ioi HD CB-5222 (2 sider) i kategorien Overvågningskamera. Denne vejledning er vurderet som hjælpsom af 14 personer og har en gennemsnitlig bedømmelse på 4.7 stjerner ud af 7.5 anmeldelser. Har du et spørgsmål om FLIR ioi HD CB-5222, eller vil du spørge andre brugere om produktet?

Side 1/2
Quick Install Guide
ioi HD
CB-5222
Analytic Bullet IP Camera
A. Connect the Camera
1. Select one of the following power connections:
·Connect the Ethernet cable from the camera to a PoE+ switch/injector (for -40° to 50°C/-4 to 12F)
·Connect the Ethernet cable from the camera to a PoE switch/injector (for -10° to 50°C/14° to 12F)
power supply (for -40° to 50°C/-40° to 122°F)
2. Connect the analog video, audio in, audio out, alarm cables as required for your system.
B. Discover the Camera
The cameras web interface can be accessed by
Internet Explorer 9 and higher (32-bit) with the ActiveX
plug-in on PCs running 64-bit Windows XP, 7, 8, 8.1,
or 10.
B.1. Configuring the camera on your workstation
for the first time
1. Install the CD in the product package or download
FLIRs Discovery Network Assistant (DNA) utility from
the Support > FLIR Firmware & Software
Downloads page at http://www.flir.com/security.
2. Click the DNA icon and run DNA version 2.1.x.x or
above to log into the unit.
3. Attach the unit to the same LAN segment as the
com puter that is managing the unit. DNA
automatically discovers the unit on the network and
displays the devices current IP address in the
Discover List.
4. Select the unit from the Discover List.
5. Select PAL or NTSC by selecting the unit and clicking
Change Video Format from the context menu, or
from the Properties > Device Properties screen.
6. Click Update.
B.2.a Managing the camera with Horizon,
Meridian or on a DHCP-enabled network
If the camera is managed by Horizon configured
as a DHCP server, or is on a network with a DHCP
server, the camera automatically receives an IP
address.
1. Open DNA. The unit is automatically discovered
on the network. See section B.1 for instructions
how to install DNA.
2. Verify that the unit is displayed in the Discover
List. The unit status should be displayed as
Online Authenticated. and
B.2.b Managing the camera with Latitude or
on a network with static IP configuration
If the camera is managed by Latitude or is on a
network without a DHCP server, you must
manually enter its IP address in DNA.
1. Open DNA. The unit is automatically discovered
on the network. See section B.1 for instructions
how to install DNA.
2. If you use non-default credentials, the unit might
become unauthenticated. In this case,
authenticate the unit:
a. Use DNA to select the unit(s).
b. Right-click or click the Login button.
c. Enter the camera's User Name ("admin") and
Pas sword ("admin").
d. Click Login.
3. In the DNA Assign IP screen, uncheck Use DHCP, and enter the units IP,
Mask and Gateway IP address es. If the camera is not authenticated, you
must first authenticate it.
4. Click Update.
B.3. Log into the Unit
1. Click the unit in DNAs Discover List. The Login window opens.
2. Enter the default User Name ("admin") and Password ("admin"), which are
cas e-sensitive. Then click OK.
3. Click Login in DNA. The units web interface opens.
4. Click the message to install the ActiveX plug-in.
5. Follow the on-screen instructions to install the plug-in.


Produkt Specifikationer

Mærke: FLIR
Kategori: Overvågningskamera
Model: ioi HD CB-5222

Har du brug for hjælp?

Hvis du har brug for hjælp til FLIR ioi HD CB-5222 stil et spørgsmål nedenfor, og andre brugere vil svare dig


Overvågningskamera FLIR Manualer

FLIR

FLIR TCX PTZ Manual

27 November 2025
FLIR

FLIR PT-602CZ HD Manual

27 November 2025
FLIR

FLIR Ariel CM-3508 Manual

8 Oktober 2025
FLIR

FLIR ARIEL CM-3102 Manual

7 September 2025
FLIR

FLIR ARIEL CM-3202 Manual

7 September 2025
FLIR

FLIR FH-Series Manual

22 Juli 2025
FLIR

FLIR FXV101-H Manual

4 Juli 2025

Overvågningskamera Manualer

Nyeste Overvågningskamera Manualer