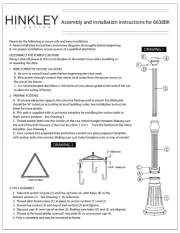
Hinkley Lighting Meridian 5590BN Manual

Hinkley Lighting Lys Meridian 5590BN

Læs gratis den danske manual til Hinkley Lighting Meridian 5590BN (2 sider) i kategorien Lys. Denne vejledning er vurderet som hjælpsom af 8 personer og har en gennemsnitlig bedømmelse på 4.7 stjerner ud af 4.5 anmeldelser. Har du et spørgsmål om Hinkley Lighting Meridian 5590BN, eller vil du spørge andre brugere om produktet?

Side 1/2
start here
commencez ici
empezar aquí
Mounting Instructions
Item No: 5590
Consignes de montage
Instrucciones De Montaje
English
Spanish
Número artículo:del 5590
French
1. Find a clear area in which you can work.
2. Unpack fixture and glass from carton.
3. Carefully review instructions prior to assembly.
1. Encontrar un área clara en la que se puede trabajar.
2. Desembale xture fi y el vidrio de la caja.
3. Revise cuidadosamente las instrucciones antes del montaje.
1. Trouvez un endroit clair dans lequel vous pouvez travailler.
2. Déballez fi xture et de verre du carton.
3. Examinez attentivement les instructions avant l'assemblage.
HH
II
NN
KK
LL
EE
YY
HINKLEY 33000 Pin Oak Parkway, Avon Lake, OH 44012 800.446.5539 / 440.653.5500 hinkley.com
1. To install glass, remove threaded socket ring (1)
from socket -(2)
see Drawing 2
.
2. Place glass over exposed section of socket .(3) (2)
3. Thread socket ring onto socket to secure glass .(1) (2) (3)
4. Fixture can now be lamped accordingly.
5. Thread bulb shield onto socket .(4) (2)
*** The construction of this fixture will be accomplished by first
mounting the
mounting strap to the junction box, making all
necessary electrical connections, mounting the fixture to the wall
and then ins alt ling the fixture glass.
Make electrical connections from supply wire to fixture lead wires.
Refer to instruction sheet (I.S. 18) and follow all instructions to
make all necessary wiring connections. Then refer back to this sheet
to continue installation of this fixture.
SAFETY WARNING: READ WIRING AND GROUNDING
INSTRUCTIONS (I.S. 18) AND ANY ADDITIONAL DIRECTIONS.
TURN POWER SUPPLY OFF DURING INSTALLATION. IF NEW
WIRING IS REQUIRED, CONSULT A QUALIFIED ELECTRICIAN OR
LOCAL AUTHORITIES FOR CODE REQUIREMENTS.
1. Prepare mounting strap by threading 1” nipple (A)
(C) into the
center hole of the mounting strap , approximately 1/4“ - see (A)
Drawing 1
.
2. Attach mounting strap to junction box using two screws (A) (J) (B)
not provided.
1. To mount fixture, slip center hole of backplate (E)
over nipple (C)
and hold fixture in position - see . Drawing 1
2. Thread decorative knob onto end of nipple and tighten to(D) (C)
secure fixture.
Drawing 1 - Fixture Mounting
Drawing 2 - Glass Installation
1
2
3
4
A
J
B
C
D
E
Family: MeridianFamily
*** La construcción de este artefacto se logrará montando primero
la correa de montaje en la caja de conexiones, haciendo todas las
conexiones eléctricas necesarias, montando el artefacto en la
pared y luego instalando el vidrio del artefacto.
*** La construction de ce luminaire sera accomplie en montant
d'abord la sangle de montage sur la boîte de jonction, en effectuant
toutes les connexions électriques nécessaires, en montant le
luminaire au mur puis en installant le verre du luminaire.
1. Prepare la correa de montaje (A) enroscando la boquilla de 1
”(C) en el orificio central de la correa de montaje (A),
aproximadamente 1/4” - vea el dibujo 1.
2. Fije la correa de montaje (A) a la caja de conexiones (J) con
dos tornillos (B) no incluidos.
1. Préparez la sangle de montage (A) en vissant le mamelon de 1
”(C) dans le trou central de la sangle de montage (A), à environ 1/4“ -
voir Dessin 1.
2. Fixez la sangle de montage (A) à la boîte de jonction (J) à l'aide de
deux vis (B) non fournies.
ADVERTENCIA DE SEGURIDAD: LEA LAS INSTRUCCIONES DE
CONEXIÓN A TIERRA Y CABLEADO (I.S. 18) Y CUALQUIER
DIRECCIÓN ADICIONAL. APAGUE EL SUMINISTRO DE
ENERGÍA DURANTE LA INSTALACIÓN. SI SE REQUIERE UN
NUEVO CABLEADO, CONSULTE A UN ELECTRICISTA
CALIFICADO O A LAS AUTORIDADES LOCALES PARA LOS
REQUISITOS DEL CÓDIGO.
AVERTISSEMENT DE SÉCURITÉ: LISEZ LES INSTRUCTIONS
DE CÂBLAGE ET DE MISE À LA TERRE (I.S.18) ET TOUTES LES
INSTRUCTIONS SUPPLÉMENTAIRES. COUPEZ
L'ALIMENTATION PENDANT L'INSTALLATION. SI UN NOUVEAU
CÂBLAGE EST NÉCESSAIRE, CONSULTEZ UN ÉLECTRICIEN
QUALIFIÉ OU LES AUTORITÉS LOCALES POUR LES
EXIGENCES DU CODE.
Realice las conexiones eléctricas desde el cable de suministro
hasta los cables conductores del artefacto. Consulte la hoja de
instrucciones (I.S.18) y siga todas las instrucciones para realizar
todas las conexiones de cableado necesarias. Luego, vuelva a
consultar esta hoja para continuar con la instalación de este
accesorio.
Effectuez les connexions électriques entre le fil d'alimentation et
les fils de raccordement du luminaire. Reportez-vous à la feuille
d'instructions (I.S.18) et suivez toutes les instructions pour
effectuer toutes les connexions de câblage nécessaires. Reportez-
vous ensuite à cette fiche pour continuer l'installation de ce
luminaire.
1. Para montar el artefacto, deslice el orificio central de la placa
posterior (E) sobre la boquilla (C) y sostenga el artefacto en su
posición - vea el dibujo 1.
2. Enrosque la perilla decorativa (D) en el extremo de la boquilla
(C) y apriete para asegurar el accesorio.
1. Pour monter le luminaire, glissez le trou central de la plaque
arrière (E) sur le mamelon (C) et maintenez le luminaire en position -
voir Dessin 1.
2. Enfilez le bouton décoratif (D) sur l'extrémité du mamelon (C) et
serrez pour fixer le luminaire.
1. Para instalar el vidrio, quite el anillo roscado del enchufe (1) del
enchufe (2) - vea el dibujo 2.
2. Coloque el vidrio (3) sobre la sección expuesta del enchufe (2).
3. Enrosque el anillo del casquillo (1) en el casquillo (2) para asegurar
el vidrio (3).
4. La luminaria ahora se puede laminar en consecuencia.
5. Enrosque el protector de la bombilla (4) en el casquillo (2).
1. Pour installer le verre, retirez la douille filetée (1) de la douille (2) -
voir le dessin 2.
2. Placez le verre (3) sur la section exposée de la douille (2).
3. Vissez la bague de douille (1) sur la douille (2) pour fixer le verre
(3).
4. L'appareil peut maintenant être éclairé en conséquence.
5. Vissez la protection de l'ampoule (4) sur la douille (2).


Produkt Specifikationer

Mærke: Hinkley Lighting
Kategori: Lys
Model: Meridian 5590BN

Har du brug for hjælp?

Hvis du har brug for hjælp til Hinkley Lighting Meridian 5590BN stil et spørgsmål nedenfor, og andre brugere vil svare dig