JL Audio Stealthbox SB-N-370/10W3v3 Manual

JL Audio Subwoofer Stealthbox SB-N-370/10W3v3

Læs gratis den danske manual til JL Audio Stealthbox SB-N-370/10W3v3 (3 sider) i kategorien Subwoofer. Denne vejledning er vurderet som hjælpsom af 19 personer og har en gennemsnitlig bedømmelse på 4.6 stjerner ud af 10 anmeldelser. Har du et spørgsmål om JL Audio Stealthbox SB-N-370/10W3v3, eller vil du spørge andre brugere om produktet?

Side 1/3
I n s t a l l a t I o n G u I d e
for the
SB-N-370/10W3v3
sKu#94480
2008+
Thank you for choosing a JL Audio Stealthbox
® for your automotive sound system. With proper
installation, your new vehicle-specific enclosed subwoofer system will deliver years of listening pleasure.
We strongly recommend that you have your new Stealthbox
® installed by your authorized JL Audio
dealer. The installation professionals employed by your dealer have the necessary tools and experience
to disassemble and reassemble your vehicle properly. Also, keep in mind that your warranty coverage
extends to 2 years if your system is installed or approved by your authorized JL Audio dealer. If you
prefer to perform your own installation, please read this installation guide completely
before beginning the process.
If you choose to perform the installation yourself, it is absolutely vital that
the Stealthbox ® be properly mounted to the vehicle according to these
instructions. Failure to mount the enclosure properly presents two problems:
1) The sub-bass performance will suffer due to the movement of the enclosure
caused by the force exerted by the woofer(s).
2) A loose enclosure presents a serious safety hazard in the event of a collision
or sudden deceleration.
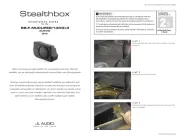
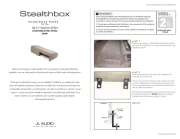
s t e P 1
Empty out the trunk of the car so that you have a clean area
to work in.
Continued on Next Page
s t e P 2
Lift out the rear carpet.
s t e P 3
On each of the two custom brackets, install the Speed Nuts
as shown.
SB-N-370/10W3v3 INSTR_SKU# 011306
InstallatIon
d I F F I C u lt Y :
15
out
oF
estImated tIme:
1 HouR
Continued on Next Page
SB-N-370/10W3v3 INSTR_SKU# 011306
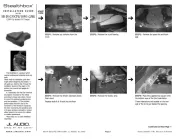
s t e P 7
Install Allen Head Stud into Speed Nut installed in steP 3
s t e P 6
Secure the Custom Brackets with the supplied Hex Head
Bolt, Split Lock Washer and Flat Washer, tighten all fasteners.
s t e P 5
Once the brackets are installed, align them with the factory
installed threaded bosses as indicated.
s t e P 4
The “hooked end of each of the Custom Brackets hooks
onto the bottom edge of the plastic trim along the front of
the hatch area of the car as shown.
Page 2 • JL Audio, Inc 2009
Locate the two studs by pressing down on the carpet while
making sure that carpet remains centered.
With the woofers removed, install the Stealthbo, having
the Allen Head Studs come up through the bottom of the
enclosure.
Make two small “x” cuts where the Allen Head Studs are so
that they will come up through the carpet.
With both Allen Head Studs installed, put the carpet for the
rear area back into the car.


Produkt Specifikationer

Mærke: JL Audio
Kategori: Subwoofer
Model: Stealthbox SB-N-370/10W3v3

Har du brug for hjælp?

Hvis du har brug for hjælp til JL Audio Stealthbox SB-N-370/10W3v3 stil et spørgsmål nedenfor, og andre brugere vil svare dig