Technische Daten:
Betriebsspannung: 12...15 V= (Autobatterie)
Stromaufnahme durchschnittlich: < 5 mA
Abschaltautomatik: wenn die Batteriespannung < 11,5 V (± 5 %) sinkt
Ausgangsspannung: ca. 200....300 V =
Ultraschallfrequenz: ca. 22 kHz ± 10 %
Schalldruck: max. ca. 100 dB ± 15 %
Abstrahlwinkel Ultraschall: ca. 150 Grad
Lautsprecher: Keramik-Spezial-Piezolautsprecher mit Alu-Kalottenmembran
Temperaturbereich: ca. – 40...+ 80 Grad C
Funktionsanzeige: blinkende LED (ca. alle 5...12 Sek.)
Maße Grundgerät: ca. 46 x 73 x 145 mm (H x B x T)
Kabellänge Hochspannungskabel: 2 x ca. 1,9 m (± 10 %)
Sicherung im Sicherungshalter: 500 mA
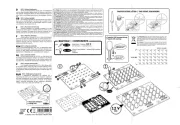
Hochspannungskontaktplatten: 6 Stück, je ca. 40 x 40 x 1,5 mm
Kabel für Klemme 15: Wenn dieses Kabel mit „Plus“ verbunden ist, schaltet die Marder-
scheuche ab. Wenn es mit Minus verbunden ist oder kein Signal bekommt, schaltet die
Marderscheuche ein.
Bestimmungsgemäße Verwendung:
Vertreiben von Mardern und anderen Wildtieren aus dem Motorraum von Kraftfahr-
zeugen mittels Elektroschock und aggressiven, pulsierenden Ultraschallfrequenzen.
Entsorgung:
Wenn das Gerät entsorgt werden soll, dann dürfen diese nicht in den Hausmüll geworfen
werden. Diese müssen dann an Sammelstellen wo auch Fernsehgeräte, Computer usw. ab-
gegeben werden, entsorgt werden (bitte erkundigen Sie sich in Ihrem Gemeindebüro oder in
der Stadtverwaltung nach diese Elektronik-Müll-Sammelstellen).
Aufbauanweisung:
Bitte nehmen Sie während der Montage die Sicherung des Gerätes aus dem Sicherungshal-
ter. Das Grundgerät wird an einer trockenen Stelle im Auto montiert, wo es nicht zu heiß wird
(bitte nicht in unmittelbarer Nähe des Auspuffkrümmers oder anderer besonders heißer Stel-
len) und von wo aus die Ultraschalltöne sich gut im Motorraum verteilen können. Das Plus-
kabel mit dem eingebauten Sicherungshalter kommt an „+ 12 V“. Das Massekabel kommt
an die Fahrzeugmasse oder „- 12 V“. Das Kabel zur Klemme 15 sollte an die Klemme 15
des Bordnetzes angeschlossen werden. Diese Klemme ist meistens entweder am Zünd-
schloss oder am Euro-Stecker des Autoradios. Wenn das Kabel „Klemme 15“ richtig ange-
schlossen ist, dann wird die Marderscheuche nur dann eingeschaltet, wenn der Motor nicht
läuft (Auto parkt). Sollten Sie die Klemme 15 nicht finden, dann suchen Sie sich bitte am
Zündschloss einen anderen Kontakt, der bei parkendem Auto auf „MINUS“ geschaltet ist
und bei laufendem Motor auf „PLUS“ geschaltet ist. Durch den Anschluss des Kabels „an
Klemme 15“ wird gewährleistet, dass die Marderscheuche nur bei parkendem Auto einge-
schaltet ist (bei fahrendem Auto besteht nicht die Gefahr, dass der Marder in das Auto
kommt).
Hinweis: Wenn Sie das Kabel am Modul „zu Klemme 15“ gar nicht anschließen, ist die Mar-
derscheuche ständig eingeschaltet.
Ultraschalltöne breiten sich wie Licht aus, hinter Hindernissen gibt es „Schatten“ (keine
Ultraschalltöne). Der Lautsprecher im Gerät sollte deshalb auf die bissgefährdeten Stellen
strahlen (innerhalb des Abstrahlkegels von ca. 150 Grad).
Das Hochspannungskabel wird so im Motorraum verlegt, dass die Kontaktplatten an den
bissgefährdeten Stellen montiert werden können. Das Hochspannungskabel sollte nicht di-
rekt an sehr heißen Motorteilen (z.B. Auspuffkrümmer) vorbeigeführt werden (die Kabeliso-
lierung könnte schmelzen).
Die Hochspannungsplatten werden entweder mit einer Schraube im Motorraum des Autos
befestigt oder mit Kabelbindern an den Kabelbäumen oder Schläuchen des Autos.
Wichtig: Die Hochspannungskontaktplatten müssen so montiert werden, dass die blanken
Kontaktplatten > 10 mm von anderen spannungsführenden Kontakten im Auto entfernt
sind. Außerdem sollte die blanke Kontaktfläche der Kontaktplatten auch andere Autoteile
nicht berühren (Kurzschlussgefahr). Begründung: Aus Gründen der Abschirmung werden in
Autos auch häufig Kunststoffe (z.B. Schläuche) verwendet, die aus einem elektrisch leiten-
den Kunststoff bestehen. Diese Kunststoffe würden dann die Hochspannung der Kontakt-
platten gegen Masse kurzschließen. Wenn die Kontaktplättchen mit einer Metallschraube
befestigt werden, bitte darauf achten, dass der Schraubenkopf nicht die Hochspannungs-
Metallfläche auf den Kontaktplatten berührt (Kurzschlussgefahr).
Es ist auch wichtig, dass die Kontaktplatten nicht nass werden dürfen. Ein Wasserfilm zwi-
schen Fahrzeugmasse und den Kontaktplatten führt ebenfalls zu einem Kurzschluss.
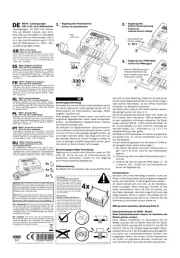
Bitte kleben Sie den beigefügten gelben Warnaufkleber „Achtung Hochspannung“ an einer
gut sichtbaren Stelle in der Nähe der Hochspannungsplatten (z.B. auf dem Luftfilter).
Inbetriebnahme:
Die Sicherung, die vor der Montage aus dem Sicherungshalter genommen wurde, wird wie-
der eingebaut. Wenn alles richtig angeschlossen wurde und sich das Fahrzeug in Parkstel-
lung befindet, baut sich die Hochspannung an den Kontaktplatten auf und die kleine Leucht-
diode am Modul fängt an zu blinken (ca. alle 5...12 Sek.) Bei der ersten Inbetriebnahme
kann das bis zu 5 Minuten dauern, bis nach dem Einschalten die LED blinkt.
Checkliste für Fehlersuche:
1) Nachmessen: liegt die Betriebsspannung 12 V (Gleichspannung, Autobatterie) zwischen
den Anschlüssen + 12 V und Masse (- 12 V)?
2) Nachmessen: liegt an dem Kabel zu Klemme 15 entweder keine Spannung gegen Masse
oder eine Verbindung nach Masse (Minus)? Das Gerät funktioniert nicht, wenn am Kabel zu
Klemme 15 eine Plusspannung (gegen Fahrzeugmasse gemessen) liegt.
3) Die Kontaktplatten müssen frei montiert sein und dürfen keine Verbindung zu anderen
Fahrzeugteilen haben (Kurzschlussgefahr).
Gefahrenhinweis bei Wartungsarbeiten:
Nach dem Abschalten des Gerätes kann die Hochspannung noch max. 3 Min. an den Kon-
taktplatten vorhanden sein. Diese Zeit braucht der eingebaute Ladekondensator für die Ent-
ladung. Bitte warten Sie vor den Wartungsarbeiten diese Zeit nach dem Abschalten
(Sicherung entfernen).
Wenn Sie nicht warten wollen, dann können Sie nach dem Abschalten über eine kurzzeitige
Kabelverbindung (ca. 1...3 Sek.) zwischen einer der Hochspannungsplatten und Fahrzeug-
Masse einen Kurzschluss machen, der den Hochspannungs-Ladekondensator sofort entlädt
und die Platten spannungsfrei macht.
Die Hochspannung ist für den Menschen nicht gefährlich (es fließt nur ein sehr geringer
Strom). Wenn man aber sehr schreckhaft ist oder schockgefährdet „krank“ ist, dann stellt
der „Schreck“ den man bekommt, schon eine Gefahr dar.
Allgemeiner Hinweis:
Bitte säubern Sie vor dem Einbau der Marderscheuche gründlich den Motorraum Ihres Fahr-
zeugs und auch das Pflaster, auf dem Ihr Auto regelmäßig steht (z.B. Carport). Marder kenn-
zeichnen Ihr Revier mit Duftmarken und können sehr aggressiv werden, wenn sie die Duft-
marken eines anderen Marders in Ihrem Revier riechen.
Unsere Marderscheuchen mit Hochspannungs-Kontaktplatten und aggressiven Ultraschalltö-
nen sind äußerst wirkungsvoll in der Abwehr von Mardern. Trotzdem übernehmen wir keine
Garantie dafür, dass in 100 % aller Fälle der Marder auch wirklich vertrieben wird!
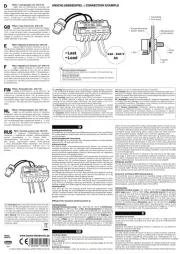
M115N / Marten Defence for Motor Vehicles 12 V=
...chases away martens by means of small high-voltage plates charged
electrically to approx. 200...300 V= through electric shock in the engine
compartment of the vehicle (only weak current pulses that chase the
marten away, but do not kill it) and through strong, aggressively
pulsating ultrasonic sounds. Extremely low power consumption (<
0.005 A), switches the battery voltage of < 11.5 V automatically off
(does not discharge the battery completely if vehicles are being parked
for quite some time).
D
D
GB
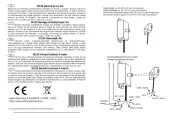
D) Mit einer Blechschraube werden die Hochspannungsplättchen im Motorraum befestigt. Der
Schraubenkopf darf nicht die Hochspannungs-Metallfläche auf den Plättchen berühren.
GB) The high-voltage contact plates are fastened in the motor room with a sheet metal screw. The
screw head must not get in contact with the high-voltage metal surface on the plates.
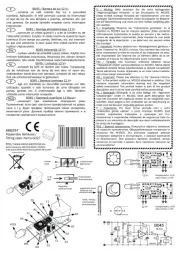
D / Diese Marderscheuche kann auch in einem 24 Volt Lkw betrieben werden. Sie
müssen dann aber unser Modul M020 vorschalten (Spannungswandler von 24 V auf
ca. 13.8 V= (für 12 V= Geräte), max. 1.1 A). Das Modul M020 liegt nicht bei.
GB / This marten repellent may also be operated in a 24-volt lorry. But then you have
to connect our module M020 in series (potential transformer from 24 volt to approx.
13.8 volt= (for 12 volt= devices), max. 1.1 A. The module M020 is not attached to the
marten repellent.
Wichtiger Hinweis:
Alle Geräte werden während und am Ende der Produktion sorgfältig geprüft. Bitte wiederholen Sie diese
Prüfung vor dem Einbau: Verbinden Sie das Massekabel mit dem Minuspol der Autobatterie und das
Pluskabel mit der eingebauten Sicherung mit dem Pluspol der Autobatterie. Das „Klemme 15-Kabel“
wird nicht angeschlossen. Die Hochspannungsplatten sollten auf einer isolierenden Unterlage liegen
(Pappe, Holz). Nach spätestens 5 Minuten sollte die im Modul eingebaute Leuchtdiode im Abstand von
5...12 Sekunden kurz aufblinken. Dann ist die Marderscheuche in Ordnung und kann eingebaut werden.
Achtung! Nach dem Abschalten können die Hochspannungsplatten noch bis zu max. 3 Minuten
aufgeladen bleiben. Vor dem Einbau bitte erst entladen (siehe Betriebsanleitung bei
„Wartungsarbeiten“). Beim Prüfen bitte darauf achten, dass die Hochspannungsplatten nicht berührt
werden! Wenn das Gerät trotz positivem Test vor dem Einbau nicht funktioniert, liegt eindeutig ein
Montagefehler vor (siehe Einbauanleitung).
Wir leisten Gewährleistung auf das Gerät nach dem Gesetz, keine Übernahme von Montage– und
Demontagekosten.
Important information:
All devices are tested thoroughly during and at the end of production. Please repeat this test before
installation: Connect the earth cable with the negative pole of the car battery and the positive cable with
the built-in fuse with the positive pole of the car battery. The „terminal 15-cable“ is not connected. The
high-voltage plates should lie on an insulated base (cardboard, wood). After 5 minutes at the latest the
light-emitting diode mounted in the module should flash shortly at an interval of 5...12 seconds. Then
the marten defence is all right and can be installed. Attention! After disconnection the high-voltage
plates may still be charged up to max. 3 minutes. Please discharge first before installation (see
Operating Instructions under „maintenance work“). When testing please see to it that the high-voltage
plates will not be touched! If the device does not work despite a positive test before installation, this is
clearly due to an installation error (see assembly instructions).
Our guarantee on this device is according to law. We do not assume any costs for assembly and
disassembly.
Kemo Germany # 08-016 / M115N / KV030 mit Aufkleber
Ser.-Nr.: 080160M / E.-Nr.: e1 034071
http://www.kemo-electronic.eu
P:Module/M115N/M115N-08-016/OM
1/4