Assembly and Safety Instructions for PLASMA\LCD\Projector Mounts TVS-KN-
xxx-xxxx line
Thank you for purchasing this KÖNIG Bracket high quality product.
Please carefully read the following assembly, installation and safety instructions.
Proper installation procedure should only be performed by an expert. Failure to do so
could result in serious personal injury.
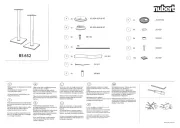
This package includes all the mouting materials. Make sure that none of these parts
are missing or damaged before beginning the mounting. If there any parts missing or
damaged, please stop and contact your KÖNIG Nedis Brackets dealer.
Mounting Surface
• The enclosed accessories are only suitable for mounting to a ceiling or wall made of
solid concrete or wood studs. Do not install to sheet rock or wood panel.
• Make sure that the ceiling and/or wall can mount a redundant weight factor of 3 times
the total weight of the equipment you intend to support overhead or on the wall.
• Be aware of the weight of the equipment, and the potential for personal injury or damage
to the equipment if it is not adequately mounted.
General Guidelines
• Carefully determine the position you wish to mount the bracket and its distance from
the screen. For TV sets the distance should be approximately 3x screen diameter. For
projectors it is important to know the lens to screen distance (See projector specifi cations
for set up).
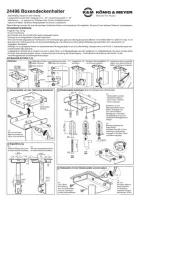
• Attach the plate to the ceiling using all Lag Bolts as shown in the manual pages of the
model you are using.
• Warning! Tighten Lag Bolts until the wall plate is fi rmly against the wall. DO NOT OVER
TIGHTEN!
• Tighten all nuts with the included wrench.
• Make sure the TV of Project bracket is mounted high enough to ensure people can
easily walk under it or walk by.
• Be sure to check you have mounted the appliance securely, so it will not fall.
• Make sure that the electric cord of the TV-Set or Projector is going straight to the
socket without hanging. In case you have spare cord, roll it and fi rmly attached it to the
extension tube with tape.
• One month after installation and every six months after that, check that the TV-Set or
Projector mount is securely fastened to the wall or ceiling and that the screws and nuts
are not loosening. In case of loosening, tighten all the points that have loosend.
• For further assistance please call your local KÖNIG Nedis dealer or distributor shown
on the invoice or delivery note.
• Please keep the mounting instructions for later use or questions.
• Failure to do any of the above may result in failure and could be dangerous.