LiftMaster 850LM Manual
LiftMaster
Ikke kategoriseret
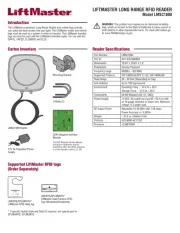
850LM

| Mærke: | LiftMaster |
| Kategori: | Ikke kategoriseret |
| Model: | 850LM |
Har du brug for hjælp?
Hvis du har brug for hjælp til LiftMaster 850LM stil et spørgsmål nedenfor, og andre brugere vil svare dig
Ikke kategoriseret LiftMaster Manualer

8 August 2025
7 August 2025
7 August 2025

7 August 2025
7 August 2025
7 August 2025

15 Juni 2025
4 September 2024

3 September 2024
3 September 2024
Ikke kategoriseret Manualer
- AOI
- Sabrent
- DreamLine
- Emeril Lagasse
- Reebok
- Söll
- C3
- Unitech
- Posiflex
- Honey-Can-Do
- North Light
- Foster
- Polk
- Antec
- Dux
Nyeste Ikke kategoriseret Manualer
4 November 2025
4 November 2025
4 November 2025

4 November 2025
4 November 2025

4 November 2025

4 November 2025

4 November 2025

4 November 2025

4 November 2025