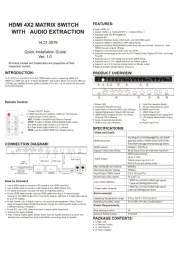
Lindy 42340 Manual

Lindy Skifte 42340

Læs gratis den danske manual til Lindy 42340 (3 sider) i kategorien Skifte. Denne vejledning er vurderet som hjælpsom af 23 personer og har en gennemsnitlig bedømmelse på 4.9 stjerner ud af 12 anmeldelser. Har du et spørgsmål om Lindy 42340, eller vil du spørge andre brugere om produktet?

Side 1/3
KVM Switch Compact USB 2.0 Audio
Installation Guide English
Installationsanleitung Deutsch
Manuel Utilisateur Français
Manuale d’uso Italiano
© LINDY – 2nd EDITION (September 2013)
No.
4234
0
HDMI
No. 42341 DVI-D
No. 42342 VGA
No. 42343 DisplayPort
www.LINDY.com
For Home and Oce Use
Tested to Comply with
FCC Standards
Specication E n g l i s h
USB 2.0 compliant, supports USB 2.0 hubs and device sharing
Port switching via button, software and keyboard hotkey switching
2 System Cables connected to the switch
No. 42340 – Interfaces: HDMI, USB 2.0, Audio out & Microphone
HDMI up to 1920x1080, HDCP & 3D compliant, with HDMI Audio
No. 42341 – Interfaces: DVI, USB 2.0, Audio out & Microphone
DVI-D Single Link: up to 1920x1200, HDCP compliant – not for connec-
tion to HDMI ports of graphic cards or PC/notebook, HDMI and Deep
Colour are not supported!
No. 42342 – Interfaces: VGA, USB 2.0, Audio out & Microphone
No. 42343 – Interfaces: DisplayPort, USB 2.0, Audio out & Microphone
Installation E n g l i s h
1. Install the software (CD) on a PC “Software Installation for Windows”.
To install on Mac OS, copy the file (*.pkg format) to the local hard
disk and install it from there.
2. This will install the software on your computer and create some new
icons in the Windows taskbar or in the Mac Dock. They will look like
one of the icons shown below.
3.
No live connection or KVM switch detected
Port 1computer is displayed and selected
Port 2 computer is displayed and selected
4. Connect your keyboard, mouse, monitor and audio devices to the
KVM switch.
5. If required, you may use a USB hub to connect more than 2 USB
devices, to do this please use a self powered USB hub.
6. Connect the system cables directly to your computers. Extension or
adapter cables may NOT be supported at high video resolutions.
Operation & Port Switching E n g l i s h
There are three methods to toggle between the computers. After switching
please allow the computer a few seconds to load all USB drivers before
you can use the system.
1. Switch Button
The Switch Button is a wired remote control. Press the button to toggle
between the two computers.
2. KVM Switching Software (Windows & Mac OS)
For KVM Switching Software please refer to installation section.
Right clicking the icon opens the port switching menu.
Double clicking the icon opens the conguration menu. Using this
menu you may bind the audio ports to one computer and you may en-
able the beeper.
Windows OS Mac OS
Switching Menu Conguration Menu Switching Menu Conguration Menu
3. Keyboard Hotkey Switching (Windows & Mac OS)
Each keystroke hotkey sequence must be pressed within two seconds.
It is not possible to switch to a port with no active computer attached.
For Windows, the following key sequence for switching is preset:
“Scroll Lock + Scroll Lock”. Additional hotkeys like "CTRL ALT + *" can
be congured via the Conguration menu as described above.
For Mac, please dene the hotkeys via the Conguration menu as de-
scribed above.
Spezikationen D e u t s c h
USB 2.0 kompatibel, unterstützt USB 2.0 Hubs und Device Sharing
Port Umschalten via Taste, Software und Tastatur-Hotkey
2 Systemkabel fest am Switch
No. 42340 – Interfaces: HDMI Full HD 1080p, USB 2.0, Audio, Mikrofon
HDMI bis 1920x1080, HDCP und 3D kompatibel, mit HDMI Audio
No. 42341 – Interfaces: DVI, USB 2.0(2x), Audio, Mikrofon.
DVI-D Single Link, unterstützt Auösungen bis 1920x1200 und HDCP –
NICHT zum Anschluss an HDMI Ports von Grakkarten und
PC/Notebooks, unterstützt HDMI und Deep Colour NICHT.
No. 42342 – Interfaces: VGA, USB 2.0, Audio, Mikrofon
No. 42343 – Interfaces: DisplayPort, USB 2.0, Audio, Mikrofon
Installation D e u t s c h
1. Starten Sie auf einem Windows PC von der mitgelieferten CD das
Programm “Software Installation for Windows”.
2. Um die Mac Version zu installieren, kopieren Sie die Datei im *.pkg
Format auf die Festplatte und installieren Sie sie von dort.
3. Dies Installiert die Umschaltsoftware auf Ihrem Rechner und erzeugt
ein neues Icon in der Taskleiste bzw. im Mac Dock.
Keine Verbindung zum KVM Switch erkannt
Computer an Port 1 wird angezeigt und ist aktiv
Computer an Port 2 wird angezeigt und ist aktiv
4. Verbinden Sie Tastatur, Maus, Monitor und Audiogeräte mit dem KVM
Switch.
5. Verwenden Sie einen USB Hub um weitere Devices anzuschließen.
Der USB Hub sollte über ein eigenes Netzteil verfügen!
6. Verbinden Sie die KVM-Kabel direkt mit dem Computer. Verwenden
Sie bei hohen Auösungen keine Verlängerungen oder Adapterkabel!
Bedienung und Port-Umschaltung D e u t s c h
Es gibt drei Methoden um zwischen den Computern umzuschalten. Nach
dem Umschalten müssen auf dem Rechner zuerst die USB Treiber akti-
viert werden. Bitte warten Sie einige Sekunden auf den Abschluss der
Installation bevor Sie das System verwenden.
1. Umschaltknopf
Der Umschaltknopf ist eine kabelgebundene Fernbedienung. Mit ei-
nem einfachen Betätigen des Knopfes, schaltet der Switch um.
2. KVM Umschalt-Software (Windows & Mac Betriebssysteme)
Die KVM Umschalt-Software muss wie oben beschrieben installiert
werden.
Rechtsklick auf das Umschalticon önet das Umschaltmenü.
Doppelklick auf das Icon önet das Kongurationsmenü. Hier können
Sie weitere Tastaturhotkeys denieren, die Audioports fest an einen
Rechner binden, und den Beeper ein- und ausschalten.
Windows OS Mac OS
Umschaltmenü Kongurationsmenü Umschaltmenü Kongurationsmenü
3.
Tastatur Hotkey Umschaltung (Windows & Mac OS)
Jede Tastenkombination muss in weniger als 2 Sekunden abge-
schlossen werden. Es ist nicht möglich auf einen Port ohne ange-
schlossenen aktiven Rechner zu schalten.
Für Windows verwenden Sie die Tastenkombination “Rollen + Rollen”.
Weitere Hotkeys, z.B. „CTRL ALT + *“ können über das Kongurati-
onsmenü umdeniert werden.
Mac User denieren ihre Hotkeys über das Kongurationsmenü, s.o.
Spécications F r a n çai s
USB 2.0, supporte des hubs USB 2.0 et le partage d’appareils USB
Commutation par bouton sur le switch, par logiciel et par séquence
clavier hotkey
2 câbles combo xés au KVM
No. 42340 – Interfaces: HDMI Full HD 1080p, USB 2.0, audio, micro.
HDMI jusqu‘au 1920x1080, compatible HDCP et 3D, audio sur HDMI.
No. 42341 – Interfaces: DVI, USB 2.0, audio, micro.
DVI-D Single Link: résolutions jusqu’au 1920x1200, compatible HDCP –
NE PAS connecté aux ports HDMI de carte graphique sur PC/Notebook,
HDMI et Deep Colour NON pris en charge !
No. 42342 – Interfaces: VGA, USB 2.0, audio, micro
No. 42343 – Interfaces: DisplayPort, USB 2.0, audio, micro
Installation Fr a n ç ai s
1. Installez le logiciel PC “Software Installation for Windows”.
Pour l’installer sous Mac OS, copiez le chier (format *.pkg) vers le
disque dur local et installez-le depuis ce disque.
2. Cela installera le logiciel sur votre ordinateur et créera des nouveaux
icônes dans la barre des tâches Windows ou dans la barre Mac Dock.
Ils ressembleront à cela:
Aucune connexion détectée au switch KVM
Le port 1 est aché et sélection
Le port 1 est afché et sélectionné
3. Connectez le clavier, la souris, l’écran et les appareils audio au switch
KVM.
4. Si nécessaire, vous pouvez utiliser un hub USB pour connecter plus
que 2 périphériques USB. Vériez que le hub utilisé possède une
alimentation externe
5. Connectez les câbles combo directement à vos ordinateurs.
N’employez pas d’adaptateurs ou rallonges si vous utilisez de hautes
résolutions !
Utilisation & commutation Français
Il y a 3 méthodes de commutations. Après la commutation, laissez
quelques secondes à tous les pilotes USB de se charger avant d’utiliser le
système.
1. Bouton du switch
Ce bouton est une télécommande laire. Pressez le bouton pour
commuter entre les 2 ordinateurs.
2. Logiciel KVM Switching (Windows & Mac OS)
Merci de lire le paragraphe précédent.
Clic droit sur l’icône ouvre le menu de commutation.
Double clic sur l’icône ouvre le menu de conguration. En utilisant ce
menu, vous pouvez lier les ports audio à un port et vous pouvez acti-
ver le bip sonore.
Windows OS Mac OS
Menu du switch Menu de conguration Menu du switch Menu de conguration
3. Séquence hotkey clavier (Windows & Mac OS)
Chaque séquence hotkey doit être pressée en moins de 2 secondes.
Il n’est pas possible de commuter sur un port non actif (pas
d’ordinateur allumé ou connecté).
Pour Windows, la séquence clé de commutation est: “Scroll Lock +
Scroll Lock”. Ces séquence clés peuvent être changées en: "CTRL
ALT + *" via le menu de conguration décrit ci-dessus.
Pour Mac, merci denir les hotkeys via le menu de conguration
décrit ci-dessus.


Produkt Specifikationer

Mærke: Lindy
Kategori: Skifte
Model: 42340

Har du brug for hjælp?

Hvis du har brug for hjælp til Lindy 42340 stil et spørgsmål nedenfor, og andre brugere vil svare dig


Skifte Lindy Manualer

Lindy

Lindy 38084 Manual

27 December 2024
Lindy

Lindy 39385 Manual

4 September 2024
Lindy

Lindy 70436 Manual

21 August 2024
Lindy

Lindy 39380 Manual

21 August 2024
Lindy

Lindy 32328 Manual

20 August 2024
Lindy

Lindy 70437 Manual

20 August 2024
Lindy

Lindy 38350 Manual

19 August 2024
Lindy

Lindy 38248 Manual

19 August 2024
Lindy

Lindy 42340 Manual

18 August 2024
Lindy

Lindy 38155 Manual

18 August 2024

Skifte Manualer

Nyeste Skifte Manualer