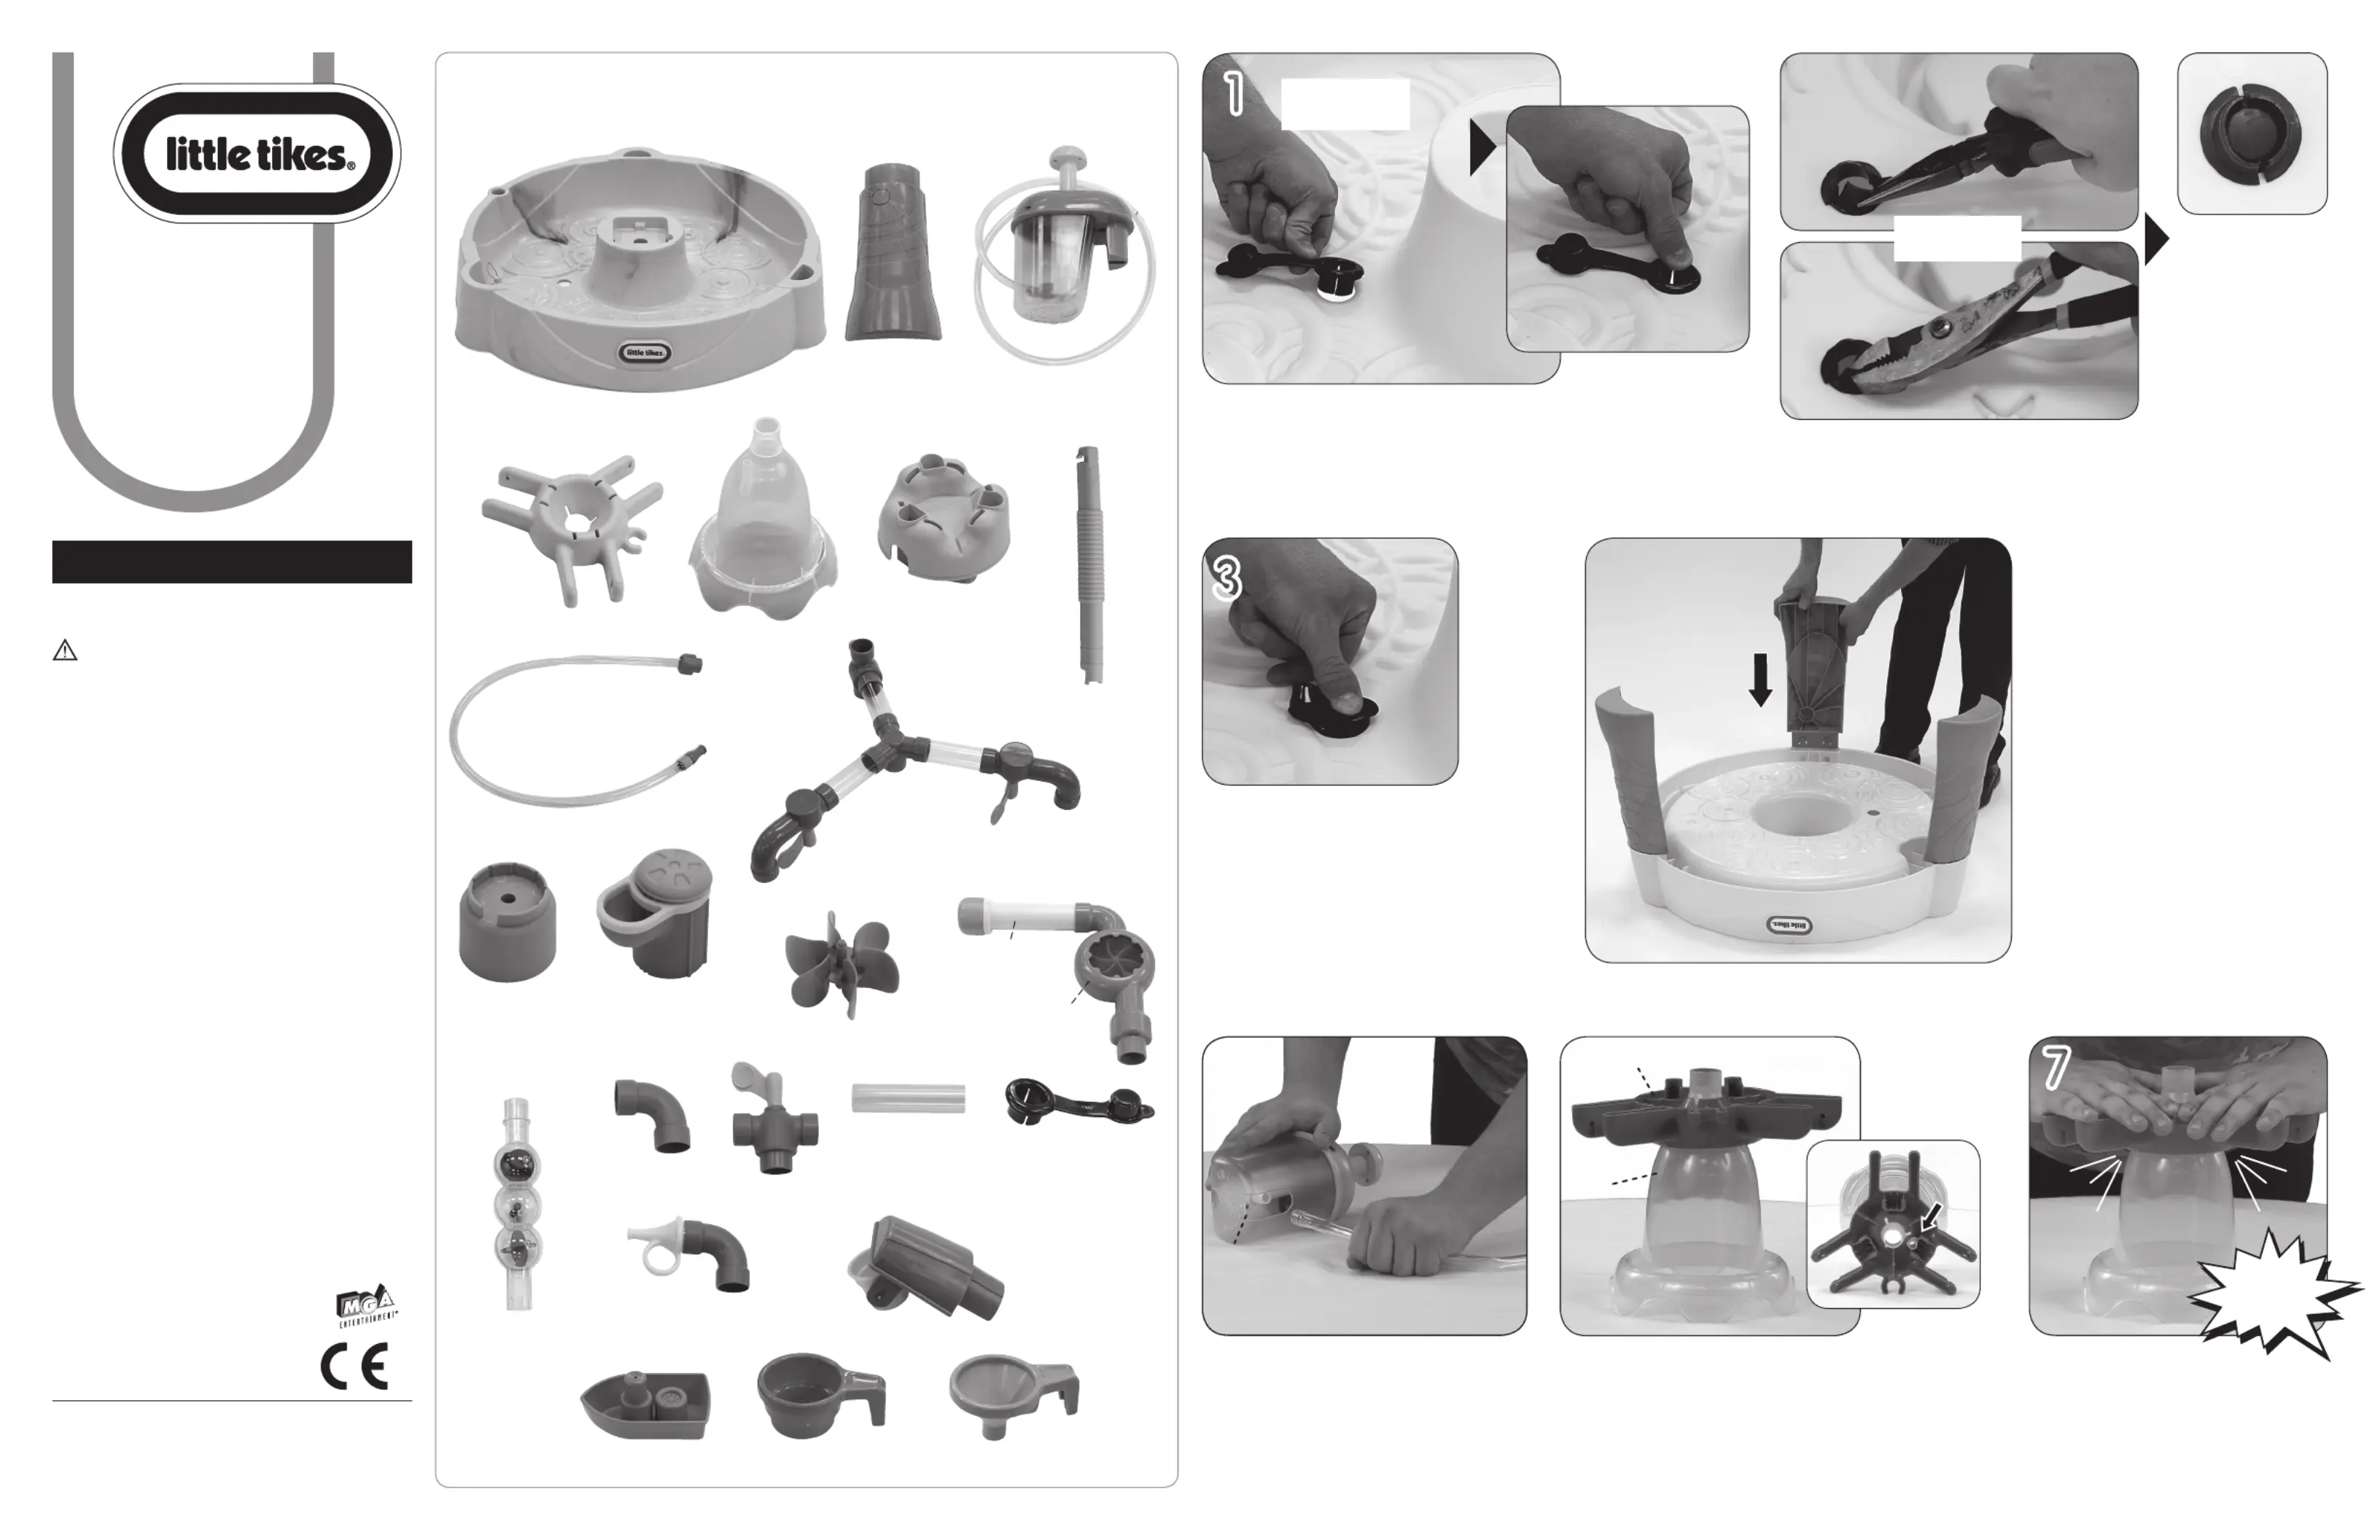
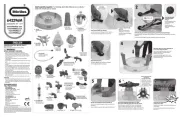
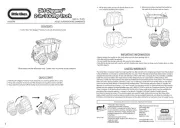
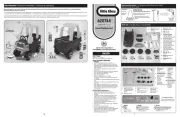
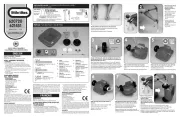
Little Tikes 642296M Manual


Læs gratis den danske manual til Little Tikes 642296M (4 sider) i kategorien Legetøj. Denne vejledning er vurderet som hjælpsom af 6 personer og har en gennemsnitlig bedømmelse på 4.5 stjerner ud af 3.5 anmeldelser. Har du et spørgsmål om Little Tikes 642296M, eller vil du spørge andre brugere om produktet?

Side 1/4
ENGLISH
FOUNTAIN FACTORY WATER TABLE™
Ages: 2 years & up
Please save sales receipt for proof of purchase.
WARNING:
ADULT ASSEMBLY REQUIRED.
Keep these instructions for future reference.
Prior to assembly, this package contains small parts:
hardware which is a choking hazard and may contain
until assembled.
Adult supervision required. Do not leave children
unattended.
This product is intended for outdoor domestic family use
only.
This product is intended for use by children ages 2 years
and up.
Use this product on a rm, level surface and avoid using
near swimming pools, on or near steps, hills or inclines.
Do not allow children to sit, stand play or climb on the
top of surface. Failure to do so may cause the product to
become unstable.
Intended for use with the supplied accessories only.
Never ll with anything except clean tap water. Use of
other liquids may be harmful or damage the unit. Never ll
with sand or dirt.
Do not store or leave water in product when not in use.
DISPOSAL
Disassemble and dispose of equipment in such a manner
that no hazardous conditions such as, but not limited to,
small parts and sharp edges exist at the time equipment is
discarded.
CONSUMER SERVICE
TOLL-FREE NUMBER:
United States:
www.littletikes.com
1-800-321-0183 Monday - Friday
The Little Tikes Company
2180 Barlow Road
Hudson, OH 44236
E-mail: service@littletikescare.com
United Kingdom:
www.littletikes.co.uk
Little Tikes
MGA Entertainment (UK) Ltd
50 Presley Way
Crownhill
Milton Keynes MK8 0ES
Bucks, UK
E-mail: Info.LittleTikes@mgae.com
Printed in U.S.A. D.R.©2016 The Little Tikes Company
© The Little Tikes Company, an MGA Entertainment company. LITTLE TIKES® is a trademark of Little Tikes
in the U.S. and other countries. All logos, names, characters, likenesses, images, slogans, and packaging
appearance are the property of Little Tikes. Please keep this address and packaging for reference since
it contains important information. Contents, including specications and colors, may vary from photos
depicted on package. Instructions included. Please remove all packaging including tags, ties & tacking
stitches before giving this product to a child.
Adult assembly required / Le montage devra être effectué par un adulte /
Debe ser armado por un adulto
1
Insert drain plug (M) into opening.
Insérez le bouchon de vidange (M) dans l'ouverture.
Inserte el tapón de desagüe (M) en la abertura.
4
3
drain plug
bouchon de vidange
tapón de desagüe
Push drain plug through
opening.
Enfoncez le bouchon de
vidange dans l'ouverture.
Empuje el tapón de desagüe
por la abertura.
Close drain plug cover.
Fermez le capuchon du bouchon de vidange.
Cierre la tapa del tapón de desagüe.
Close drain plug cover.
Fermez le capuchon du bouchon de vidange.
Cierre la tapa del tapón de desagüe.
Flip water table over. Insert table legs (B)
x3, as shown. Snap into place.
Retournez la table aquatique. Insérez les
pieds de table (B) x3, comme indiqué.
Emboîtez-les en place.
Dé vuelta la mesa de agua. Inserte las 3
patas de la mesa (B) tal y como se muestra.
Encájelas en su lugar.
2
Work the plug around the opening pulling only the plug edge through.
Passez le bouchon sur le pourtour de l'ouverture en ne tirant que le bord du bouchon au travers
de celle-ci.
Continúe tirando del tapón hasta que lo pase el borde por la abertura.
Plug edge should be
completely pulled
through.
Le bord du bouchon doit
passer en entier dans
l'ouverture.
El borde del tapón
debe haber pasado por
completo.
OR /
OU / O
642296M
XIM642296-1R1 - 4/17
www.littletikes.com
www.littletikes.co.uk
www.littletikes.nl
www.littletikes.pl
A. Table top
Plateau de la table
Mesa
B. Table Legs (3)
Pieds de la table (3)
Patas de la mesa (3)
W. Funnel / Entonnoir / Embudo
V. Cup / Coupelle / Taza
C. Pump Assembly
Assemblage de la pompe
Montaje de bomba
D. Center Holder
Support central
Soporte central
E. Center Funnel
Entonnoir central
Embudo central
F. Center Cap
Bouchon central B
Tapa central
G. Center Column (3)
Colonne centrale (3)
Columna central (3)
I. Spray Assembly
Assemblage du vaporisateur
Montaje del rociador
H. Center Connector Assembly
Assemblage du connecteur central
Montaje del conector central
K. Pop-up Assembly
Assemblage escamotable
Montaje del saliente
M2. Spinometer
Spinomètre
Tacómetro
M1. Sprinkler Stick
Tube d'arrosage
Brazo de aspersión
O. Elbow
Coude
Codo
Q. Elbow with Spout
Coude avec bec
Codo con boquilla
R. 4" Clear Tubes (3)
Tubes transparents 10 cm (3)
Tubos transparentes
de 10 cm (4") (3)
P. T-Valve
Robinet
Válvula en T
S. Drain Plug
Bouchon de vidange
Tapón de desagüe
T. Dump Bucket Assembly
Assemblage du seau basculant
Montaje de la cubeta de desagüe
U. Boat / Bateau / Bote
J. Pop-up Base
Base escamotable
Base saliente
L. Spinners (3)
Aubes (3)
Rotámetros (3)
N. Center Bubble Tube
Tube à bulles central
Tubo de burbujas central
Detach clear tubing from pump assembly (C).
Détacher la tubulure transparente de l’ensemble de la
pompe (C).
Retire el tubo transparente del conjunto de bomba (C).
Place center funnel (E) upside down on a table.
Place center holder (D) upside down onto the funnel.
Placer lentonnoir central (E) à lenvers sur une nappe.
Placer le support central (D) à l’envers sur l’entonnoir.
Coloque el embudo central (E) boca abajo sobre una mesa.
Coloque el soporte central (D) boca abajo en el embudo.
Press down on center holder
until you hear a click.
Appuyer sur le support central jusqu’à entendre un
son de déclic.
Empuje hacia abajo el soporte central hasta que
oiga un clic.
Ensure opening for tube
is positioned
through center holder.
S’assurer que l’ouverture
du tube est positionnée à
travers le support central.
Asegúrese de que la
abertura del tubo pase a
través del soporte central.
Snap!
Enclencher !
¡Encástrelos!
C
E
D
5 6 7
Place pop-up base (J) onto table. Align the base to the slot in
the pocket as shown.
Placer la base escamotable (J) sur la table. Aligner la base sur
l'encoche dans la poche comme illustré.
Coloque la base saliente (J) en la mesa. Alinee la base en la ranura
del compartimento tal como se muestra.
Place pop-up assembly (K) onto cap.
Placer l’assemblage escamotable (K)
sur le bouchon.
Coloque el montaje saliente (K) en la tapa.
16 17
L
L
L
Attach the 3 spinners (L) to the center holder.
Attacher les trois aubes (L) sur le support central.
Encaje los 3 rotámetros (L) en el soporte central.
Align Notches
Aligner les encoches
Alinear las muescas
K
Insert the center bubble tube (N) into the assembled funnel.
Insérer le tube de bullage (N) dans l’entonnoir assemblé.
Inserte el tubo central de burbujas (N) en el embudo montado.
Insert the of the clear tubing from the pump NON-RIBBED END
assembly onto the opening in the funnel.
NOTE: tubing should curve outward as shown.
Insérer l’extrémité NON-CANNELÉ de la tubulure transparente sur
l’ensemble de la pompe sur l’ouverture de l’entonnoir.
REMARQUE : la tubulure doit être incurvée vers l’extérieur comme indiqué.
Inserte el EXTREMO NO ACANALADO del tubo transparente del
conjunto de bomba en la abertura del embudo.
NOTA: el tubo debe curvarse hacia fuera, como se muestra.
N
8 9
Push completely down
until ridge rests against
the funnel opening.
Pousser entièrement vers le
bas jusqu’à ce que la crête
repose sur l’ouverture de
l’entonnoir.
Empuje completamente
hacia abajo hasta que el
reborde calce en la apertura
del embudo.
Ribbed end
Extrémité cannelée
Extremo acanalado
Non-ribbed end
Extrémité non-cannelée
Extremo no acanalado
Insert center connector assembly (H) onto the bottom of the
bubble tube.
Insérer l’ensemble du connecteur central (H) sur le dessous du
tube de bullage.
Inserte el conjunto del conector central (H) en la parte inferior
del tubo de burbujas.
Insert the (3) center columns (G) into the center holder. Snap into place.
Insérer les (3) colonnes centrales (G) dans le support central. Enclencher en place.
Inserte las tres (3) columnas centrales (G) en el soporte central. Presione hasta que encaje
en la posición adecuada.
10 11
G x3
H
Thread ribbed end of clear tubing through the opening directly behind the
“U” shaped cut out on the center cap (F) as shown.
Visser l’extrémité cannelée de la tubulure transparente dans l’ouverture située
directement derrière la découpe en U sur le capuchon central (F) comme indiqué.
Enrosque el extremo acanalado del tubo transparente en la abertura que se
encuentra detrás del perl en forma de «U» en la tapa central (F), como se
muestra.
Press center cap onto connector assembly while inserting
the (3) center columns.
Presser le capuchon central sur l’ensemble du connecteur tout
en inrant les (3) colonnes.
Empuje la tapa central sobre el conjunto del conector mientras
inserta las tres (3) columnas centrales.
Snap (3) center columns into the center cap.
Enclencher (3) colonnes centrales dans le capuchon central.
Acople las tres (3) columnas centrales en la tapa central.
F
“U” shaped
cut out
Découpe
en U
Perl en
forma de «U»
13
Insert the of clear tubing onto pump assembly.ribbed end
Insérer l’extrémité cannelée de la tubulure transparente sur l’ensemble de la pompe.
Inserte el extremo acanalado del tubo transparente en el conjunto de bomba.
14
C
NOTE: Hold the shaft of the pump handle to prevent turning
while assembling tubing.
REMARQUE : tenir l’arbre de la poige de la pompe pour
l’empêcher de tourner lors de lassemblage de la tubulure.
NOTA: Sujete el eje del mango de la bomba para evitar que gire
mientras se monta el tubo.
Align notches on the center cap to the notches in the table. Snap into place.
Aligner les encoches sur le capuchon central aux encoches dans la nappe. Enclencher en place.
Alinee las ranuras en la tapa central con las ranuras en la mesa. Presione hasta que encajen en la
posición adecuada.
Insert pump into table pocket with hole.
Insérer la pompe dans la poche de la nappe contenant le trou.
Inserte la bomba en el compartimiento de mesa con oricio.
12
Table pocket
with hole
Poche de la table
avec trou
Compartimento de
mesa con oricio
15
Snap!
Enclencher !
¡Encástrelos!
Snap!
Enclencher !
¡Encástrelos!
Snap!
Enclencher !
¡Encástrelos!
Align Notches
Aligner les encoches
Alinear las muescas


Produkt Specifikationer

Mærke: Little Tikes
Kategori: Legetøj
Model: 642296M

Har du brug for hjælp?

Hvis du har brug for hjælp til Little Tikes 642296M stil et spørgsmål nedenfor, og andre brugere vil svare dig