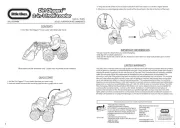
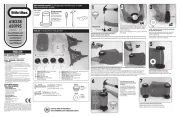
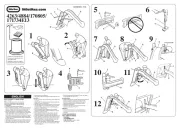
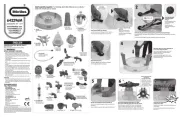
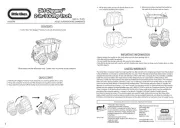
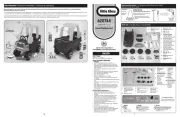
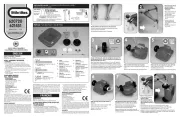
Little Tikes Cozy Coupe Shopping Cart Manual

Little Tikes Legetøj Cozy Coupe Shopping Cart

Læs gratis den danske manual til Little Tikes Cozy Coupe Shopping Cart (6 sider) i kategorien Legetøj. Denne vejledning er vurderet som hjælpsom af 41 personer og har en gennemsnitlig bedømmelse på 4.6 stjerner ud af 21 anmeldelser. Har du et spørgsmål om Little Tikes Cozy Coupe Shopping Cart, eller vil du spørge andre brugere om produktet?

Side 1/6
Adult assembly required / Le montage devra être effectué par un adulte /
Debe ser armado por un adulto 2
4
1
Included in hardware pack.
Discard after use.
Inclus dans le sac de visserie.
Jeter après usage.
Incluidos con las piezas para
montaje. Descártelo después
de utilizarlo.
3
5
6
Snap hubcap onto wheel. Repeat for other 3 wheels.
Emboîtez l’enjoliveur sur la roue. Répétez cette étape pour les
3 autres roues.
Coloque a presión el tapacubos en la rueda. Repita en las otras
3 ruedas.
Place cap nut into cap nut assembly tool as shown.
Hammer 1 wheel axle into cap nut.
Placez l’écrou borgne dans l’outil pour écrou borgne comme indiqué. Martelez 1 essieu de roues dans l’écrou borgne.
Coloque la tuerca tapón en el dispositivo para tuerca tapón tal y como se muestra. Martille 1 eje de rueda en la tuerca tapón.
Slide wheel on to axle with hubcap facing cap nut.
Faites coulisser la roue sur un essieu avec l’enjoliveur faisant
face à l’écrou borgne.
Deslice la rueda en el eje con el tapacubos de cara a la tuerca
tapón.
Place cap nut assembly tool onto cap nut and slide wheel assembly and axle through the front axle guides while
holding axle in position (as shown). NOTE: It may be necessary to use a hammer.
Placez l’outil de montage d’écrou borgne sur l’écrou borgne et faites coulisser l’ensemble de roue et l’essieu dans les guide de
l’essieu avant, tout en maintenant ce dernier en position (comme indiqué). REMARQUE: utilisez un marteau si nécessaire.
Coloque el dispositivo para tuerca tapón en la tuerca tapón y deslice el conjunto de la rueda y el eje por las guías del eje
delantero mientras mantiene el eje en posición (tal y como se muestra). NOTA: Es posible que necesite usar un martillo.
Repeat steps 1 through 5 for back wheel assembly.
Répétez les étapes 1 à 5 pour l’ensemble de roues arrière.
Repita los pasos 1 al 5 en el conjunto de las ruedas traseras.
Place cap nut on to axle and hammer into place using cap
nut tool on each end.
Placez l’écrou borgne sur l’essieu et martelez pour le maintenir
place sur chaque extrémité à l’aide de l’outil pour écrou borgne.
Coloque la tuerca tapón en el eje y martíllela para asentarla
en su lugar. Use un dispositivo para tuerca tapón en cada
extremo.
Parts List / Liste des Pieces / Lista de Partes
AB
C
D
E
F
L R
G
I I I I
H HH H
Truss Head Screw - 1" (2.54 cm)
Vis à tête bombée - 2,54 cm
Tornillo de cabeza reforzada - 2,54 cm
Cap Nut
Écrou borgne
Remate
J x10 M x4
N x10 Pan Head Screw - 1/2" (1.27 cm)
Vis à tête cylindrique bombée - 1,27 cm
Tornillo de cabeza plana biselada de 1,27 cm
ENGLISH
COZY COUP SHOPPING CART
PINK SHOPPING CART
Ages: over 1 1/2 years and up
Please save sales receipt for proof of purchase.
ADULT ASSEMBLY REQUIRED.
WARNING:
Keep these instructions for future reference.
Prior to assembly, this package contains small parts:
hardware which is a choking hazard and may contain
sharp edges and sharp points. Keep away from children
until assembled.
Adult supervision required. Do not leave children
unattended.
This product is intended for use by children ages
over 1 1/2 - years and up.
This product is intended for indoor/outdoor domestic
family use only.
Protect your eyes. Always wear safety glasses when using
a hammer.
When temperatures fall below 0°F/-18°C, outdoor use of
this product is not recommended. In extreme cold, plastic
materials lose resilience and may become brittle and crack
upon impact. Store product in a warmer, protected place.
CONSUMER SERVICE
TOLL-FREE NUMBER:
United States:
www.littletikes.com
1-800-321-0183 Monday - Friday
The Little Tikes Company
2180 Barlow Road
Hudson, OH 44236
E-mail: littletikes.cares@littletikescare.com
United Kingdom:
www.littletikes.co.uk
Little Tikes
MGA Entertainment (UK) Ltd
50 Presley Way
Crownhill
Milton Keynes MK8 0ES
Bucks, UK
E-mail: Info.LittleTikes@mgae.com
Printed in U.S.A. D.R.©2015 The Little Tikes Company
© The Little Tikes Company, an MGA Entertainment company. LITTLE TIKEis a trademark of Little Tikes in the
U.S. and other countries. All logos, names, characters, likenesses, images, slogans, and packaging appearance
are the property of Little Tikes. Please keep this address and packaging for reference since it contains important
information. Contents, including specications and colors, may vary from photos depicted on package. Instructions
included. Please remove all packaging including tags, ties & tacking stitches before giving this product to a child.
LIMITED WARRANTY
The Little Tikes Company makes fun, high quality toys. We warrant to the original purchaser that this product is free
of defects in materials or workmanship for one year * from the date of purchase (dated sales receipt is required for
proof of purchase). At the sole election of The Little Tikes Company, the only remedies available under this warranty
will be the replacement of the defective part or replacement of the product. This warranty is valid only if the product
has been assembled and maintained per the instructions. This warranty does not cover abuse, accident, cosmetic
issues such as fading or scratches from normal wear, or any other cause not arising from defects in material and
workmanship. *The warranty period is three (3) months for daycare or commercial purchasers.
A. Shopping Cart Body / Carrosserie du chariot /
Cuerpo del carrito de compras
B. Roof / Toit / Techo
C. Eyes / Yeux / Ojos
D/E Basket / Panier / Canasta
F. Basket handle / Poignée du panier /
Mango de la canasta
G. Wheel axles (2) / Essieux de roues (2) / Ejes de las ruedas (2)
H. Wheels (4) / Roues (4) / Ruedas (4)
I. Hubcaps (4) / Enjoliveurs (4) / Tapacubos (4)
L. Left Roof Support / Support gauche du toit /
Soporte izquierdo del techo
R. Right Roof Support / Support droit du toit /
Soporte derecho del techo
Cap nut tool
Chasse pour
capuchon de vis
Dispositivo para
tuerca tapón
Cap nut tool
x2
x4 x2
or
618338
620195
XIM618338-1R1 - 8/15
www.littletikes.com
www.littletikes.co.uk
www.littletikes.nl
www.littletikes.pl
Tools required (not included)
Outils Requis (non compris)
Herramientas Requeridas (no incluidas)
U.S.A and Canada: For warranty service or replacement part information, please visit our website at www.
littletikes.com, call 1-800-321-0183 or write to: Consumer Service, The Little Tikes Company, 2180 Barlow Road,
Hudson OH 44236, U.S.A. Some replacement parts may be available for purchase after warranty expires—contact
us for details.
Outside U.S.A and Canada: Contact place of purchase for warranty service. This warranty gives you specic legal
rights, and you may also have other rights, which vary from country/state to country/state. Some countries/states
do not allow the exclusion or limitation of incidental or consequential damages, so the above limitation or exclusion
may not apply to you.
Please keep this manual as it contains important information.
Visit our website at
www.littletikes.com
to register your product online and
to enter our sweepstakes.
(No purchase necessary)
FRANÇAIS
CHARIOT
CHARIOT ROSE
Âge: de 1 1/2 ans et plus
Prière de conserver le reçu comme preuve d’achat.
MONTAGE PAR UN ADULTE REQUIS
AVERTISSEMENT:
Conserver ces instructions à titre de référence.
Avant l’assemblage du produit, ce paquet contient des
petites pièces de matériel qui peuvent présenter un risque
d’étouement, et des bords et des arrondis tranchants.
Tenir hors de pore des enfants avant l’assemblage
complet.
(2) Cap nut tools.
(2) Chasse pour capuchon de vis.
(2) Dispositivo para tuerca tapón.
M
M
7Attach eyes with screws (J) x2 as
shown.
Fixez les yeux avec les vis (J) x2
comme indiqué.
Fije los ojos con 2 tornillos (J) tal y
como se muestra.
J p1-x2 - 1" (2.54 cm)
17
8
14
Locate the "L" and "R" molded in
roof supports(L & R). Match them
to the "L" and "R" molded into
the roof.
Recherchez le « L » et le « R » moulés
dans les supports du toit (gauche et
droite). Faites-les correspondre aux
« L » et « R » moulés dans le toit.
Ubique la “L” y la “R” moldeadas
en los soportes del techo (L y R).
Hágalas coincidir con la “L” y la “R
moldeadas en el techo.
9
Attach each roof support to roof using screws (N) x 2.
Fixez chaque support du toit à l’aide des vis (N) x 2
Fije cada uno de los soportes al techo con 2 tornillos (N).
10
15
Turn roof over and
balance on a table as
shown. Start screw
(J) by turning 2 to 3
times. Do not screw
completely.
Retournez le toit et
placez-le en équilibre
sur une table comme
indiqué. Amorcez la vis
(J) en la tournant de 2
ou 3 tours. Ne serrez
pas à fond.
vuelta el techo y
balancéelo en una
mesa tal y como se
muestra. Comience a
enroscar el tornillo (J)
dándole 2 ó 3 vueltas.
No lo ajuste por
completo.
12
16
While holding the roof tightly together, nish securing
screws.
Tout en tenant le toit fermement ensemble, nissez de serrer
les vis.
Mientras mantiene bien unido el techo con el cuerpo, termine de
fijar los tornillos.
J p2-x2 - 1" (2.54 cm)
To assemble basket handle, line up the ribs inside of basket handle (F)
to the slots inside of the handle pocket part of basket (D). Push into place.
Pour assemble la poige du panier, alignez les nervures à l’intérieure de la poignée (F) sur les fentes à
l’intérieur de la partie femelle de la poignée du panier (D). Mettez-les en place en appuyant.
Para armar el mango de la canasta, alinee las salientes de adentro del mango (F) con las ranuras que esn
dentro de la cavidad que hay para el mango en la canasta (D). Empuje el mango para asentarlo en su lugar.
Attach basket handle to basket with screw (N).
Fixez la poignée sur le panier à l’aide de la vis (N).
Fije el mango a la canasta con un tornillo (N).
Fit both sides of basket together. Be sure basket is securely
together as in the 3 locations shown.
Appariez les deux côs du panier. Assurez-vous que le panier est
correctement assemblé aux 3 emplacements indiqués.
Junte las dos mitades de la canasta. Asegúrese que quede bien
unida en los 3 lugares indicados.
Secure other side of handle using screw (N).
Fixez lautre côté de la poignée avec la vis (N).
Asegure el otro lado del mango con 1 tornillo (N).
R
L
N x 2 - 1/2" (1.27 cm)
13
Attach each roof support (L&R) to the body using screws (J) x2.
Fixez chaque support du toit (L et R) sur la carrosserie à l’aide
des vis (J) x2.
Fije cada uno de los soportes del techo (L y R) al cuerpo con
2 tornillos (J).
J p2-x2 - 1" (2.54 cm)
N p2-x1 -
1/2" (1.27 cm)
N p2-x1 -
1/2" (1.27 cm)
R
L
L
Basket Assembly / Assemblage du Panier / Montaje de la Canasta
1
3
2
11
Position the roof on to the body.
Align front supports and push
into open grooves in the body.
Positionnez le toit sur la carrosserie.
Alignez les supports avant et
enfoncez-les dans les creux dans la
carrosserie.
Coloque el techo en el cuerpo del
carrito. Alinee los soportes adelante
y empújelos en las ranuras abiertas
del cuerpo.
18 19
1. Start screws (N) p2-x6 by turning screw 2 to 3 times in the 6 locations shown above. 2. Check to make sure basket
remains securely together (refer to Step 17), then continue to tighten screws completely.
1. Amorcez les vis (N) x6, en les tournant de 2 ou 3 tours aux 6 emplacements indiqués ci-dessus. 2. Assurez-vous que le panier
est correctement assemblé (reportez-vous à l’étape 17) et continuez en serrant les vis à fond.
1. Comience a enroscar 6 tornillos (N)ndoles 2 ó 3 vueltas en los 6 lugares indicados arriba. 2. Verique que la canasta quede
bien unida (consulte el paso 17). Continúe enroscando los tornillos hasta que queden completamente ajustados.
N p2-x3 -
1
/2" (1.27 cm) N p2-x3 -
1/2" (1.27 cm)


Produkt Specifikationer

Mærke: Little Tikes
Kategori: Legetøj
Model: Cozy Coupe Shopping Cart
Bredde: 246.9 mm
Dybde: 604.3 mm
Højde: 495.3 mm
Produktfarve: Black, Blue, Red, Yellow
Produkttype: Enkelt legetøj
Pakkevægt: 3270 g
Pakkedybde: 241.3 mm
Pakkebredde: 403.4 mm
Pakkehøjde: 558.8 mm
Produkter pr. intermodal container (20 fod): 521 stk
Produkter pr. intermodal container (40 fod, HC): 1224 stk
Pakketype: Kasse
Materiale: Plast
Certificering: CE
Hovedkassen højde (udvendigt): 558.8 mm
Hovedkassens længde (udvendigt): 241.3 mm
Hovedkassens bruttovægt (udvendigt): 3270 g
Hovedkassens bredde (udvendigt): 403.4 mm
Produkter pr. intermodal container (40 fod): 1197 stk
Anbefalet alder (min.): 2 År
Foreslået køn: Dreng
Ydre emballage volumen: 54400 cm³
Pakkevolumen: 54400 cm³
Tema: Shopping
Forudsamlet: Ja

Har du brug for hjælp?

Hvis du har brug for hjælp til Little Tikes Cozy Coupe Shopping Cart stil et spørgsmål nedenfor, og andre brugere vil svare dig