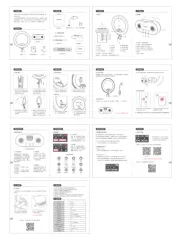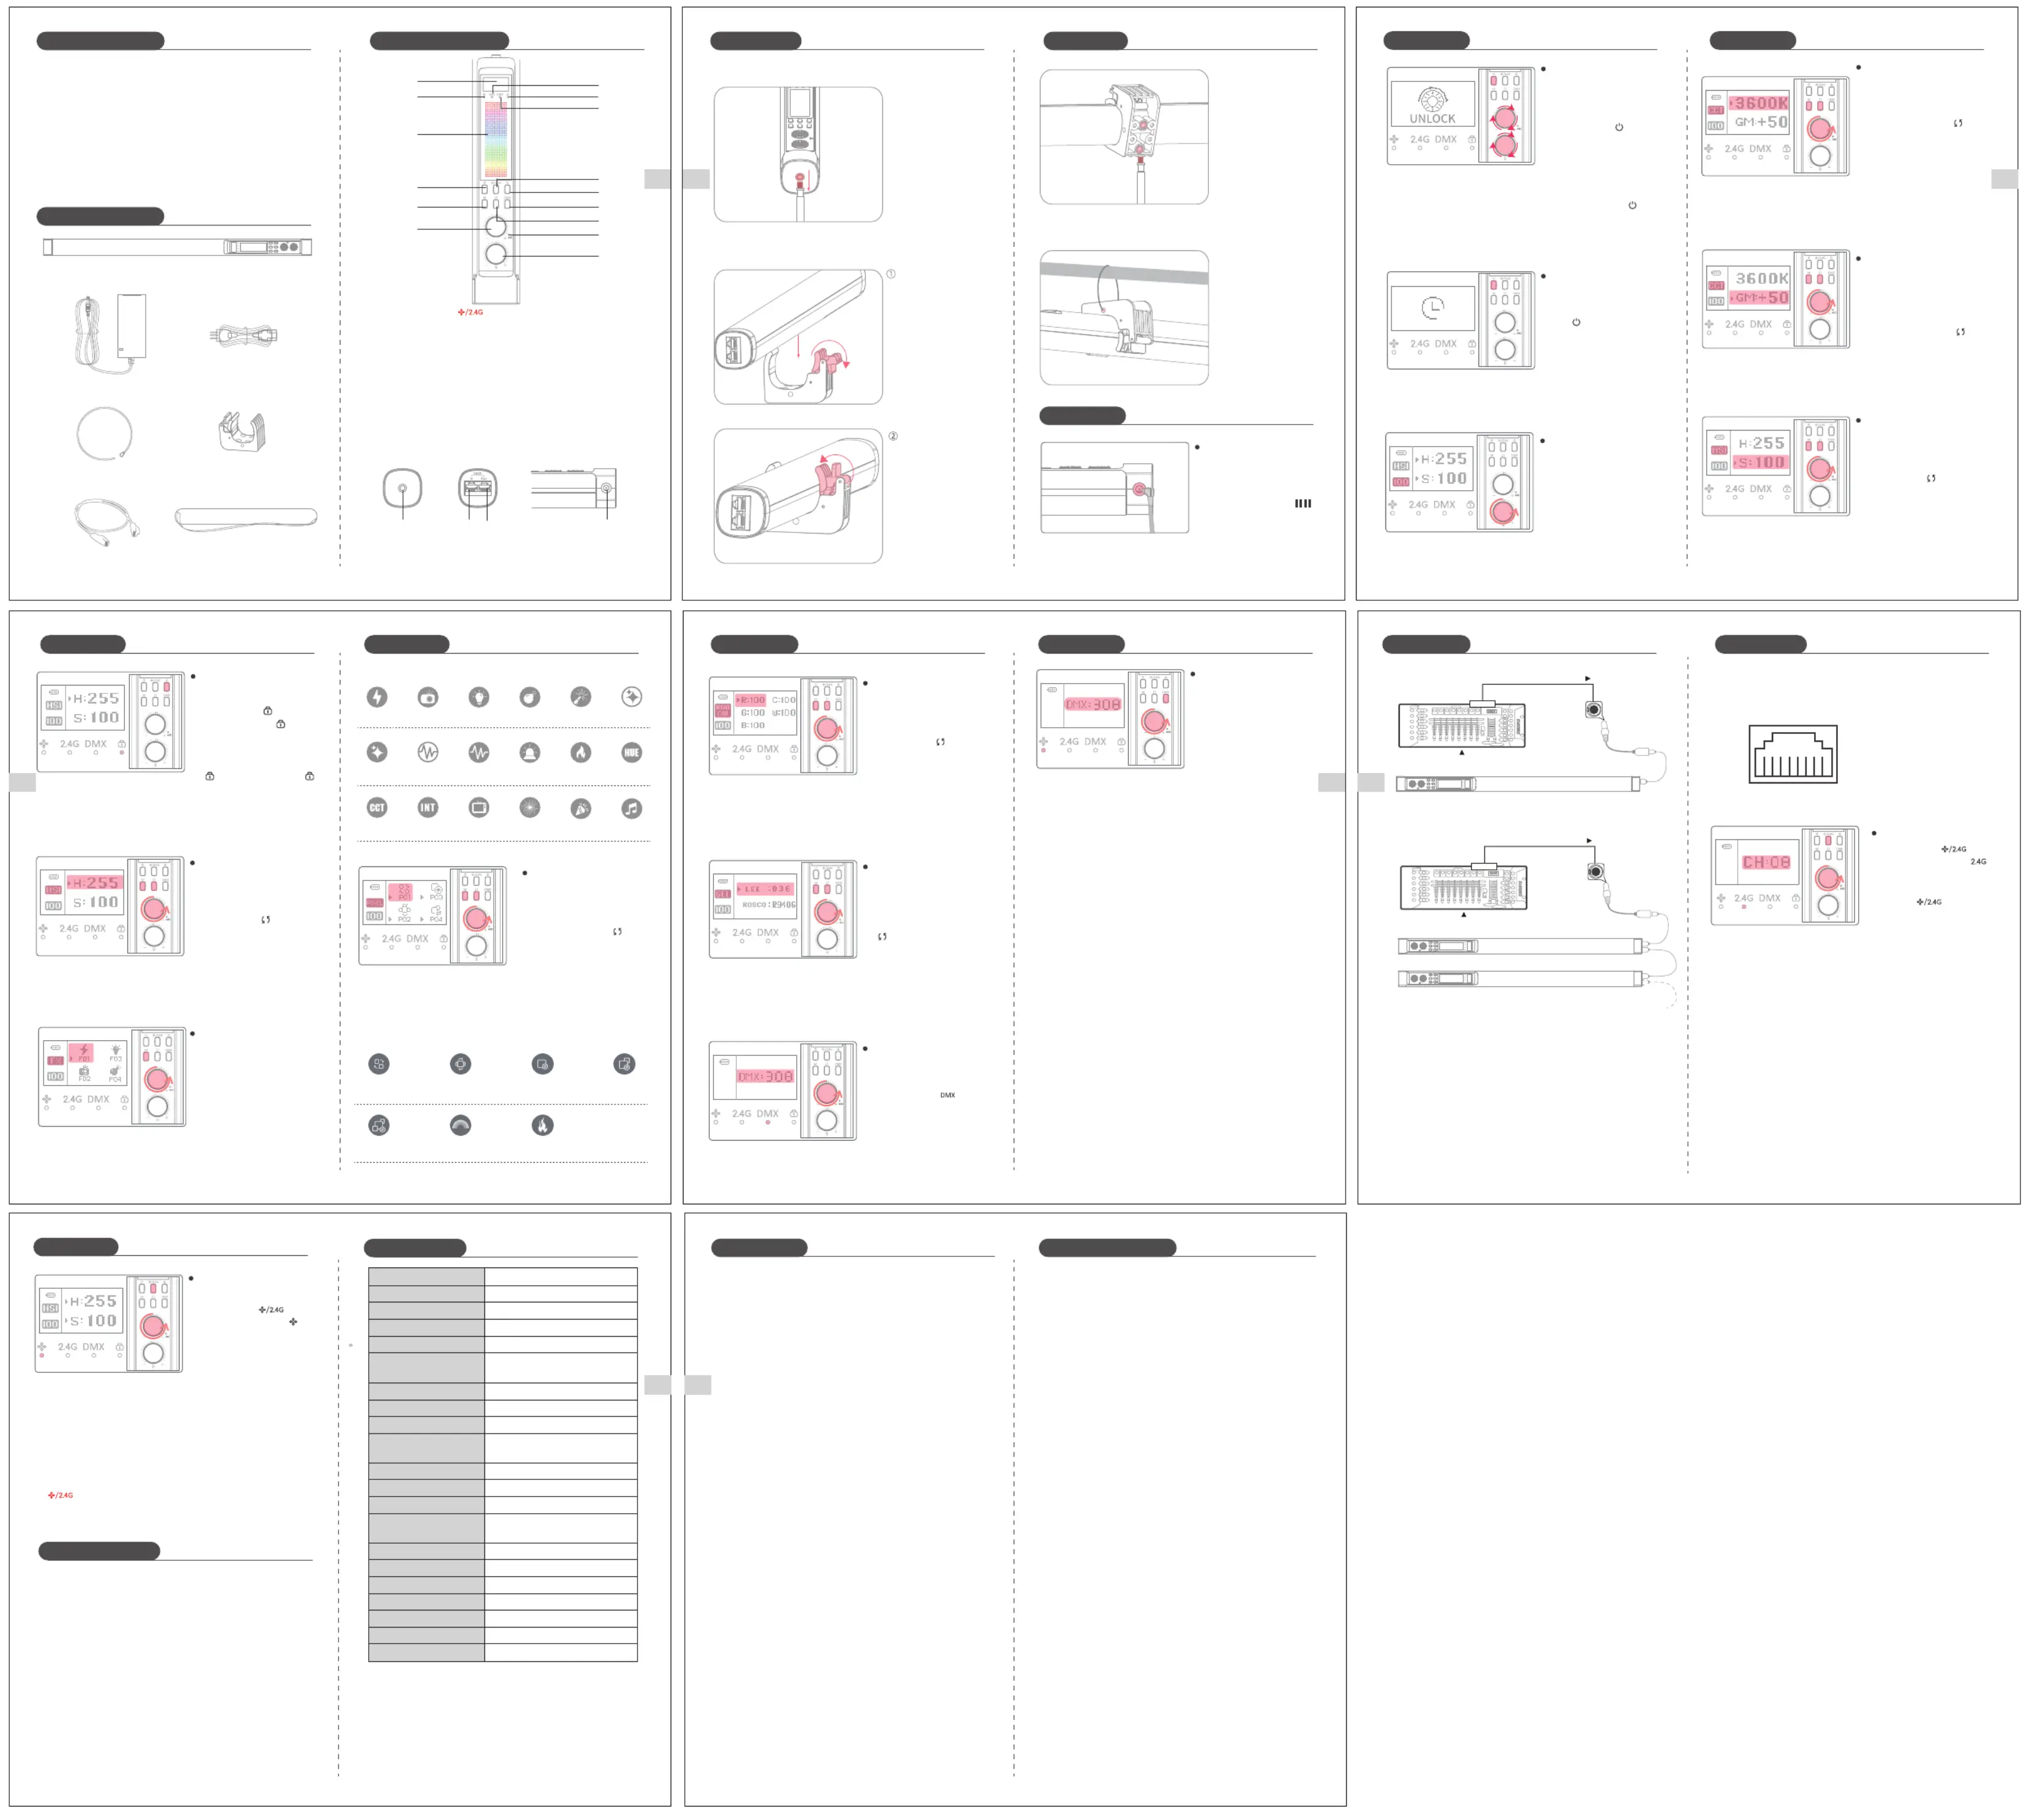
① Screen ② Infinity Connection Indicator Light
③ 2.4G Connection Indicator Light
④ Touchpad Lock Status Indicator Light
⑤ DMX Connection Indicator Light
⑥ Color Touchpad ⑦ Power On/Off Button
⑧ Mode Switch Button ⑨ Wireless Connection Switch Button
⑩ Color Touch Bar Unlock/Lock Button
⑪ DMX Channel Adjustment Button
⑫ Mode Settings Switch Button
⑬ Mode Settings Value Adjustment Dial
⑭ Microphone Port ⑮ Brightness Adjustment Dial
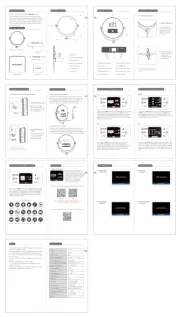
Short press the " " button
until the indicator light " "
lights up to enter the 2.4G
connection mode. Press and
hold the " " button for 1
second until the screen displays
"CH", then rotate the settings
value adjustment dial to set
Thank you for purchasing the TL60 RGB multifunctional stick light!
The TL60 RGB stick light is an innovative product that offers a good selection
of colors and over 25 special effects, including 18 scene effects and 7 pixel
effects. The device can be easily controlled via APP, directly through the
control panel, 2.4G, and DMX professional lighting control, catering to the
needs of both professional and amateur users. Whether you're an
experienced user or a novice, you can easily adjust the lighting to your
preference using any of the multiple control methods available. With its
versatility and user-friendly design, the TL60 RGB stick light is a must-have
tool for any lighting enthusiast.
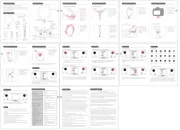
of the stand into the 1/4"
Adapt the use of the steel
wire to your specific needs
located at the top of the
DMX Cable ×1 Storage Bag ×1
2. Installing with the power supply clamp
When the light stick is connected
to a console, the " " indicator
lights up, indicating that it is in
DMX mode. Rotate the settings
value adjustment dial to adjust
※ In DMX mode, please refer to the TL60 RGB DMX Channel Table" in the
appendix for relevant control schemes.
When the channel number of DMX console and that of DMX control box are
the same, you can use the console to adjust various functions. This is suitable
for one light or multiple light connection.
* In DMX mode, the channel number is 1 by default.
* In DMX mode, the channel range can be set to 1-512.
* After the DMX signal is lost, the last signal will be remembered and can be
used to control the lights.
When connected to Infinity or
2.4G, short press the "DMX"
button to enter the DMX channel
adjustment interface. Then,
rotate the settings value
adjustment dial to configure
※Short press the "DMX" or "M" button to exit the DMX adjustment interface.
※In pixel effect mode, you can scan the QR code to download the app and
adjust the specific setting for the selected effect.
DMX Channel Adjustment (Not
DMX Connection (Connected
brightness adjustment knob
to adjust the brightness.
Short press the "M" button until
the screen displays "CCT" to
switch to color temperature
mode. Short press the " "
button until the screen selects
the "00K" option, then rotate
the settings value adjustment
Color Temperature Adjustment
Short press the "M" button
until the screen displays "CCT"
to switch to color temperature
mode. Short press the " "
button until the screen selects
the "GM" option, then rotate
the setting value adjustment.
Short press the "M" button until
the screen displays "RGBCW"and
switches to RGBCW mode. Then,
short press the " " button until
the setting is selected on the
screen. Finally, rotate the value
1. Connect the DMX cable to the light.
2. Connect the XLR to RJ45 adapter cable to the DMX cable.
3. Connect the DMX standard console to the light.
※The XLR to RJ45 adapter cable and DMX console are not included in
To ensure compatibility with the lights, please check the DMX interface
definition of the XLR to RJ45 adapter cable before purchase,as shown
Short press the "M" button
until the screen displays
"GEL" and switches to gel
mode. Then, short press the
" " button until the setting
is selected on the screen.
Finally, rotate the dial to set
Short press the "M" button until
the screen displays "FX" and
switches to scene mode. Then,
rotate the settings value
adjustment dial until the screen
switches to a different scene.
Short press the "M" button until
the screen displays "HSI" and
switches to RGB mode. Then,
short press the " " button
until the "H" option is selected
on the screen. Finally, rotate
the settings value adjustment
Hue Adjustment (with button)
Short press the " " button in
any mode, and the " " indicator
light will not light up. Then, adjust
the hue by sliding your finger on
the touch panel. Short press the
" " button again, and the " "
indicator light will light up. The
touch panel is now locked and
⑯ 1/4" Screw Hole ⑰ DMX Input Socket
⑱ DMX Output Socket ⑲ Power Input Socket
Connecting a Single Light
Connecting Multiple Lights
Short press the "M" button until
the screen displays "HSI" and
switches to HSI mode. Then,
short press the " " button until
the "S" option is selected on the
screen. Finally, rotate the
settings value adjustment dial
Short press the "M" button until
the screen displays "PIXEL" and
switches to pixel effect mode.
Then, short press the " "
button or rotate the settings
value adjustment dial until the
desired effect is displayed on
Product Overview Product Illustration
Installation Installation How to Use
How to UseHow to UseHow to UseHow to Use
Color Rendering Index (CRI)
5600K@0.5M(1730Lux)Maximum Illuminance
0%-100% (in increments of 1%)Brightness Adjustment
0~360°Color Tone Adjustment
0~100Saturation Adjustment
14.8V/3000mAh/44.4WhBuilt-in Battery
Approx. 2 hoursCharging Time
DC Power/Lithium BatteryPower Supply
-10℃~40℃Operating Temperature
Approx. 2 hours at 100% brightnessBattery Life
APP, Control Panel, 2.4G, DMX ControlControl Methods
※In 2.4G mode, you can set multiple LED lights to the same channel
(CH8 for example) . When you adjust one LED light, the other lights
sharing the same channel will also change in sync.
1. DO NOT place the product in an environment with a temperature higher
2. DO NOT drop the product on the ground, subject it to collisions, or strong
3. DO NOT stare directly at the light when using it, as direct light can cause
4. DO NOT use the product in a dusty or humid environment.
5. DO NOT modify the circuit board or disassemble the product without
6. Please unplug the power cord when not in use.
7. If not used for a long time, store the product in a well-ventilated, dry area,
away from heat and magnetic fields.
Short press the " " button
until the indicator light " "
lights up to enter Infinity
connection mode. If you want
to control the device via your
phone, you need to connect
the device from the "NEEWER"
APP. For further guidance,
please scan the QR code on the
APP prompt card and refer to
Connectng via the Infinity
※Before connecting via the APP, please reset the Infinity connection.
To do so, simply press and hold the middle button on the dial
To begin charging, connect the
power cord to the DC socket.
While charging, the screen will
display a charging icon " "
to indicate the progress of the
charging process. Once the
battery is fully charged, the
screen will display a full
battery icon and remain on.
CCT loop INT loop TV screen PartyFireworks
CCT Pulse HUE Pulse Cop car Candlelight HUE loop
Explosion Welding CCT Flash
※ Long press the " " button for 5 seconds to reset the
This device complies with Part 15 of the FCC Rules. Operation is subject to the
following two conditions: (1) this device may not cause harmful interference,
and (2) this device must accept any interference received, including interference
that may cause undesired operation.
CAUTION: The user is cautioned that changes or modifications not expressly
approved by the party responsible for compliance could void the user's
authority to operate the equipment.
NOTE: This equipment has been tested and found to comply with the limits for
a Class B digital device, pursuant to part 15 of the FCC Rules. These limits are
designed to provide reasonable protection against harmful interference in a
residential installation. This equipment generates, uses and can radiate radio
frequency energy and, if not installed and used in accordance with the
instructions, may cause harmful interference to radio communications.
However, there is no guarantee that interference will not occur in a particular
installation. If this equipment does cause harmful interference to radio or
television reception, which can be determined by turning the equipment off
and on, the user is encouraged to try to correct the interference by one or
more of the following measures:
—Reorient or relocate the receiving antenna.
—Increase the separation between the equipment and receiver.
—Connect the equipment into an outlet on a circuit different from that to
which the receiver is connected.
—Consult the dealer or an experienced radio/TV technician for help.
FCC RF Radiation Exposure Statement:
1. This Transmitter must not be co-located or operating in conjunction with
any other antenna or transmitter.
2. This equipment complies with RF radiation exposure limits set forth for
an uncontrolled environment.
The device has been evaluated to meet general RF exposure requirement.
The device can be used in portable exposure condition without restriction.
- English Warning Statement
“This device complies with Industry Canada licence-exempt RSS standard(s).
Operation is subject to the following two conditions: (1) this device may not
cause interference, and (2) this device must accept any interference, including
interference that may cause undesired operation of the device.” The digital
apparatus complies with Canadian CAN ICES-3 (B)/NMB-3(B).
This radio transmitter has been approved by Industry Canada to operate
with the antenna types listed with the maximum permissible gain indicated.
Antenna types not included in this list, having a gain greater than the
maximum gain indicated for that type, are strictly prohibited for use with
The device has been evaluated to meet general RF exposure requirement.
The device can be used in portable exposure condition without restriction.
- French Warning Statement
“Le présent appareil est conforme aux CNR d'Industrie Canada applicables
aux appareils radio exempts de licence. L'exploitation est autorisée aux
deux conditions suivantes : (1) l'appareil ne doit pas produire de brouillage,
et (2) l'utilisateur de l'appareil doit accepter tout brouillage radioélectrique
subi, mêmesi le brouillage est susceptible d'en compromettre le
fonctionnement.” Cet appareil numérique de la classe B est conforme à la
Le présent émetteur radio a été approuvé par Industrie Canada pour
fonctionner avec les types d'antenne énumérés ci-dessous et ayant un gain
admissible maximal. Les types d'antenne non inclus dans cette liste, et dont
le gain est supérieur au gain maximal indiqué, sont strictement interdits
pour l'exploitation de l'émetteur.
L'équipement a été évalué comme satisfaisant aux exigences générales en
matière d'exposition aux radiofréquences. L'appareil peut être utilisé sans
restriction dans des conditions d'exposition portatives.
To turn the light on using
the built-in lithium battery,
display will show "UNLOCK".
Then, rotate any knob three
times to activate the light.
While the light is powered
on, press and hold the " "
When the light is powered
on, short press the ON/OFF
standby mode. Press again