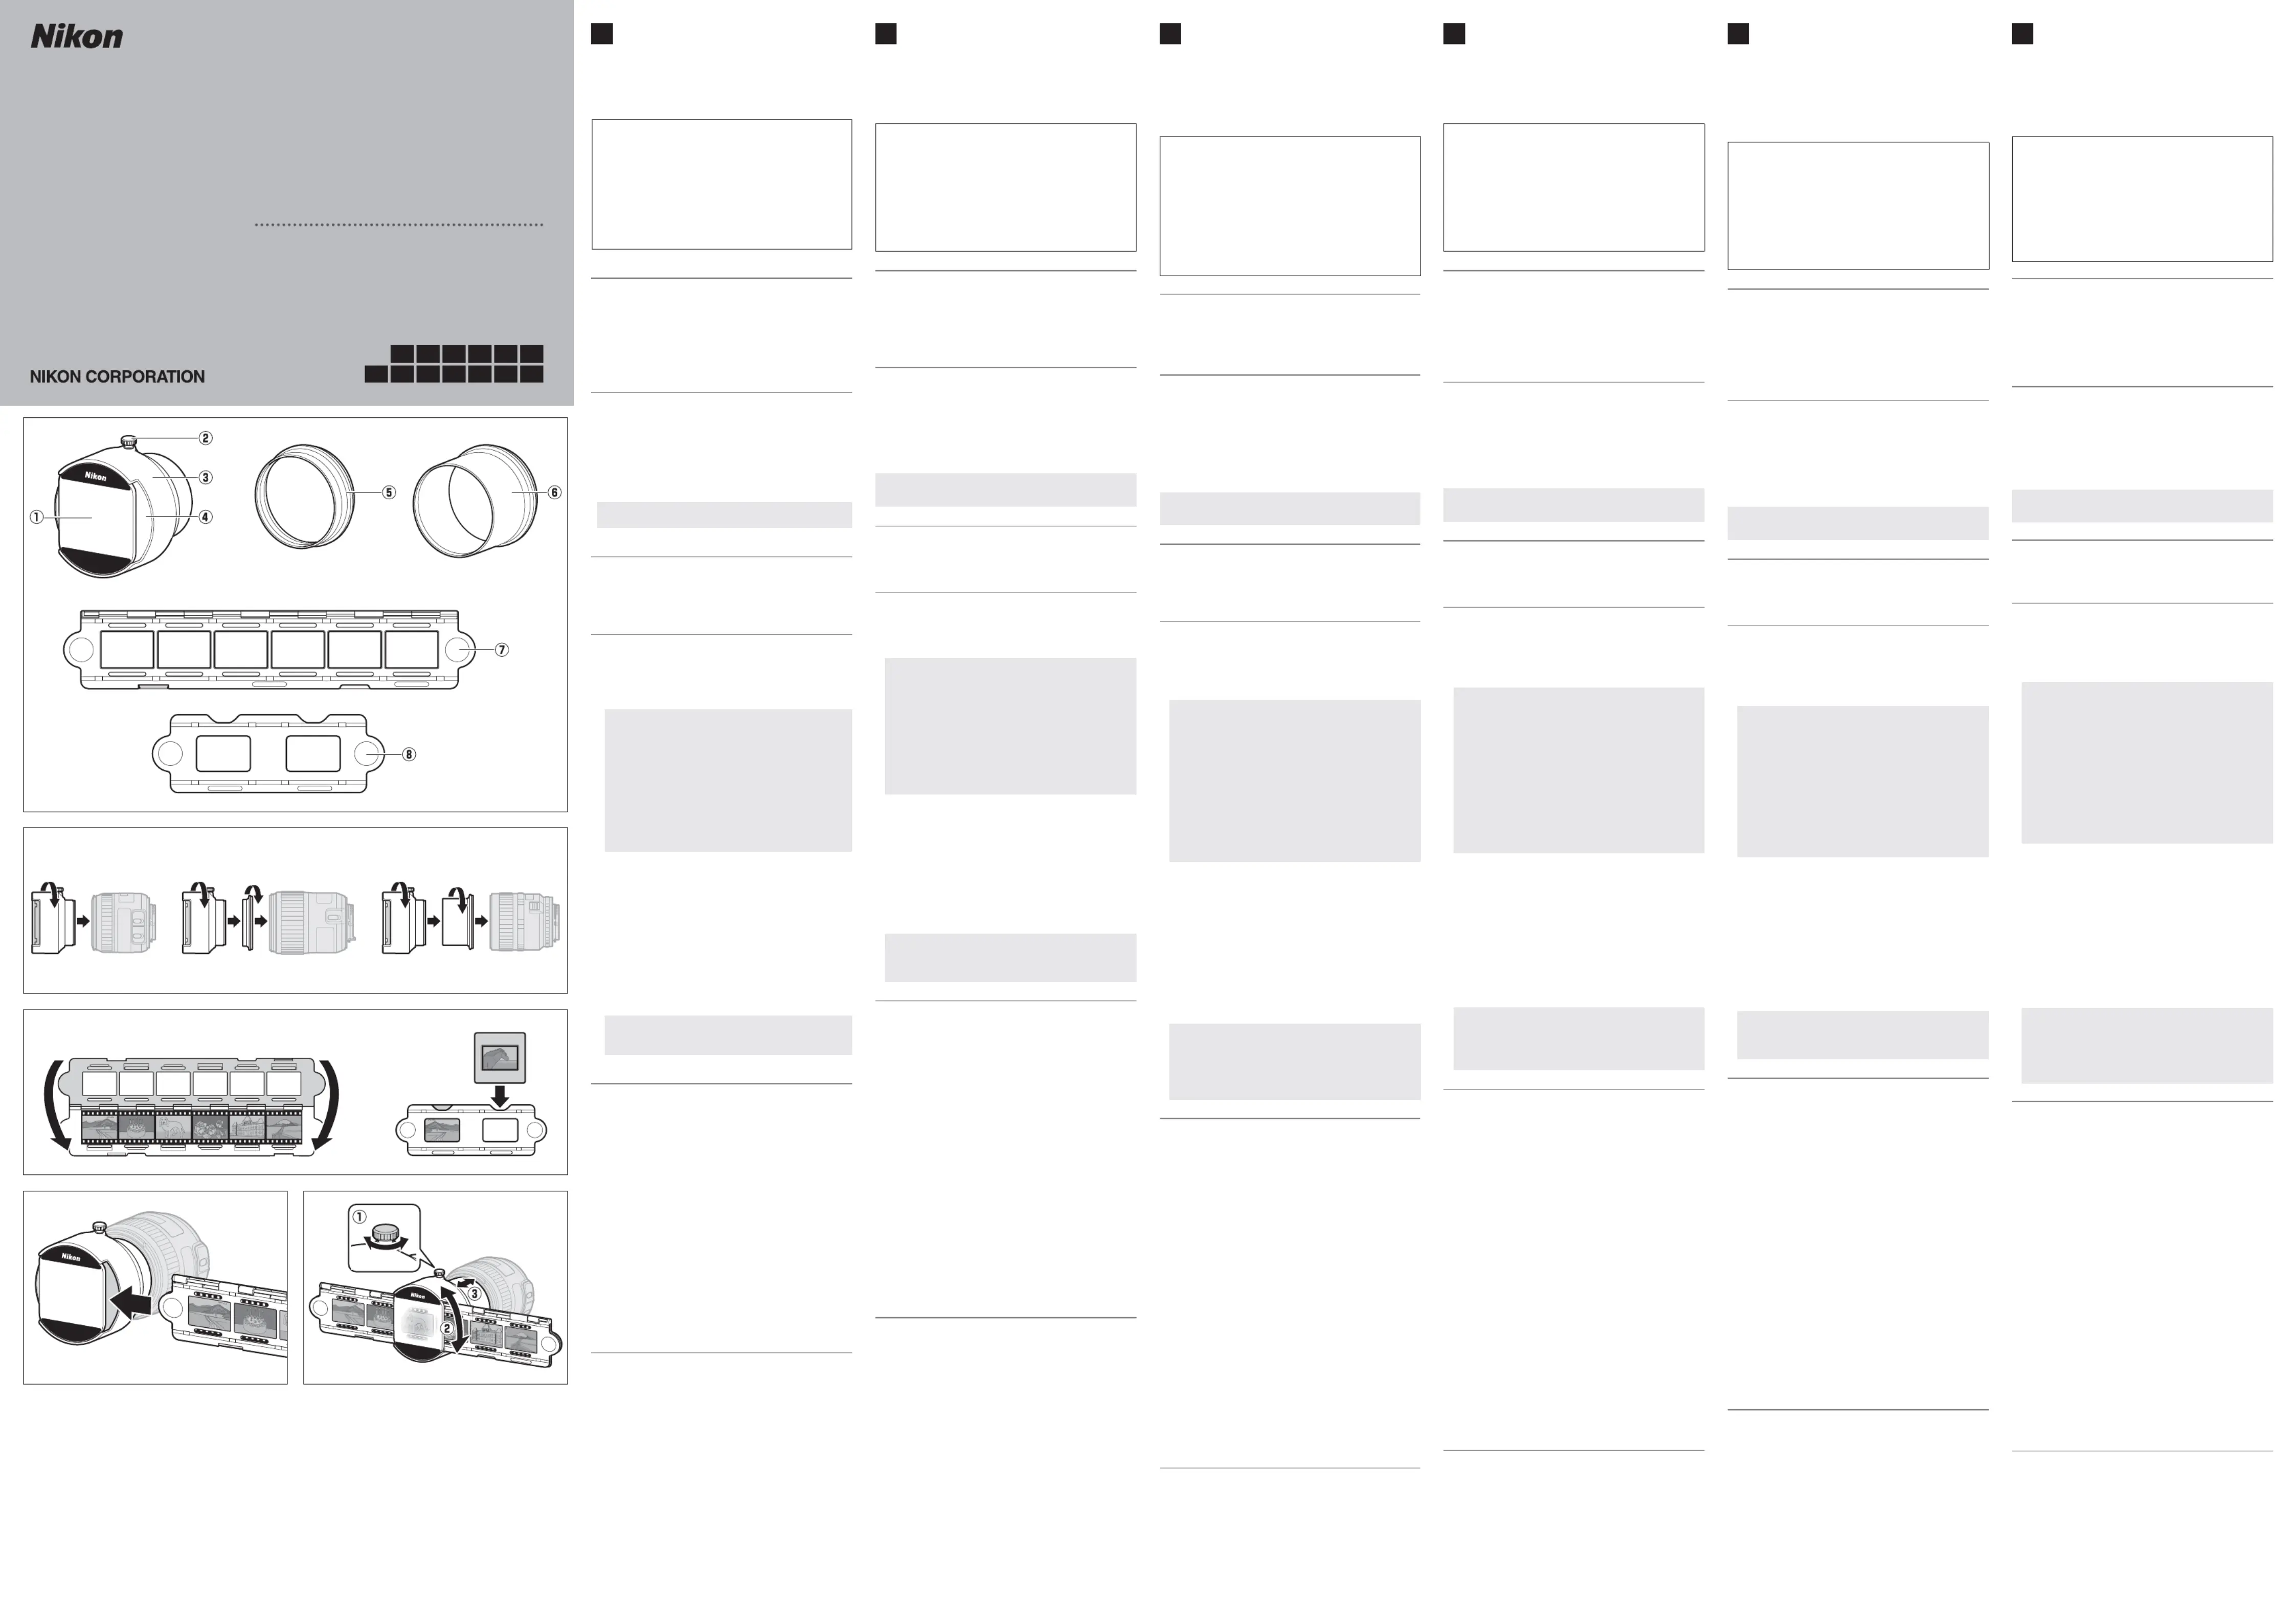
ルムを固定して撮影するためのアダプターです。ニコン一眼
レフカメラに装着したニコン製レンズに取り付けて使用しま
• AF-S DX Micro NIKKOR 40mm f/2.8G
• AF-S Micro NIKKOR 60mm f/2.8G ED
• AI AF Micro-Nikkor 60mm f/2.8D
AF-S DX Micro NIKKOR 40mm f/2.8G
AF-S Micro NIKKOR 60mm f/2.8G ED
AI AF Micro-Nikkor 60mm f/2.8D
✔フードやフィルターなどははあらかじめ取り外してくだ
とアダプターの両方をつかんで回転させ、レンズから取り外
ムの位置を修正すると、フィルムを傷つける可能性があ
✔ホルダーにフィルムが傾いてセットされたり、丸みをお
びたままセットされると、撮影時にピントムラが生じる
✔フィルムをセットした後、ブロアーでゴミやホコリを軽
構図はカメラの画像モニターまたはファインダーで確認
画角調節リングを回すと、ホルダーの傾きを調節できま
画角調節リングを前後に動かすと、画角を調節できます
✔自然光下での撮影、または、高演色性蛍光灯やライト
ださい。本体との距離が近すぎたり、長時間連続して作業
を行うと、熱によってフィルムに異常をきたしたり、ホル
ダーが変形したりする場合がありますので充分にご注意く
可動部を操作するときは、指をはさまないようにご注意く
次の場合など、使用するフィルムによっては、オートフォー
カスでのピント合わせが正常にできないことがあります。
ストリップフィルムホルダーおよびスライドマウントホル
製品の外観、仕様、性能は予告なく変更することがあります
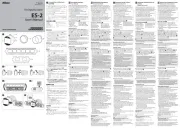
The ES-2 fi lm digitizing adapter attaches to Nikon
lenses mounted on Nikon digital SLR cameras, where
it can be used to photograph 35mm fi lm. It can be
attached to the following lenses:
• AF-S DX Micro NIKKOR 40 mm f/2.8G
• AF-S Micro NIKKOR 60 mm f/2.8G ED (requires
supplied 62mm adapter )A
• AF Micro-Nikkor 60 mm f/2.8D (requires supplied
* When an FX-format Micro NIKKOR lens is mounted
on a DX-format camera, the picture angle decreases
and the edges of the fi lm will be cropped out.
Parts of the ES-2 (Figure
Parts of the ES-2 (Figure
Parts of the ES-2 (Figure
Parts of the ES-2 (Figure Parts of the ES-2 (Figure
i FH-5 slide mount holder
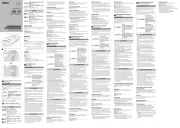
Attaching the ES-2
Attaching the ES-2
Attaching the ES-2
Attaching the ES-2Attaching the ES-2
If you are using an AF-S DX Micro NIKKOR 40 mm
f/2.8G, screw the ES-2 directly onto the front of the lens
(Figure -1). Users of the AF-S Micro NIKKOR 60 mm x
f/2.8G ED and AF Micro-Nikkor 60 mm f/2.8D will need
respectively to attach the 62mm adapter (Figure A
x-2) or 62mm adapter (Figure -3) to the ES-2 and Bx
then screw them onto the lens.
Remove all hoods, fi lters, and the like from the lens
before attaching the ES-2.
Removing the ES-2
Removing the ES-2
Removing the ES-2
Removing the ES-2Removing the ES-2
If you are using adapter or A B, grasp the ES-2 and the
adapter and unscrew them from them lens. You can
then remove the adapter from the ES-2.
Using the ES-2
Using the ES-2
Using the ES-2
Using the ES-2Using the ES-2
Place the fi lm or slides to be photographed into the
strip fi lm or slide mount holder (see Figure c-1
for fi lm, Figure -2 for slides). Slides must be in c
landscape (“wide”) orientation.
Be sure that fi lm is correctly placed in the FH-4, as
otherwise closing the holder could damage the fi lm.
Do not attempt to reposition fi lm while it is inserted
in the FH-4, as this could damage the fi lm.
If the fi lm has curl or is placed at angle to the holder,
parts of the resulting photograph may not be in
After positioning the fi lm, remove dust and lint with
Insert the holder into the holder insertion slot (Figure
Frame the shot in the camera viewfi nder or monitor
(Figure ). Angle of view and tilt are adjusted using b
the view angle adjustment ring: release the locking
screw ( ) and rotate the ring to adjust tilt ( ) or q w
slide it in or out to choose the angle of view ( ).e
Tighten the locking screw.
We recommend using natural light or a light source
(color rendering index) such as a light
box or high-CRI fl uorescent lamp.
Precautions for U
Precautions for U
Precautions for U
Precautions for Use
se
se
sePrecautions for Use
• Do not pick up or hold the lens or camera using only
• Do not exert pressure on light boxes, glass, or other
breakable surfaces when using the ES-2.
• When using an incandescent light source, keep the
diff user screen at least 30cm (1 ft.) from the bulb. If
the adapter is placed too close to an incandescent
bulb or left too long in its vicinity, the heat may
damage the fi lm or deform the holder.
• Observe caution to avoid catching your fi ngers in
• Depending on the type of image photographed, you
may occasionally fi nd that the camera is unable to
focus using autofocus. For example, the camera may
have diffi culty focusing if the image is:
• The windows in the strip fi lm holder and slide mount
holder are equivalent to 36 × 24 mm.
Speci
Speci
Speci
Speci
cations
cations
cations
cationsSpeci cations
Dimensions: Approx. 71.4mm/2.9in. (maximum, ⌀
excluding locking screw) × 47.3mm/1.9in., excluding
Weight: Approx. 80g (2.9oz.), excluding accessories
Holder dimensions (W× H× D):
• FH-4 strip lm holder: Approx. 52×275×3.8mm
• : Approx. 52×155×3.8mm FH-5 slide mount holder
Nikon reserves the right to change the appearance,
specifi cations, and performance of this product at any
time and without prior notice.
Filmdigitalisierungsadapter
Der Filmdigitalisierungsadapter ES-2 lässt sich an
Nikon-Objektiven montieren, um Kleinbild-Dias oder
Filmstreifen mit Nikon Digital-Spiegelrefl exkameras
abzufotografi eren und damit zu digitalisieren. Er kann
an folgenden Objektiven benutzt werden:
• AF-S DX Micro-NIKKOR 40 mm 1:2,8G
• AF-S Micro-NIKKOR 60 mm 1:2,8G ED
(erfordert mitgelieferten 62-mm-Adapter A)
• AF Micro-Nikkor 60 mm 1:2,8D
(erfordert mitgelieferten 62-mm-Adapter B)
* Wird ein FX-Format Micro-NIKKOR-Objektiv an einer
DX-Format-Kamera angesetzt, wird ein kleineres
Objektfeld erfasst und nur ein Ausschnitt des
T
T
T
Teile des ES
eile des ES
eile des ES
eile des ES-2 (Abbildung
-2 (Abbildung
-2 (Abbildung
-2 (Abbildung Teile des ES-2 (Abbildung
u Filmstreifenhalter FH-4
Anbringen des ES-2
Anbringen des ES-2
Anbringen des ES-2
Anbringen des ES-2Anbringen des ES-2
Wenn Sie ein AF-S DX Micro-NIKKOR 40 mm 1:2,8G
verwenden, wird der ES-2 direkt auf das Frontgewinde
des Objektivs geschraubt (Abbildung x-1). Benutzer
des AF-S Micro-NIKKOR 60 mm 1:2,8G ED oder des
AF Micro-Nikkor 60 mm 1:2,8D müssen zunächst den
62-mm-Adapter A (Abbildung -2) bzw. 62-mm-x
Adapter (Abbildung -3) am ES-2 anbringen und Bx
dann diese Kombination an das Objektiv schrauben.
Entfernen Sie Gegenlichtblenden, Filter und ähnliches
vom Objektiv, bevor Sie den ES-2 montieren.
Abnehmen des ES-2
Abnehmen des ES-2
Abnehmen des ES-2
Abnehmen des ES-2Abnehmen des ES-2
Wenn Sie den Adapter oder einsetzen, umfassen A B
Sie den ES-2 und den Adapter und schrauben Sie die
Kombination vom Objektiv ab. Sie können dann den
Adapter vom ES-2 trennen.
V
V
V
Verwenden des ES-2
erwenden des ES-2
erwenden des ES-2
erwenden des ES-2Verwenden des ES-2
Legen Sie den Filmstreifen oder die Dias, die
reproduziert werden sollen, in den Filmstreifenhalter
bzw. den Diarahmenhalter (siehe Abbildung c-1 für
Film, Abbildung -2 für Dias). Die Dias müssen im c
Querformat eingelegt werden.
Achten Sie darauf, dass der Filmstreifen korrekt im
FH-4 positioniert wird, weil andernfalls beim Schließen
des Halters der Film beschädigt werden kann.
Versuchen Sie nicht, die Position des Filmstreifens zu
verändern, während er im FH-4 eingelegt ist, da dies
den Film beschädigen könnte.
Wellt sich der Filmstreifen oder liegt er nicht gerade
im Halter, werden Teilbereiche der Reproaufnahmen
möglicherweise unscharf abgebildet.
Nach dem Positionieren von Film oder Dia sollten Sie
Staub oder Fusseln mit einem Blasebalg beseitigen.
Stecken Sie den Halter in den Einschub (Abbildung v).
Kontrollieren Sie den Bildausschnitt im Sucher oder
Monitor der Kamera (Abbildung b). Der Bildausschnitt
sowie der Drehwinkel um die optische Achse lassen
sich mit dem Ring für die Justierung einstellen. Lösen
Sie zunächst die Feststellschraube (q). Drehen Sie
den Ring zum Ändern des Drehwinkels (w), oder
schieben Sie ihn nach vorne oder nach hinten, um den
Bildausschnitt zu wählen (e).
Ziehen Sie die Feststellschraube fest.
Wir empfehlen die Verwendung einer natürlichen
oder künstlichen Lichtquelle mit einem hohen
beispielsweise einer Leuchtplatte oder einer
Leuchtstoffl ampe mit hohem CRI-Wert.
W
W
W
Warn- und Gebrauchshin
arn- und Gebrauchshin
arn- und Gebrauchshin
arn- und Gebrauchshinweise
weise
weise
weiseWarn- und Gebrauchshinweise
• Tragen oder heben Sie das Objektiv oder die Kamera
nicht ausschließlich am ES-2.
• Üben Sie keinen Druck auf Leuchtplatten,
Glasscheiben oder andere zerbrechliche Flächen aus,
wenn Sie den ES-2 benutzen.
• Wenn Sie eine Glühlampe als Lichtquelle
verwenden, halten Sie mindestens 30cm Abstand
zwischen Streuscheibe und Lampe. Wird der
Filmdigitalisierungsadapter zu nah an der Glühlampe
platziert (oder für zu lange Zeit), kann die Hitze den
Film beschädigen oder den Halter verformen.
• Passen Sie auf, dass Sie ihre Finger nicht in
beweglichen Teilen einklemmen.
• In Abhängigkeit vom abzufotografi erenden Bildinhalt
kann die Kamera unter Umständen nicht automatisch
scharfstellen. Beispielsweise funktioniert der
Autofokus der Kamera möglicherweise nicht bei
Bildvorlagen mit folgenden Eigenschaften:
• Die Ausschnitte im Filmstreifenhalter und
Diarahmenhalter entsprechen 36 × 24 mm.
T
T
T
Technische Daten
echnische Daten
echnische Daten
echnische DatenTechnische Daten
Abmessungen: ca. 71,4mm (größter Durchmesser, ohne ⌀
Feststellschraube)×47,3mm, ohne Zubehör
Gewicht: ca. 80g, ohne Zubehör
Abmessungen der Halter (B× H× T):
• : ca. 52×275×3,8mmFilmstreifenhalter FH-4
• : ca. 52×155×3,8mmDiarahmenhalter FH-5
Nikon behält sich vor, jederzeit das Erscheinungsbild, die
technischen Daten oder die Leistungsmerkmale dieses
Produkts ohne vorherige Ankündigung zu ändern.
Duplicateur de lm et diapo
Le duplicateur de fi lm et diapo ES-2 se fi xe sur des
objectifs Nikon montés sur des refl ex numériques
Nikon. Il permet de photographier des fi lms 24x36mm.
Il peut se fi xer sur les objectifs suivants:
• AF-S DX Micro NIKKOR 40 mm f/2.8G
• AF-S Micro NIKKOR 60 mm f/2.8G ED (nécessite
l'adaptateur 62mm fourni)A
• AF Micro-Nikkor 60 mm f/2.8D (nécessite
l'adaptateur 62mm fourni)B
* Lorsqu'un objectif Micro NIKKOR de format FX est
monté sur un appareil photo de format DX, l'angle de
champ est réduit et les bords du fi lm sont tronqués.
Nomenclature du ES-2 (Figur
Nomenclature du ES-2 (Figur
Nomenclature du ES-2 (Figur
Nomenclature du ES-2 (Figure
e
e
e Nomenclature du ES-2 (Figure
u Porte fi lm en bande FH-4
i Porte diapo montée FH-5
Fixa
Fixa
Fixa
Fixation du ES-2
tion du ES-2
tion du ES-2
tion du ES-2Fixation du ES-2
Si vous utilisez un objectif AF-S DX Micro NIKKOR 40 mm
f/2.8G, vissez le duplicateur ES-2 directement à l’avant
de l’objectif (Figure x-1). Si vous utilisez l’objectif
AF-S Micro NIKKOR 60 mm f/2.8G ED ou AF Micro-
Nikkor 60 mm f/2.8D, vous devez fi xer respectivement
l’adaptateur A 62mm (Figure -2) ou 62mm (Figure xB
x-3) sur le ES-2, puis visser l’ensemble sur l’objectif.
Retirez tous les parasoleils, fi ltres et autres accessoires
similaires de l'objectif avant de fi xer le duplicateur ES-2.
Retrait du duplicateur ES-2
Retrait du duplicateur ES-2
Retrait du duplicateur ES-2
Retrait du duplicateur ES-2
Retrait du duplicateur ES-2
Si vous utilisez l’adaptateur A B ou , saisissez le ES-2 et
l’adaptateur et dévissez-les de l’objectif. Vous pouvez
ensuite retirer l’adaptateur du ES-2.
Utilisation du ES-2
Utilisation du ES-2
Utilisation du ES-2
Utilisation du ES-2Utilisation du ES-2
Placez le fi lm ou les diapositives que vous souhaitez
photographier dans le porte fi lm en bande ou porte
diapo montée (voir la Figure c-1 pour le fi lm, la
Figure -2 pour les diapositives). Les diapositives c
doivent être à l’horizontale.
Vérifi ez que le fi lm est placé correctement dans le
FH-4, car vous risquez sinon d'endommager le fi lm
en fermant le porte fi lm.
N'essayez pas de repositionner le fi lm lorsqu'il
est inséré dans le FH-4, car cela risquerait
Si le fi lm n'est pas plat ou s'il est placé de biais sur
le porte fi lm, il se peut que certaines zones de la
photographie obtenue ne soient pas nettes.
Après avoir positionné le fi lm, retirez la poussière et
les peluches à l’aide d’une souffl ette.
Insérez le porte fi lm ou diapo dans le logement
d’insertion du porte fi lm ou diapo (Figure v).
Cadrez l’image dans le viseur ou sur l’écran de l’appareil
photo (Figure b). Vous pouvez régler l’angle de vue et
l’inclinaison à l’aide de la bague de réglage de l’angle
de vue: dévissez la vis de blocage ( ) et tournez la q
bague pour régler l’inclinaison (w) ou faites-la glisser
vers l’avant ou l’arrière pour choisir l’angle de vue (e).
Serrez la vis de blocage.
Nous vous recommandons d'utiliser la lumière
naturelle ou une source lumineuse dotée d'un R
de rendu des couleurs, IRC) élevé, comme une boîte à
lumière ou une lampe fl uorescente dont l'IRC est élevé.
Précautions d
Précautions d
Précautions d
Précautions d’
’
’
’utilisation
utilisation
utilisation
utilisationPrécautions d’utilisation
• Ne prenez pas, ni ne tenez l’objectif ou l’appareil
photo uniquement par le ES-2.
• N’exercez pas de pression sur les boîtes à lumière,
le verre ou d’autres surfaces cassables lors de
• Lors de l’utilisation d’une source lumineuse
incandescente, maintenez l’écran de diff usion à 30cm
au moins de l’ampoule. Si l’adaptateur est trop près
d’une ampoule incandescente ou s’il est laissé trop
longtemps à proximité, la chaleur risque d’endommager
le fi lm ou de déformer le porte fi lm ou diapo.
• Faites attention de ne pas vous coincer les doigts dans
• Selon le type d’image photographié, vous
remarquerez peut-être parfois que l’appareil photo ne
parvient pas à faire le point à l’aide de l’autofocus. Par
exemple, l’appareil photo peut avoir des diffi cultés à
faire le point si l’image est:
• Les fenêtres du porte fi lm en bande et du porte diapo
montée mesurent 24 × 36 mm.
Caractéristiques
Caractéristiques
Caractéristiques
CaractéristiquesCaractéristiques
Dimensions: environ 71,4mm (maximum, sans la vis de ⌀
blocage)×47,3mm, sans les accessoires
Poids : environ 80g, sans les accessoires
Dimensions du porte lm ou diapo (L× H× P):
• Porte lm en bande FH-4: environ 52×275×3,8mm
• : environ 52×155×3,8mmPorte diapo montée FH-5
Nikon se réserve le droit de modifi er à tout moment
l’apparence, les caractéristiques et les performances de ce
produit sans avis préalable.
Adaptador de digitalización de
El adaptador de digitalización de película ES-2 se instala
en los objetivos de Nikon montados en las cámaras SLR
digitales de Nikon y puede usarse para fotografi ar películas
de 35mm. Puede instalarse en los siguientes objetivos:
• AF-S DX NIKKOR Micro 40 mm f/2.8G
• AF-S NIKKOR Micro 60 mm f/2.8G ED (requiere del
adaptador A de 62mm suministrado)
• AF Nikkor Micro 60 mm f/2.8D (requiere del
adaptador B de 62mm suministrado)
* Al montar un objetivo NIKKOR Micro de formato FX
en una cámara de formato DX, el ángulo de la imagen
disminuye y los extremos de la película serán recortados.
Partes del ES-2 (imagen
Partes del ES-2 (imagen
Partes del ES-2 (imagen
Partes del ES-2 (imagen Partes del ES-2 (imagen
Instalación del ES-2
Instalación del ES-2
Instalación del ES-2
Instalación del ES-2Instalación del ES-2
Si está usando un AF-S DX NIKKOR Micro 40 mm f/2.8G,
atornille el ES-2 directamente en la parte delantera del
objetivo (imagen -1). Los usuarios del AF-S NIKKOR x
Micro 60 mm f/2.8G ED y del AF Nikkor Micro 60 mm f/2.8D
necesitarán instalar respectivamente el adaptador A de
62mm (imagen -2) o el adaptador de 62mm (imagen xB
x-3) al ES-2 y, a continuación, atornillarlos al objetivo.
Retire todos los parasoles, fi ltros y similares del objetivo
antes de instalar el ES-2.
Extracción del ES-2
Extracción del ES-2
Extracción del ES-2
Extracción del ES-2Extracción del ES-2
Si está usando el adaptador o , sostenga el ES-2 A B
y el adaptador y desenrósquelos del objetivo. A
continuación, puede extraer el adaptador del ES-2.
Uso del ES-2
Uso del ES-2
Uso del ES-2
Uso del ES-2Uso del ES-2
Coloque la película o diapositivas a fotografi ar en
el portapelícula o portadiapositivas (consulte la
imagen c-1 para la película y la imagen c-2 para
las diapositivas). Las diapositivas deben estar en
orientación paisaje (“horizontal”).
Asegúrese de que la película esté colocada
correctamente en el FH-4, de lo contrario, al cerrar el
portador podría dañar la película.
No intente recolocar la película mientras esté introducida
en el FH-4, puesto que podría dañar la película.
Si la película está curvada o en ángulo en el
portador, partes de la fotografía resultante podrían
Después de colocar la película, elimine el polvo y la
pelusilla con una perilla.
Introduzca el portador en la ranura de inserción del
Encuadre la toma en el visor o pantalla de la cámara
(imagen ). El ángulo de visión y la inclinación se b
ajustan usando el anillo de ajuste del ángulo de visión:
libere el tornillo de bloqueo (q) y gire el anillo para
ajustar la inclinación (w) o deslícelo hacia adentro o
hacia afuera para seleccionar el ángulo de visión (e).
Apriete el tornillo de bloqueo.
Se recomienda usar luz natural o una fuente de luz con
(índice de reproducción cromática) alto, tal como una
caja de luz o una lámpara fl uorescente con un CRI alto.
Precauciones de uso
Precauciones de uso
Precauciones de uso
Precauciones de usoPrecauciones de uso
• No levante ni sujete el objetivo o la cámara usando
• No ejerza presión en las cajas de luces, cristal o
cualquier otra superfi cie delicada al usar el ES-2.
• Al usar una fuente de luz incandescente, mantenga
la pantalla difusora a un mínimo de 30cm (1 pie)
de distancia de la bombilla. Si coloca el adaptador
demasiado cerca de una bombilla incandescente o si
lo deja durante mucho tiempo en su proximidad, el
calor podría dañar la película o deformar el portador.
• Preste atención para evitar que sus dedos se
enganchen en las piezas móviles.
• En función del tipo de imagen fotografi ada, notará
que ocasionalmente la cámara no será capaz de
enfocar usando autofoco. Por ejemplo, la cámara
podría tener ciertos problemas al enfocar si la imagen:
• Es extremadamente oscura
• Tiene un contraste muy alto
• Tiene un contraste muy bajo
• Las ventanas del portapelícula y el portadiapositivas
deslizante son equivalentes a 36 × 24 mm.
Especi
Especi
Especi
Especi
caciones
caciones
caciones
caciones
Dimensiones: Aprox. 71,4mm/2,9pulg. (máximo, ⌀
excluyendo el tornillo de bloqueo)×47,3mm/1,9pulg.,
Peso: Aprox. 80g (2,9oz), excluyendo los accesorios
Dimensiones del portador (an.× al.× pr.):
• : Aprox. 52×275×3,8mm Portapelícula FH-4
• : Aprox. 52×155×3,8mm Portadiapositivas FH-5
Nikon se reserva el derecho de cambiar el aspecto, las
especifi caciones y el rendimiento de este producto en
cualquier momento y sin previo aviso.
Адаптер для оцифровки пленок
Адаптер для оцифровки пленок ES-2 крепится к
объективам Nikon, установленным на цифровых
зеркальных фотокамерах Nikon, на которых он может
использоваться для фотографирования пленки 35мм.
Он может крепиться к следующим объективам:
• AF-S DX Micro NIKKOR 40 мм f/2,8G
• AF-S Micro NIKKOR 60 мм f/2,8G ED (требуется
поставляемый адаптер A 62мм)
• AF Micro-Nikkor 60 мм f/2,8D (требуется
поставляемый адаптер B 62мм)
* Если объектив Micro NIKKOR формата FX установлен
на фотокамеру формата DX, угол изображения
уменьшается, и края пленки будут обрезаны.
Детали ES-2 (рис.
Детали ES-2 (рис.
Детали ES-2 (рис.
Детали ES-2 (рис.
У
У
У
Ус
с
с
становка ES-2
тановка ES-2
тановка ES-2
тановка ES-2Установка ES-2
При использовании AF-S DX Micro NIKKOR 40мм f/2,8G
вкрутите ES-2 непосредственно в переднюю часть
объектива (рис. x-1). При использовании AF-S Micro
NIKKOR 60 мм f/2,8G ED и AF Micro-Nikkor 60мм f/2,8D
необходимо присоединить адаптер A 62мм (рис.x-2)
или адаптер 62мм (рис. Bx-3) соответственно к ES-2,
а затем вкрутить их в объектив.
Перед присоединением ES-2 снимите с объектива
все крышки, фильтры и т.д.
Снятие ES-2
Снятие ES-2
Снятие ES-2
Снятие ES-2
Если используется адаптер A B или , возьмитесь за
ES-2 и адаптер и выкрутите их из объектива. Затем
можно снять адаптер с ES-2.
Использование ES-2
Использование ES-2
Использование ES-2
Использование ES-2Использование ES-2
Поместите пленку или слайды для
фотографирования в держатель для пленок или
слайдов (см. рис. c c-1 для пленок, рис. -2 для
слайдов). Слайды должны устанавливаться в
горизонтальной («альбомной») ориентации.
Убедитесь, что пленка правильно установлена
в FH-4, так как в противном случае закрытие
держателя может привести к повреждению пленки.
Не пытайтесь изменить положение пленки,
когда она вставлена в FH-4, так как это может
привести к повреждению пленки.
Если пленка изогнута или находится под углом
к держателю, часть полученной фотографии
может находиться не в фокусе.
После установки пленки удалите пыль и ворс с
Вставьте держатель в гнездо для установки
Наведите кадр в видоискателе или на мониторе
фотокамеры (рис. b). Угол зрения и наклон
регулируются с помощью кольца регулировки
угла зрения: открутите фиксирующий винт (q) и
поверните кольцо, чтобы отрегулировать наклон
(w), или передвиньте его внутрь или наружу,
чтобы выбрать угол зрения (e).
Затяните фиксирующий винт.
Мы рекомендуем использовать естественный
свет или источник света с высоким индексом
коробка или флуоресцентная лампа с высоким
коэффициентом цветопередачи (CRI).
Меры предосторожности
Меры предосторожности
Меры предосторожности
Меры предосторожности
• Не поднимайте и не держите объектив или камеру,
используя для этого только ES-2.
• При использовании ES-2 не допускайте давления
на световые коробки, стекло или другие
• При использовании лампы накаливания держите
рассеивающий экран на расстоянии не менее
30см от лампы. Если адаптер находится слишком
близко к лампе накаливания или слишком долго
находится рядом с ней, это может привести к
повреждению пленки или деформации держателя.
• Соблюдайте осторожность, чтобы пальцы не
попали в движущиеся части.
• В зависимости от типа сфотографированного
изображения фотокамера иногда может быть
неспособна сфокусироваться с помощью автофокуса.
Например, фотокамера может испытывать трудности
с фокусировкой, если изображение:
• Очень высококонтрастное
• Окошки в держателе для пленок и держатель для
слайдов соответствуют формату 36 × 24 мм.
Т
Т
Т
Технические характеристики
ехнические характеристики
ехнические характеристики
ехнические характеристикиТехнические характеристики
Размеры: Прибл. ⌀ 71,4мм (максимум, без
фиксирующего винта)×47,3мм, без принадлежностей
Вес: Прибл. 80г, без принадлежностей
Размеры держателя (Ш× В× Г):
• Держатель для пленок FH-4: Прибл. 52×275×3,8мм
• Держатель для слайдов FH-5: Прибл. 52×155×3,8мм
Компания Nikon сохраняет за собой право изменять
внешний вид, технические характеристики и
рабочие показатели данного изделия в любое время
и без предварительного уведомления.