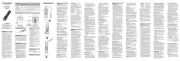
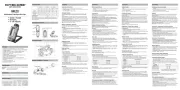
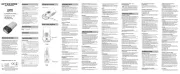
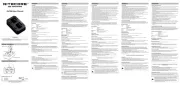
Power Button / ZOOM Button
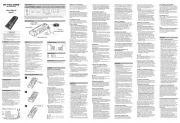
Top Strap Installation Guide
Battery Installation / Removal
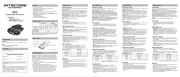
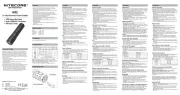
• Max output of 3,000 lumens
• Utilizes 8 x 4-core UHE LEDs
• Equipped with primary lights (color temperature: 4,500K) featuring
electronic focus adjustment of spotlight / oodlight, and auxiliary red lights
• Utilizes an optical matrix lens system with various facets
• Includes a 5,500mAh 21700 high capacity Li-ion battery
• Highly ecient constant current circuit provides a stable output
• Built-in intelligent Li-ion battery charging circuit with a USB-C charging port
• Designed with two buttons dierent in shape and touch, oering quick
• Oers 5 brightness levels, 3 special modes, and 2 brightness options for
• Designed with 4 power indicators to indicate the remaining battery power
• Constructed from PC and aero grade aluminum alloy
• HA III military grade hard-anodized nish
• Incorporated Advanced Temperature Regulation (ATR) module (Patent
• Includes a removable bracket
• Impact resistant to 2 meters
• Waterproof and dustproof rating in accordance with IP68 (2 meters
92.4mm x 46.8mm x 45.5mm (3.64" x 1.84" x 1.79") (Bracket Included)
209g (7.37 oz) (Battery, Bracket and Headband Included)
133g (4.69 oz) (Bracket and Headband Included)
NITECORE NL2155HP Rechargeable Li-ion Battery (5,500mAh), USB-C to USB-C
Charging Cable, Bracket, Headband, Storage Case, Top Strap, Spare O-ring
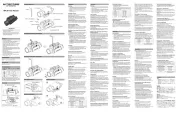
Primary Light (Neutral White Light)
Mixed Light Spotlight / Floodlight / Mixed Light Floodlight Mixed Light
*TURBO HIGH MID ULTRALOW SOS BEACON HIGH SLOW FLASHINGLOW LOW
4h 30min 7h 15min 12h 32h 84h — — 41h 73h —
192m 136m 82m 47m 12m — — 10m 4m —
9,216cd 4,612cd 1,683cd 561cd 35cd — — 23cd 4cd —
IP68, 2m (Waterproof and Submersible)
Note: The stated data is measured by using the NITECORE 21700 rechargeable Li-ion battery (5,500mAh), in accordance with the international ashlight testing
standards ANSI/PLATO FL 1-2019, at an ambient temperature of 26°C (79°F) from the NITECORE Lab. The data may vary in real world use due to dierent batteries
usage or environmental conditions.
* The 3000-lumen TURBO level is only accessible when using a 21700 rechargeable Li-ion battery with a discharge current over 8A.
* This product is equipped with a thermal protection function, which automatically regulates the output of the product according to the working condition to maintain
1. Dieses Produkt ist für den Gebrauch durch Erwachsene ab 18 Jahren
bestimmt. Bitte bewahren Sie dieses Produkt außerhalb der Reichweite
2. VORSICHT! Mögliche gefährliche Strahlung! Blicken Sie NICHT direkt in
den Lichtstrahl und leuchten Sie niemandem direkt in die Augen!
3. Das Produkt erzeugt bei längerem Betrieb große Hitze. Bitte lassen
Sie bei der Verwendung Vorsicht walten. Es wird empfohlen, hohe
Helligkeitsstufen nicht über längere Zeiträume zu verwenden, um
Verbrennungen und Produktschäden zu vermeiden.
4. Decken Sie das Produkt NICHT ab und stellen Sie es NICHT in die Nähe
anderer Gegenstände, da dies zu Schäden am Produkt oder Unfällen
aufgrund hoher Temperaturen führen kann.
5. Verwenden Sie das Produkt NICHT zur Beleuchtung von brennbaren
oder explosiven Materialien, da die hohe Hitze zu Verbrennungen oder
6. Bitte verwenden Sie das Produkt auf normale Weise, um Unfälle im Falle
eines Produktausfalls zu vermeiden.
7. Tauchen Sie das Produkt NICHT in Flüssigkeiten ein, wenn es heiß ist.
Dies kann zu irreparablen Schäden an der Lampe führen, da der Luftdruck
innerhalb und außerhalb des Gehäuses unterschiedlich ist.
8. Wenn das Produkt in einer geschlossenen oder entammbaren Umgebung,
wie z. B. einer Tasche oder einem Rucksack, aufbewahrt wird oder wenn es
über einen längeren Zeitraum nicht benutzt wird, schalten Sie das Produkt
bitte aus und aktivieren Sie den Sperr-Mode (oder schrauben Sie den
Batteriedeckel ab), um eine versehentliche Aktivierung und Gefahren durch
übermäßige Hitze zu vermeiden. Alternativ können Sie auch die Batterie
entfernen, um Schäden durch auslaufende Batterien zu vermeiden.
9. Setzen Sie das Produkt NICHT über einen längeren Zeitraum Temperaturen
über +60°C aus, da sonst die Gefahr Einer Explosion oder Verbrennung
10. Bitte laden Sie das Produkt mit dem Original-Ladekabel auf, um die
Lebensdauer des Akkus nicht zu verkürzen.
11. Bitte laden Sie das Produkt alle 6 Monate auf, wenn es über einen
längeren Zeitraum nicht benutzt wird.
12. Nehmen Sie dieses Produkt NICHT auseinander und modizieren
Sie es nicht, da es dadurch beschädigt wird und Die Produktgarantie
erlischt. Vollständige Informationen zur Garantie nden Sie im Abschnitt
"Garantiebedingungen" in dieser Bedienungsanleitung.
Die unsachgemäße Verwendung des Akkus kann zu schweren Akkuschäden
oder Sicherheitsrisiken wie Verbrennung oder Explosion führen. Verwenden
Sie den Akku NICHT, wenn seine Verpackung beschädigt ist oder wenn
sein Entladestrom nicht zu Ihrem Produkt passt. Zerlegen, durchstechen,
zerschneiden, zerquetschen, verbrennen Sie den Akku NICHT! Schließen Sie
den Akku NICHT kurz. Mischen Sie NICHT Akkus verschiedener Marken oder
Typen. Wenn Sie ein Auslaufen, einen ungewöhnlichen Geruch oder eine
Verformung feststellen, stellen Sie die Verwendung des Akkus sofort ein und
entsorgen Sie ihn ordnungsgemäß. Entsorgen Sie das Gerät/den Akku in
Übereinstimmung mit den geltenden örtlichen Gesetzen und Vorschriften.
Einsetzen / Entfernen des Akkus
Legen Sie die Batterie/den Akku - wie in der Abbildung gezeigt - nach dem
Abschrauben des Batteriefachdeckels ein bzw. nehmen sie ihn heraus und
schrauben den Deckel wieder fest. Bitte entfernen Sie die Isolierfolie vor
1. Vergewissern Sie sich, dass die Batterie mit dem negativen Ende in
Richtung des Batteriefachdeckels eingelegt ist. Das Produkt funktioniert
nicht, wenn die Batterie falsch eingelegt ist.
2. Wenn die Akkuspannung niedrig ist, verwenden Sie das Produkt nicht
mehr und laden Sie den Akku so schnell wie möglich auf, um Schäden zu
Improper use of the battery may result in severe battery damage or safety
hazards such as combustion or explosion. DO NOT use the battery if its wrapper
is damaged or if its discharge current does not match your product. DO NOT
disassemble, puncture, cut, crush, incinerate or short-circuit the battery. DO
NOT mix the batteries of dierent brands or types. If any leakage, abnormal
odor, or deformation is noticed, stop using the battery immediately and dispose
of it properly. Dispose of the device/batteries in accordance with applicable local
1. This product is intended for use by adults aged 18 and over. Please keep
this product out of the reach of children.
2. CAUTION! Possible dangerous radiation! DO NOT stare directly into the
light beam or shine the light directly into the eyes of anyone!
3. The product will generate massive heat during prolonged operation.
Please exercise caution during use. It is recommended not to use high
brightness levels for extended periods to prevent burns and product
4. DO NOT cover the product or put it close to other objects, as this may
cause damage to the product or accidents due to high temperatures.
5. DO NOT use the product to illuminate ammable or explosive materials,
as the high heat may lead to combustion or explosion.
6. Please use the product in a standard manner to avoid accidents in the
event of product failure.
7. DO NOT submerge the product into any liquid when it is hot. Doing so
may cause irreparable damage to the light due to the dierence of air
pressure inside and outside.
8. When the product is placed in an enclosed or ammable environment
such as a pocket or backpack, or when it is left unused for an extended
period, please turn o the product and activate the Lockout Mode (or
unscrew the battery cap) to avoid accidental activation and dangers
caused by excessive heat. Alternatively, remove the battery to prevent
damage from battery leakage.
9. DO NOT expose the product to temperatures above 60°C (140°F) for a
prolonged time, as this poses a risk of battery explosion or combustion.
10. Please recharge the product with the original charging cable to avoid
shortening the lifespan of the battery.
11. Please recharge the product every 6 months when left unused for a
12. DO NOT disassemble or modify this product as doing so will cause
damage to it and render the product warranty invalid. Please refer to the
warranty section in the manual for complete warranty information.
Short press when the light is on
Double press when the light is on
Double press when the light is off
Double press in any status
Long press when the light is off
Short press when the light is off
Long press when the light is on
Battery Installation / Removal
As illustrated, after unscrewing the battery cap, insert / remove the battery
and screw to tighten the cap. Please remove the insulation lm before the
1. Ensure the battery is inserted with the negative end facing towards the
battery cap. The product will not work if the battery is incorrectly inserted.
2. When the power level is low, please stop using the product and recharge
the battery as soon as possible to prevent damage.
The product is equipped with an intelligent charging system. Please charge
the product before the rst use.
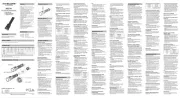
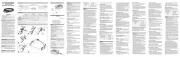
Power Connection: As illustrated, uncap the USB protection cover and use
the USB cable to connect an external power supply (e.g. an adapter or other
charging devices) to the charging port to begin the charging process. The
charging time is approx. 2 hours 10 minutes (charged via a 9V/2A adapter).
Charging Indication: During the charging process, the power indicators
will transition gradually from ashing to a steady light, one by one,
displaying the battery level. When the battery is fully charged, the 4 power
indicators will become steadily turned on. When fully charged, the standby
time is approx. 12 months.
Power Button / ZOOM Button
The Power Button is used for turning on / o the light and adjusting
brightness levels. The ZOOM Button is designed for switching between
Primary Light (Neutral White Light)
On: When the light is o, short press the Power Button to turn it on.
O: When the light is on, long press the Power Button to turn it o.
When there is no operation after the light has been turned on for 3 seconds,
short press the Power Button to turn it o.
Brightness Level Adjustment
Short press the Power Button within 3 seconds of turning on the primary
light to cycle through the following brightness levels: LOW – MID – HIGH.
Spotlight / Floodlight Adjustment
The product features a spotlight / oodlight adjustment function, allowing
users to switch between focused and wide beam at a certain brightness level.
• When the light is on, press and hold the ZOOM Stepless Adjustment:
Button to adjust the output ratio of the spotlight and oodlight. Release
• When the light is on, short press the ZOOM Button Quick Adjustment:
to cycle through the following sequence: Mixed Light – Floodlight –
Note: The product can memorize the output ratio of stepless adjustment.
• If the beam was switched by quick adjustment, when the headlamp is
reactivated, it will directly access LOW of the Mixed Light.
• If the beam was switched by stepless adjustment, when the headlamp is
reactivated, it will automatically access the previous memorized output
ratio of the spotlight and oodlight.
Die HC75 UHE ist mit einem intelligenten Ladesystem ausgestattet. Laden
Sie den Akku vor dem ersten Gebrauch auf.
Stromanschluss: Nehmen Sie -wie abgebildet - die USB-Schutzkappe ab
und schließen Sie mit dem USB-Kabel eine externe Stromversorgung (z.B.
einen Adapter oder andere Ladegeräte) an den Ladeanschluss an, um den
Ladevorgang zu starten. Die Ladezeit beträgt ca. 2 Stunden 10 Minuten
(aufgeladen über einen 9V/2A-Adapter).
Anzeige des Ladevorgangs: Während des Ladevorgangs gehen die LEDs
allmählich von Blinken zu Dauerlicht über und zeigen so den Ladestand an.
Wenn der Akku vollständig aufgeladen ist, leuchten die 4 LEDs durchgängig.
Bei voller Ladung beträgt die Standby-Zeit ca. 12 Monate.
EIN-/AUS-Taste / ZOOM-Taste
Die EIN-/AUS-Taste dient zum Ein- und Ausschalten des Lichts und zum
Einstellen der Helligkeit. Die ZOOM-Taste dient zum Umschalten zwischen
Primärlicht (Neutral-weißes Licht)
EIN: Wenn das Licht ausgeschaltet ist, drücken Sie kurz auf die EIN-/AUS-
Taste, um es einzuschalten.
AUS: Wenn das Licht eingeschaltet ist, drücken Sie lange auf die EIN-/AUS-
Taste, um es auszuschalten.
Wenn nach dem Einschalten des Lichts für 3 Sekunden keine Aktion erfolgt,
drücken Sie kurz auf die EIN-/AUS-Taste, um es auszuschalten.
Einstellen der Helligkeitsstufe
Drücken Sie innerhalb von 3 Sekunden nach dem Einschalten des
Hauptlichts kurz auf die EIN-/AUS-Taste, um zwischen den folgenden
Helligkeitsstufen zu wechseln: „LOW“ – „MID“ – „HIGH“.
Einstellung des Spotlicht / Flutlichts
Das Produkt verfügt über eine Spotlicht-/Flutlicht-Einstellfunktion, die es
dem Benutzer ermöglicht, bei einer bestimmten Helligkeitsstufe zwischen
fokussiertem und breitem Lichtstrahl zu wechseln.
• Halten Sie bei eingeschaltetem Licht die Stufenlose Einstellung:
ZOOM-Taste gedrückt, um das Leistungsverhältnis von Spotlicht und
Flutlicht einzustellen. Zur Bestätigung loslassen.
• Schnelleinstellung: Wenn das Licht eingeschaltet ist, drücken Sie kurz
wiederholt die ZOOM-Taste, um die folgende Sequenz zu durchlaufen:
„Misch-Licht“ – „Flutlicht“ – „Spotlicht“.
Hinweis: Das Produkt kann das Leistungsverhältnis der stufenlosen
• Wenn das Licht durch eine Schnellverstellung umgeschaltet wurde, greift
das Spotlicht bei erneuter Aktivierung direkt auf LOW des Misch-Lichts zu.
• Wurde das Licht durch stufenlose Einstellung umgeschaltet, greift die
Lampe beim Wiedereinschalten automatisch auf das zuvor gespeicherte
Leistungsverhältnis von Spotlicht und Flutlicht zu.
Wenn das Licht eingeschaltet ist, drücken Sie zweimal die EIN-/AUS-Taste,
um den TURBO-Mode des Misch-Lichts zu aktivieren.
1. Die TURBO-Stufe wird heruntergeschaltet, um eine Überhitzung zu
vermeiden und die Lebensdauer des Akkus zu verlängern, wenn sie über
einen längeren Zeitraum läuft.
2. In der TURBO-Stufe ist das Leistungsverhältnis von Spotlicht und Flutlicht
fest eingestellt und kann nicht verändert werden.
Wenn das Licht ausgeschaltet ist, drücken Sie zweimal die EIN-/AUS-Taste,
um das ULTRALOW zu aktivieren.
Hinweis: Auf der ULTRALOW-Stufe ist das Leistungsverhältnis von
Scheinwerfer und Flutlicht fest eingestellt und kann nicht verändert werden.
• Wenn das Licht ausgeschaltet ist, drücken Sie lange auf die ZOOM-Taste,
um auf die rote LOW-Stufe zuzugreifen.
• Drücken Sie innerhalb von 3 Sekunden nach dem Einschalten des roten
Lichts kurz die EIN-/AUS-Taste, um zwischen Rot LOW und Rot HIGH zu
Wenn nach dem Einschalten des roten Lichts für 3 Sekunden keine Bedienung
erfolgt, drücken Sie kurz auf die Ein/Aus-Taste, um es auszuschalten.
Sondermodi (SOS / BEACON / LANGSAMES BLINKEN)
• Wenn sich die Lampe in einem beliebigen Status bendet, drücken Sie
zweimal die ZOOM-Taste, um SOS aufzurufen.
• Drücken Sie innerhalb von 3 Sekunden nach dem Einschalten des Sonder-
Mode kurz die EIN-/AUS-Taste, um die folgende Sequenz zu durchlaufen:
„SOS“ – „BEACON“ – „LANGSAMES BLINKEN“. Drücken Sie die ZOOM-
Taste erneut, um zum vorherigen Status zurückzukehren.
• Wenn nach dem Einschalten des Sonder-Mode für 3 Sekunden keine
Aktion erfolgt, drücken Sie kurz die EIN-/AUS-Taste, um den Mode
Wenn die Lampe ausgeschaltet ist, halten Sie beide Tasten 2 Sekunden
lang gedrückt, bis die Stirnlampe dreimal blinkt, um den Zugri auf den
Sperr-Mode anzuzeigen. Im Sperr-Mode sind keine Helligkeitsstufen oder
Sondermodi verfügbar, und die Stirnlampe blinkt einmal, um diesen Status
anzuzeigen, wenn eine der Tasten gedrückt wird. Wenn Sie sich im Sperr-
Mode benden, halten Sie beide Tasten erneut 2 Sekunden lang gedrückt,
bis ULTRALOW aktiviert ist, um den Entsperrstatus anzuzeigen.
Hinweis: Die Stirnlampe wird automatisch entriegelt, wenn der Akku im
Sperr-Mode geladen oder ausgetauscht wurde.
Wenn das Licht ausgeschaltet ist, drücken Sie kurz auf die ZOOM-Taste. Die
entsprechenden LEDs leuchten nacheinander auf und schalten sich nach 2
Hinweis: Der Akku sollte aufgeladen oder ausgetauscht werden, wenn die
Lichtleistung nachlässt oder das Spotlicht nicht mehr reagiert, weil es zu
Status der LEDs Power Level
0% – 25% (Bitte laden Sie den Akku sobald
wie möglich auf oder tauschen Sie ihn aus.)
Anschließen an eine externe Stromversorgung
Das Produkt kann direkt über ein externes Netzteil betrieben werden.
Wenn die Stirnlampe an eine externe Stromversorgung angeschlossen wird,
beginnt sie automatisch mit dem Auaden und verwendet vorrangig die
Anschließen: Wenn die Stirnlampe eingeschaltet ist, schließen Sie ein
Ende des USB-Kabels an die Stirnlampe und das andere Ende an eine
Stromversorgung an. Die Stirnlampe blinkt einmal, um den Benutzer zu
Trennen Sie der Verbindung: Wenn die Stirnlampe eingeschaltet ist,
ziehen Sie das USB-Kabel ab. Die Stirnlampe blinkt zweimal (jeweils dreimal)
und hört auf zu laden. Ab diesem Zeitpunkt wird die Stirnlampe automatisch
über den Akku mit Strom versorgt.
Entsorgung von Elektro- und Elektronikgeräten
Die durchgestrichene Mülltonne bedeutet, dass Sie gesetzlich
verpichtet sind, diese Geräte einer vom unsortierten Siedlungsabfall
getrennten Erfassung zuzuführen. Die Entsorgung über die
Restmülltonne oder die gelbe Tonne ist untersagt. Enthalten die Produkte
Batterien oder Akkus, die nicht fest verbaut sind, müssen diese vor der
Entsorgung entnommen und getrennt als Batterie entsorgt werden.
1. Ce produit est destiné à être utilisé par des adultes âgés de 18 ans et
plus. Veuillez garder ce produit hors de portée des enfants.
2. ATTENTION ! Risque de rayonnement dangereux ! Ne xez pas
directement le faisceau lumineux et ne projetez pas la lumière
directement dans les yeux de quelqu'un !
3. Le produit génère une chaleur importante en cas de fonctionnement
prolongé. Veuillez faire preuve de prudence pendant l'utilisation.
Il est recommandé de ne pas utiliser des niveaux de luminosité
élevés pendant des périodes prolongées an d'éviter les brûlures et
4. NE PAS couvrir le produit ou le placer à proximité d'autres objets, car
cela pourrait endommager le produit ou provoquer des accidents dus à
des températures élevées.
5. NE PAS utiliser le produit pour éclairer des matériaux inammables ou
explosifs, car la chaleur élevée peut entraîner une combustion ou une
6. Veuillez utiliser le produit de manière appropriée an d'éviter tout
accident en cas de défaillance du produit.
7. NE PAS immerger le produit dans un liquide lorsqu'il est chaud. Cela
risquerait d'endommager irrémédiablement la lampe en raison de la
diérence de pression d'air à l'intérieur et à l'extérieur du tube.
8. Lorsque le produit est placé dans un environnement clos ou
inammable, tel qu'une poche ou un sac à dos, ou lorsqu'il n'est pas
utilisé pendant une période prolongée, veuillez éteindre le produit et
activer le mode verrouillage (ou dévisser le capuchon de la pile) an
d'éviter une activation accidentelle et les dangers causés par une chaleur
excessive. Vous pouvez également retirer la batterie pour éviter tout
dommage dû à une fuite de la batterie.
9. N'exposez PAS le produit à des températures supérieures à 60°C (140°F)
pendant une période prolongée, car cela pose un risque d'explosion ou
de combustion de la batterie.
10. Veuillez recharger le produit avec le câble de charge d'origine pour éviter
de réduire la durée de vie de la batterie.
11. Rechargez le produit tous les 6 mois s'il n'est pas utilisé pendant une
12. NE PAS démonter ou modier ce produit, car cela l'endommagerait et
rendrait la garantie du produit invalide. Veuillez-vous référer à la section
garantie du manuel pour des informations complètes sur la garantie.
⚠ Sécurité de la batterie
Une utilisation inappropriée de la batterie peut entraîner de graves
dommages ou des risques de sécurité tels que la combustion ou l'explosion.
NE PAS utiliser la batterie si son emballage est endommagé ou si son
courant de décharge ne correspond pas à votre produit. NE PAS démonter,
percer, couper, écraser, incinérer ou court-circuiter la batterie. NE PAS
mélanger des piles de marques ou de types diérents. En cas de fuite,
d'odeur anormale ou de déformation, cessez immédiatement d'utiliser la
batterie et recyclez-la de manière appropriée. Recyclez l'appareil/les piles
conformément aux lois et réglementations locales en vigueur.
Installation / désinstallation de la batterie
Comme illustré, après avoir dévissé le capuchon de la batterie, insérez /
retirez la batterie et vissez le capuchon pour le resserrer. Veuillez retirer le
papier de protection avant la première utilisation.
1. Veillez à ce que la pile soit insérée avec l'extrémité négative orientée
vers le capuchon. Le produit ne fonctionnera pas si la batterie n'est pas
2. Lorsque le niveau de puissance est faible, arrêtez d'utiliser le produit et
rechargez la batterie dès que possible an d'éviter tout dommage.
Le produit est équipé d'un système de charge intelligent. Veuillez charger le
produit avant la première utilisation.
Connexion à une source d’alimentation : Comme illustré, retirez le
couvercle de protection USB et utilisez le câble USB pour connecter une
source d'alimentation externe (par exemple un adaptateur ou d'autres
dispositifs de chargement) au port de chargement an de commencer le
processus de chargement. Le temps de charge est d'environ 2 heures et 10
minutes (avec un adaptateur 9V/2A).
Indication de charge : Pendant le processus de charge, les indicateurs
d'alimentation passent progressivement du clignotement à une lumière xe,
un par un, pour indiquer le niveau de la batterie. Lorsque la batterie est
entièrement chargée, les 4 indicateurs d'alimentation s'allument en continu.
Lorsque la batterie est complètement chargée, l'autonomie en veille est
Bouton d’alimentation / Bouton Zoom
Le bouton d'alimentation sert à allumer/éteindre la lumière et à régler les
niveaux de luminosité. Le bouton ZOOM permet de basculer entre le mode
Lumière primaire (lumière blanche neutre)
On : Lorsque la lumière est éteinte, appuyez brièvement sur le bouton
d'alimentation pour l'allumer.
O : lorsque la lumière est allumée, appuyez longuement sur le bouton
d'alimentation pour l'éteindre.
Si aucune opération n'est eectuée après que la lumière a été allumée
pendant 3 secondes, appuyez brièvement sur le bouton d’alimentation pour
Réglage du niveau de luminosité
Appuyez brièvement sur le bouton d'alimentation dans les 3 secondes qui
suivent l'allumage de la lumière primaire pour faire déler les niveaux de
luminosité suivants : FAIBLE - MOYENNE - ÉLEVÉE.
Réglage Spotlight (spot) / Floodlight (projecteur)
Le produit est doté d'une fonction de réglage des modes spotlight /
oodlight, qui permet aux utilisateurs de passer d'un faisceau focalisé à un
faisceau large à un certain niveau de luminosité.
• Lorsque la lumière est allumée, appuyez sur le Réglage progressif :
bouton ZOOM et maintenez-le enfoncé pour régler le ratio spotlight et
oodlight. Relâcher pour conrmer.
• Lorsque la lumière est allumée, appuyez brièvement Réglage rapide :
sur le bouton ZOOM pour passer de l'un à l'autre dans la séquence
suivante : Lumière mixte - Floodlight - Spotlight.
Remarque : Le produit peut mémoriser le ratio du réglage progressif.
• Si le faisceau a été changé par un réglage rapide, lorsque la lampe
frontale est réactivée, elle accède directement au niveau FAIBLE de la
• Si le faisceau a été changé par un réglage progressif, lorsque la
lampe frontale est réactivée, elle accède automatiquement au ratio
Activation du niveau TURBO
Lorsque la lumière est allumée, appuyez deux fois sur le bouton
d'alimentation pour accéder au niveau TURBO de la lumière mixte.
1. Le niveau TURBO diminue pour éviter la surchaue et prolonger la durée
de vie de la batterie lorsqu'il fonctionne pendant une période prolongée.
2. Au niveau TURBO, le rapport de sortie Spotlight / Floodlight est xe et ne
Activation du niveau ULTRALOW
Lorsque la lumière est éteinte, appuyez deux fois sur le bouton
d'alimentation pour accéder au niveau ULTRALOW.
Remarque : au niveau ULTRALOW, 1. le rapport de sortie Spotlight /
Floodlight est xe et ne peut pas être ajusté.
• Lorsque la lumière est éteinte, appuyez longuement sur le bouton ZOOM
pour accéder à la lumière rouge FAIBLE.
Thanks for purchasing NITECORE!
Please read this manual carefully before using the product and
This manual contains important safety information and operating
instructions. Please keep it for future reference.
In case of updates, please refer to the latest version available on
Rechargeable Li-ion Battery
21700 3.6V Y (Recommended)
Rechargeable Li-ion Battery
(Discharge Current Over 8A)
Rechargeable Li-ion Battery
(Discharge Current Below 8A)
Rechargeable Li-ion Battery
21700 3.6V/3.7V N (Incompatible)
When the light is on, double press the Power Button to access TURBO of the
1. The TURBO level will step down to prevent overheating and prolong
battery life when it runs for a prolonged period.
2. At TURBO level, the output ratio of the spotlight and oodlight is xed
When the light is o, double press the Power Button to access ULTRALOW.
Note: At ULTRALOW level, the output ratio of the spotlight and oodlight is
xed and cannot be adjusted.
• When the light is o, long press the ZOOM Button to access Red LOW.
• Short press the Power Button within 3 seconds of turning on the red light
to switch between Red LOW and Red HIGH.
• When there is no operation after the red light has been turned on for 3
seconds, short press the Power Button to turn it o.
Special Modes (SOS / BEACON / SLOW FLASHING)
• When the headlamp is in any status, double press the ZOOM Button to
• Short press the Power Button within 3 seconds of turning on the special
mode to cycle through the following sequence: SOS – BEACON – SLOW
FLASHING. Double press the ZOOM Button again to return to the previous
• When there is no operation after the special mode has been turned on for
3 seconds, short press the Power Button to turn it o.
When the headlamp is o, long press both buttons for 2 seconds until the
headlamp ashes 3 times to indicate access to the Lockout Mode. In Lockout
Mode, any brightness levels or special modes are unavailable, and the
headlamp will ash once to indicate this status when pressing either button.
When in the Lockout Mode, long press both buttons for 2 seconds again
until ULTRALOW is activated to indicate the unlock status.
Note: The headlamp will be automatically unlocked when charging or
replacing the battery in the Lockout Mode.
When the light is o, short press the ZOOM Button, the corresponding
power indicators will turn on sequentially and turn o after 2 seconds.
Note: The battery should be recharged or replaced when the output
appears to be dim or the headlamp becomes unresponsive due to low
Status of Indicators Power Level
0% – 25% (Please recharge or replace
the battery as soon as possible)
Connecting to an External Power Supply
The product can be directly powered by an external power supply. When
connected to an external power supply, the headlamp will automatically start
charging and prioritize using the external power supply.
Connect: When the headlamp is on, connect one end of the USB cable to
the headlamp and the other end to a power supply. The headlamp will ash
Disconnect: When the headlamp is on, disconnect the USB cable. The
headlamp will ash twice (3 times each) and stop charging. At this point, the
headlamp will be automatically powered by its battery.
• Appuyez brièvement sur le bouton d'alimentation dans les 3 secondes qui
suivent l'allumage de la lumière rouge pour passer de la lumière rouge
FAIBLE à la lumière rouge HAUTE.
• S'il n'y a pas d'opération après que la lumière rouge ait été allumée
pendant 3 secondes, appuyez brièvement sur le bouton d'alimentation
Modes spéciaux (SOS / BALISE / FLASH LENT)
• Lorsque la lampe frontale est dans n'importe quel état, appuyez deux fois
sur le bouton ZOOM pour accéder au mode SOS.
• Appuyez brièvement sur le bouton d’alimentation dans les 3 secondes qui
suivent l'activation du mode spécial pour passer à la séquence suivante :
SOS - BALISE - CLIGNOTEMENT LENT. Appuyez à nouveau deux fois sur
le bouton ZOOM pour revenir à l'état précédent.
• Si aucune opération n'est eectuée après que le mode spécial a été activé
pendant 3 secondes, appuyez brièvement sur le bouton d’alimentation
Verrouillage / Déverrouillage
Lorsque la lampe frontale est éteinte, appuyez longuement sur les deux
boutons pendant 2 secondes jusqu'à ce que la lampe frontale clignote 3 fois
pour indiquer l'accès au mode verrouillage. En mode verrouillage, tous les
niveaux de luminosité ou modes spéciaux sont indisponibles, et le faisceau
lumineux clignote une fois pour indiquer cet état lorsque l'on appuie sur
l'un des boutons. En mode verrouillage, appuyez longuement sur les deux
boutons pendant 2 secondes jusqu'à ce que le niveau ULTRALOW soit activé
pour indiquer l'état de déverrouillage.
Remarque : la lampe frontale sera automatiquement déverrouillée lors du
chargement ou du remplacement de la batterie en mode verrouillage.
Lorsque la lumière est éteinte, appuyez brièvement sur le bouton ZOOM,
les indicateurs de puissance correspondants s'allument successivement et
s'éteignent au bout de 2 secondes.
Remarque : la batterie doit être rechargée ou remplacée lorsque la
luminosité est faible ou que la lampe frontale ne répond plus en raison d'une
Statut des indicateurs Niveau de puissance
0% – 25% (Rechargez ou remplacez la
batterie dès que possible.)
Connexion à une source d’alimentation externe
Le produit peut être directement alimenté par une source d'énergie externe.
Lorsqu'elle est connectée à une source d'alimentation externe, la lampe
frontale commence automatiquement à se charger et donne la priorité à
l'utilisation de la source d'alimentation externe.
Connecter : Lorsque la lampe frontale est allumée, connectez une
extrémité du câble USB à la lampe frontale et l'autre extrémité à une source
d'alimentation. La lampe frontale clignote une fois pour informer l'utilisateur.
Déconnexion : Lorsque la lampe frontale est allumée, débranchez le câble
USB. La lampe frontale clignotera deux fois (3 fois chacune) et cessera de se
charger. À ce moment-là, la lampe frontale est automatiquement alimentée
1. Устройство предназначено для использования лицами в возрасте от
18 лет. Пожалуйста, храните его в недоступном для детей месте.
2. ВНИМАНИЕ! Возможно опасное излучение! НЕ смотрите
непосредственно на луч фонаря и НЕ направляйте луч кому-либо в
глаза (как людям, так и животным)!
3. При длительной работе устройство будет сильно нагреваться.
Пожалуйста, соблюдайте осторожность при эксплуатации.
Рекомендуется не использовать фонарь на высоких уровнях яркости
в течение длительного времени во избежание потенциальных
ожогов и повреждения устройства.
4. НЕ накрывайте чем-либо устройство, а также НЕ размещайте
предметы рядом с его головной частью, так как это может привести
к его повреждению или несчастным случаям из-за воздействия
НЕ используйте устройство для освещения легковоспламеняющихся
или взрывоопасных материалов, так как высокие температуры могут
привести к возгоранию или взрыву.
6. Пожалуйста, используйте устройство стандартным образом и в
соответствии с текущим руководством во избежание несчастных
случаев при его неисправности.
7. НЕ погружайте фонарь в жидкость, когда он нагрет. Это может
привести к его необратимому повреждению вследствие разницы
между давлением воздуха внутри и снаружи корпуса.
8. Если устройство помещено в закрытое или легковоспламеняющееся
пространство, например, в карман или рюкзак, или если оно не
используется в течение длительного периода времени, выключите
его и активируйте режим блокировки (или открутите крышку
аккумуляторного отсека) во избежание случайной активации
и, как следствие, несчастных случаев в результате перегрева.
Также рекомендуем извлечь аккумулятор из устройства для
предотвращения его потенциальной утечки.
9. НЕ подвергайте устройство воздействию температур свыше 60°C
(140°F) в течение длительного времени, так как это может стать
причиной взрыва, а также возгорания аккумулятора.
10. Пожалуйста, заряжайте устройство при помощи оригинального
зарядного кабеля во избежание сокращения срока службы
11. Пожалуйста, не забывайте заряжать устройство каждые 6 месяцев,
если оно не используется в течение длительного периода времени.
12. НЕ разбирайте устройство и НЕ вносите какие-либо изменения в его
конструкцию, так как это приведет к его повреждению и аннулирует
гарантию на продукт. Полную информацию о гарантии можно найти
в разделе «Гарантийного обслуживания» текущего руководства.
⚠ Безопасность аккумулятора
Неправильная эксплуатация аккумулятора может привести к его
серьезному повреждению или возникновению угроз безопасности,
таких как возгорание или взрыв. НЕ используйте элемент питания,
если его оболочка была повреждена или если его ток разряда не
подходит для вашего устройства. ЗАПРЕЩЕНО разбирать, прокалывать,
разрезать, раздавливать и поджигать аккумулятор, а также подвергать
его короткому замыканию. НЕ используйте вместе элементы питания
разных типов и от разных брендов. При обнаружении утечки, необычного
запаха или деформации аккумулятора немедленно прекратите его
использование и утилизируйте его надлежащим образом. Утилизируйте
устройство / элементы питания в соответствии с действующим в вашем
регионе законодательством и принятыми правилами.
Установка / Извлечение аккумулятора
Открутите крышку аккумулятора, после чего установите / извлеките
аккумулятор, как это показано на иллюстрации, после чего закрутите
заднюю крышку обратно. Пожалуйста, не забудьте удалить
изоляционную пленку перед эксплуатацией впервые.
1. Убедитесь, что аккумулятор установлен отрицательным полюсом
к крышке аккумулятора. Устройство не будет работать, если
аккумулятор установлен неправильно.
2. Если уровень заряда низкий, прекратите эксплуатацию устройства и
как можно скорее зарядите аккумулятор, чтобы предотвратить его
products are warranted for quality. Any DOA / defective
product can be exchanged for a replacement through a local distributor/
dealer within 15 days of purchase. After that, all defective / malfunctioning
products can be repaired free of charge within 60 months
from the date of purchase. Beyond 60 months, a limited warranty applies,
covering the cost of labor and maintenance, but not the cost of accessories
The warranty will be nullied if
1. the product(s) is/are broken down, reconstructed and/or modied by
2. the product(s) is/are damaged due to improper use (e.g. reversed polarity
3. the product(s) is/are damaged due to battery leakage.
For the latest information on NITECORE
products and services, please contact
distributor or send an email to service@nitecore.com