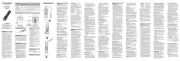
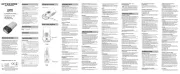
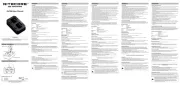
Repellent Mat Replacement
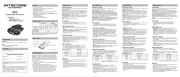
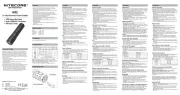
• Three functions: lighting, mosquito repelling and power bank
• Multiple color temperatures (2,700K-6,500K) available in lighting function
• Max output of 3,000 lumens
• Max throw of 120 meters
• Designedwithredlightilluminationfornightvisionpreservationandredlightashing
• Powered by a built-in 18,000mAh battery to provide a max runtime of 130 hours
• Serves as a power bank delivering a max output of 20W with a built-in intelligent
Li-ion battery charge/discharge circuit
• Designed with a two-way USB-C port and a USB-A port for output; QC fast charging
• Two rotary knobs for stepless brightness and color temperature adjustment
• 4 power indicators for battery level indication
• Made from sturdy and durable plastic material
• Equipped with a wide 360° rotary handle featuring a magnetic base and a 1/4" screw
• Waterproof and dustproof rating in accordance with IP66
• Impact resistant to 1 meter
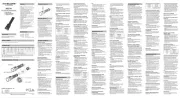
HIGHEST LOWEST CONSTANT-ON SLOW FLASHING
3,000 Lumens 50 Lumens 25 Lumens 25 Lumens
Note: The stated data is measured by using the built-in 18,000mAh rechargeable Li-
ionbattery(3.6V)inaccordancewiththeinternationalashlighttestingstandardsANSI/
PLATO FL 1-2019 at an ambient temperature of 26°C (79°F) from the NITECORE Lab.
Thedatamayvaryinrealworlduseduetodierentenvironmentalconditions.
* This product is equipped with a thermal protection function, which
automatically regulates the output of the product according to the working condition
to maintain the optimal performance.
1. Dieses Produkt ist für den Gebrauch durch Erwachsene ab 18 Jahren bestimmt. Bitte
bewahren Sie dieses Produkt außerhalb der Reichweite von Kindern auf.
2. Wenn das Produkt in der Nähe von Kindern verwendet wird, ist eine strenge
Überwachung erforderlich, um Verbrennungen zu vermeiden.
3. VORSICHT! Mögliche gefährliche Strahlung! Blicken Sie NICHT direkt in den
Lichtstrahl und leuchten Sie niemandem direkt in die Augen!
4. Das Produkt erzeugt bei längerem Betrieb große Hitze. Bitte seien Sie bei der
Verwendung vorsichtig. Es wird empfohlen, hohe Helligkeitsstufen nicht über längere
Zeit zu verwenden, um Verbrennungen und Produktschäden zu vermeiden.
5. Decken Sie das Gerät NICHT ab und stellen Sie es NICHT in die Nähe anderer
Gegenstände, da dies zu Schäden am Gerät oder zu Unfällen aufgrund der hohen
Temperaturen führen kann.
6. Verwenden Sie das Produkt NICHT zur Beleuchtung von brennbaren oder explosiven
Materialien, da die hohe Hitze zu Verbrennungen oder Explosionen führen kann.
7. Bitte verwenden Sie das Produkt auf normale Weise, um Unfälle im Falle eines
Produktausfalls zu vermeiden.
8. WenndasProduktineinergeschlossenenoderentammbarenUmgebung,wiez.B.
einer Tasche oder einem Rucksack, platziert wird oder wenn es für einen längeren
Zeitraumnichtbenutztwird,drehenSiebittedenGriüberdieDrehknöpfe,umeine
versehentliche Aktivierung und Gefahren durch übermäßige Hitze zu vermeiden.
9. Legen Sie das Produkt NICHT ins Wasser.
10.SteckenSieKEINEFinger,MetalleoderFremdkörperindieÖnungenoderindas
Fach für die Abstoßungsmatte.
11. Setzen Sie das Gerät NICHT über einen längeren Zeitraum Temperaturen über 60°C aus.
12.DiesesProduktdarfNICHTzerlegtodermodiziertwerden,dadieszuSchädenführt
unddieProduktgarantieungültigwird.VollständigeInformationenzurGarantienden
Sie im Abschnitt „Einzelheiten zur Garantie“ in dieser Anleitung.
Die unsachgemäße Verwendung von Geräten mit eingebauten Li-Ionen-Akkus kann zu
schweren Akkuschäden oder Sicherheitsrisiken wie Verbrennung oder Explosion führen.
Verwenden Sie das Gerät NICHT, wenn es beschädigt ist. Zerlegen, durchstechen,
zerschneiden, zerquetschen oder verbrennen Sie das Gerät NICHT. Wenn Sie ein Leck
oder einen ungewöhnlichen Geruch feststellen, stellen Sie die Verwendung des Geräts
sofort ein. Entsorgen Sie das Gerät/die Batterien in Übereinstimmung mit den geltenden
örtlichen Gesetzen und Vorschriften.
Dieses Produkt ist mit einem intelligenten Ladesystem ausgestattet. Bitte laden Sie das
Produkt vor dem ersten Gebrauch auf.
Stromanschluss: Entfernen Sie die USB-Schutzabdeckung und verwenden Sie das USB-
C-Ladekabel, um ein externes Netzteil (z. B. einen Adapter oder andere Ladegeräte)
an den USB-C-Anschluss anzuschließen und den Ladevorgang zu starten. Die Ladezeit
beträgtca.3Stunden40Minuten(Eingang:9V/2,22A).BeivollständigerAuadung
beträgt die Standby-Zeit ca. 12 Monate.
Anzeige des Ladevorgangs: Während des Ladevorgangs gehen die Leistungsanzeigen
schrittweise von Blinken zu Dauerlicht über und zeigen so den Batteriestand an. Wenn
der Akku vollständig aufgeladen ist, leuchten die 4 LEDs dauerhaft.
Hinweis: Das Produkt kann während des Ladevorgangs verwendet werden, wobei die
externe Stromversorgung Vorrang hat.
EIN: Wenn die Beleuchtungsfunktion ausgeschaltet ist, drehen Sie den Drehknopf
Beleuchtung im Uhrzeigersinn, bis ein „Klick“ zu hören ist, um auf die niedrigste
Helligkeitsstufe der aktuellen Farbtemperatur zuzugreifen.
Improper use of devices with built-in Li-ion batteries may result in severe battery damage or
safety hazards such as combustion or explosion. DO NOT use the device if it is damaged. DO
NOT disassemble, puncture, cut, crush, or incinerate the device. If any leakage or abnormal
odor is noticed, stop using the device immediately. Dispose of the device/batteries in
accordance with applicable local laws and regulations.
1. This product is intended for use by adults aged 18 and over. Please keep this product
out of the reach of children.
2. Close supervision is necessary to avoid burns when the product is used near children.
3. CAUTION! Possible dangerous radiation! DO NOT stare directly into the light beam or
shine the light directly into the eyes of anyone!
4. The product will generate massive heat during prolonged operation. Please exercise
caution during use. It is recommended not to use high brightness levels for extended
periods to prevent burns and product damage.
5. DO NOT cover the product or put it close to other objects, as this may cause damage
to the product or accidents due to high temperatures.
6. DONOTusetheproducttoilluminateammableorexplosivematerials,asthehigh
heat may lead to combustion or explosion.
7. Please use the product in a standard manner to avoid accidents in the event of
8. Whentheproductisplacedinanenclosedorammableenvironmentsuchasapocketor
backpack, or when it is left unused for an extended period, please rotate the handle over
the rotary knobs to avoid accidental activation and dangers caused by excessive heat.
9. DO NOT place the product in water.
10.DONOTinsertngers,metalsorforeignmattersintotheportsortherepellentmat
11. DO NOT expose the product to temperatures above 60°C (140°F) for a prolonged time.
12. DO NOT disassemble or modify this product as doing so will cause damage to it
and render the product warranty invalid. Please refer to the warranty section in the
manual for complete warranty information.
This product is equipped with an intelligent charging system. Please charge the product
Power Connection: uncap the USB protection cover and use the USB-C charging cable
to connect an external power supply (e.g. an adapter or other charging devices) to
the USB-C port to begin the charging process. The charging time is approx. 3 hours 40
minutes (input: 9V/2.22A). When fully charged, the standby time is approx. 12 months.
Charging Indication: During the charging process, the power indicators will transition
graduallyfromashingtoasteadylight,onebyone,displayingthebatterylevel.When
the battery is fully charged, the 4 power indicators will become steadily turned on.
Note: The product can be used while charging, with priority given to the external power supply.
On:WhentheLightingFunctioniso,rotatetheLightingKnobclockwiseuntila"click"is
heard to access the LOWEST brightness level of the current color temperature.
O: When the Lighting Function is on, rotate the Lighting Knob counterclockwise until a
"click"isheardtoturnito.
Brightness Level Adjustment
When the Lighting Function is on, rotate the Lighting Knob to adjust the brightness levels
Up: Rotate the Lighting Knob clockwise to smoothly increase the brightness level until it
reaches the HIGHTEST level.
Down: Rotate the Lighting Knob counterclockwise to smoothly decrease the brightness
level until it reaches the LOWEST level.
Color Temperature Adjustment
When the Lighting Function is on, rotate the Color Temperature Knob to adjust the color
• Rotate the Color Temperature Knob clockwise to adjust the color temperature
smoothly through the following sequence: Cool White Light – Neutral White Light –
WarmLight(6,500K→2,700K).
• Rotate the Color Temperature Knob counterclockwise to adjust the color temperature
smoothly through the following sequence: Warm Light – Neutral White Light – Cool
WhiteLight(2,700K→6,500K).
Note: The product is designed with a color temperature memory function. When
reactivated, it will automatically access the previous memorized color temperature.
WhentheLightingFunctionison/o:
• Long press the R Button to access Red CONSTANT-ON.
• When the red light is on, short press the R Button to switch between Red CONSTANT-
ON and Red SLOW FLASHING.
• Whentheredlightison,longpresstheRButtontoturnitoandreturntotheprevious
Mosquito Repelling Function
On: WhentheMosquitoRepellingFunctioniso,shortpressandthenlongpressthe
Repeller Button to access the default High Mode.
O:WhentheMosquitoRepellingFunctionison,longpresstheRepellerButtontoturnito.
• When the Mosquito Repelling Function is on, short press the Repeller Button to switch
between High Mode and Low Mode.
• The Repeller Indicator turns blue constant-on to indicate the High Mode, and turns
green constant-on to indicate the Low Mode.
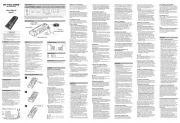
Repellent Mat Replacement
PleasemakesuretheMosquitoRepellingFunctionisturnedoandtheRepellentMat
Compartment has cooled down before replacement. Insert a new repellent mat while
pushing out the used one.
The product can accommodate a NITEOCRE mosquito repellent mat (size: 34mm x 48mm
/ 1.34" x 1.89") with a maximum duration of 6 hours, and two regular mosquito repellent
mats (size: 35mm x 22mm / 1.38" x 0.87").
1. Please insert or remove the repellent mat only after the Mosquito Repelling Function
isturnedoandthedevicehascooleddown.
2. When there is wind, please place the product upwind of the expected protection area.
3. DO NOT cover the Repellent Mat Compartment when using the Mosquito Repelling
4. DO NOT leave the product unattended when it is in use. Stop using the product at
5. It is recommended to use multiple NWL30s together for a larger protection zone.
6. DONOTusetheMosquitoRepellingFunctioninaconnedspace.
7. PleasestoretheproductonlyaftertheMosquitoRepellingFunctionisturnedoand
it has completely cooled down.
AUS: Wenn die Beleuchtungsfunktion eingeschaltet ist, drehen Sie den Drehknopf
Beleuchtung gegen den Uhrzeigersinn, bis ein „Klick“ zu hören ist, um die Funktion
Einstellen der Helligkeitsstufe
Wenn die Beleuchtungsfunktion eingeschaltet ist, drehen Sie den Drehknopf Beleuchtung,
um die Helligkeitsstufen stufenlos einzustellen.
Richtung MAX: Drehen Sie den Drehknopf Beleuchtung im Uhrzeigersinn, um die
Helligkeit stufenlos zu erhöhen, bis sie die höchste Stufe erreicht.
Richtung MINs: Drehen Sie den Drehknopf Beleuchtung gegen den Uhrzeigersinn, um
die Helligkeit stufenlos zu verringern, bis sie die niedrigste Stufe erreicht hat.
Einstellen der Farbtemperatur
Wenn die Beleuchtungsfunktion eingeschaltet ist, drehen Sie den Drehknopf Farbtemperatur,
um die Farbtemperatur stufenlos einzustellen.
• Drehen Sie den Drehknopf Farbtemperatur im Uhrzeigersinn, um die Farbtemperatur
stufenlos in der folgenden Reihenfolge einzustellen: Kalt-Weiß – Neutral-Weiß – Warm-
• Drehen Sie den Drehknopf Farbtemperatur gegen den Uhrzeigersinn, um die
Farbtemperatur stufenlos in der folgenden Reihenfolge einzustellen: Warm-Weiß –
Neutral-Weiß–Kalt-Weiß(2700K→6500K).
Hinweis: Das Produkt ist mit einer Farbtemperatur-Speicherfunktion ausgestattet. Wenn es
wieder aktiviert wird, greift es automatisch auf die zuvor gespeicherte Farbtemperatur zu.
Wenn die Beleuchtungsfunktion ein-/ausgeschaltet ist:
• Drücken Sie lange auf die Taste R, um auf Rot DAUERLICHT zuzugreifen.
• Wenn das rote Licht eingeschaltet ist, drücken Sie kurz auf die Taste R, um zwischen
Rot DAUERLICHT und Rot LANGSAM BLINKEND zu wechseln.
• Wenn das rote Licht eingeschaltet ist, drücken Sie lange auf die R-Taste, um es
auszuschalten und zum vorherigen Status zurückzukehren.
EIN: Wenn die Mückenschutzfunktion ausgeschaltet ist, drücken Sie erst kurz und dann
lange auf die Taste R, um den standardmäßigen HIGH-Mode aufzurufen.
AUS: Wenn die Mückenschutzfunktion eingeschaltet ist, drücken Sie lange auf die Taste
• Wenn die Mückenschutzfunktion eingeschaltet ist, drücken Sie kurz auf die Taste R,
um zwischen dem HIGH und dem LOW-Mode zu wechseln.
• Die Repeller-Anzeige leuchtet konstant blau, um den HIGH-Mode anzuzeigen, und
leuchtet konstant grün, um den LOW-Mode anzuzeigen.
Austausch des Mückenschutz-Pads
Vergewissern Sie sich, dass die Mückenschutzfunktion ausgeschaltet ist und das Fach für
das Mückenabwehr-Pad abgekühlt ist, bevor Sie es austauschen. Legen Sie ein neues
Mückenschutz-Pad ein, während Sie das gebrauchte Pad herausschieben.
Das Gerät kann ein NITEOCRE-Mückenschutz-Pad (Größe: 34mm x 48mm) mit einer
maximalen Dauer von 6 Stunden oder zwei normale Mückenschutz-Pads (Größe:
1. Bitte legen Sie das Mückenschutz-Pad erst dann ein oder entfernen Sie es, wenn die
Mückenschutzfunktion ausgeschaltet ist und das Gerät abgekühlt ist.
2. Legen Sie das Gerät bei Wind gegen den Wind in den zu schützenden Bereich.
3. Decken Sie das Fach für das Mückenschutz-Pad NICHT ab, wenn Sie die
Mückenschutzfunktion verwenden.
4. Lassen Sie das Gerät NICHT unbeaufsichtigt, wenn es in Gebrauch ist. Beenden Sie
den Gebrauch des Geräts bei jedem Anzeichen einer Fehlfunktion.
5. Es wird empfohlen, mehrere NWL30 zusammen zu verwenden, um eine größere
6. Verwenden Sie die Mückenschutzfunktion NICHT in einem geschlossenen Raum.
7. Bitte lagern Sie das Produkt erst, wenn die Mückenschutzfunktion ausgeschaltet ist
und es vollständig abgekühlt ist.
Das Produkt kann als Powerbank verwendet werden, um externe USB-Geräte aufzuladen.
Stromanschluss: Verwenden Sie das USB-C-Ladekabel, um externe USB-Geräte an den
USB-C-/USB-A-Anschluss des Produkts anzuschließen und den Ladevorgang zu starten.
Hinweis: Wenn Sie die USB-Ausgangsfunktion zusammen mit der Beleuchtungs-
oder Mückenschutzfunktion verwenden, schaltet sich die Beleuchtungs- oder
Mückenschutzfunktion automatisch ab, wenn die Ausgangsleistung zu hoch ist.
Wenn das Gerät ausgeschaltet ist, drücken Sie kurz die Taste R. Die entsprechenden blauen
Betriebsanzeigen leuchten nacheinander auf und schalten sich nach 2 Sekunden aus.
1. Ce produit est destiné à être utilisé par des adultes âgés de 18 ans et plus. Veuillez
conserver ce produit hors de portée des enfants.
2. Une surveillance accrue est nécessaire pour éviter les brûlures lorsque le produit est
utilisé à proximité d'enfants.
3. ATTENTION!Risquederayonnementsdangereux!NExezPASdirectementlefaisceau
lumineux et ne projetez pas la lumière directement dans les yeux de quelqu'un !
4. Le produit génère une chaleur importante en cas de fonctionnement prolongé.
Veuillez faire preuve de prudence pendant l'utilisation. Il est recommandé de ne
pasutiliserdesniveauxdeluminositéélevéspendantdespériodesprolongéesan
d'éviter les brûlures et les dommages au produit.
5. NE PAS couvrir le produit ou le placer à proximité d'autres objets, car cela pourrait
endommager le produit ou provoquer des accidents dus à des températures élevées.
6. NEPASutiliserleproduitpouréclairerdesmatériauxinammablesouexplosifs,carla
chaleur élevée peut entraîner une combustion ou une explosion.
7. Veuillezutiliserleproduitdemanièreappropriéeand'évitertoutaccidentencasde
8. Lorsqueleproduitestplacédansunenvironnementclosouinammable,telqu'une
poche ou un sac à dos, ou lorsqu'il n'est pas utilisé pendant une période prolongée,
veuillezfairepivoterlapoignéesurlesboutonsrotatifsand'éviteruneactivation
accidentelle et les dangers causés par une chaleur excessive.
9. NE PAS placer le produit dans l'eau.
10. NE PAS insérer de doigts, de métaux ou de corps étrangers dans les ports ou dans le
compartiment du patch répulsif.
11. NE PAS exposer le produit à des températures supérieures à 60°C (140°F) pendant
12.NEPASdémonteroumodierceproduit,carcelal'endommageraitetrendraitla
garantie du produit invalide. Veuillez-vous référer à la section garantie du manuel
pour des informations complètes sur la garantie.
L'utilisation inappropriée d'appareils dotés de batteries Li-ion intégrées peut entraîner
de graves dommages à la batterie ou des risques de sécurité tels que la combustion
ou l'explosion. N'utilisez PAS l'appareil s'il est endommagé. NE PAS démonter, percer,
couper, écraser ou incinérer l'appareil. En cas de fuite ou d'odeur anormale, cessez
immédiatement d'utiliser l'appareil. Recyclez l'appareil/les piles conformément aux lois et
réglementations locales en vigueur.
Ce produit est équipé d'un système de charge intelligent. Veuillez charger le produit avant
Connexion à source d’alimentation : Retirer le cache de protection USB et utiliser le
câble de charge USB-C pour connecter l’appareil à une alimentation externe (par exemple,
unadaptateursecteuroud'autresdispositifsdecharge)auportUSB-Candecommencer
le processus de recharge. Le temps de recharge est d'environ 3 heures 40 minutes (entrée
: 9V/2,22A). Lorsqu'il est complètement chargé, l'autonomie en veille est d'environ 12 mois.
Indication de recharge : Pendant le processus de recharge, les indicateurs
d'alimentationpassentprogressivementduclignotementàunelumièrexe,unparun,
pour indiquer le niveau de la batterie. Lorsque la batterie est complètement chargée, les
4indicateursd'alimentations'allumentdemanièrexe.
Remarque : le produit peut être utilisé pendant le chargement, la priorité étant donnée
à l'alimentation externe.
On : Lorsque la fonction d'éclairage est désactivée, tourner le bouton d'éclairage dans le
sens des aiguilles d'une montre jusqu'à ce qu'un « clic » se fasse entendre pour accéder
au niveau de luminosité le plus bas de la température de couleur actuelle.
O : Lorsque la fonction d'éclairage est activée, tournez le bouton d'éclairage dans le sens
inverse des aiguilles d'une montre jusqu'à ce que vous entendiez un « clic » pour l'éteindre.
Réglage du niveau de luminosité
Lorsque la fonction d'éclairage est activée, tournez le bouton d'éclairage pour régler les
niveaux de luminosité progressivement.
Augmenter : Tournez le bouton d'éclairage dans le sens des aiguilles d'une montre pour
augmenter progressivement le niveau de luminosité jusqu'à ce qu'il atteigne le niveau le
Diminuer : Tournez le bouton d'éclairage dans le sens inverse des aiguilles d'une montre
pour diminuer progressivement le niveau de luminosité jusqu'à ce qu'il atteigne le niveau
Réglage de la température de couleur
Lorsque la fonction d'éclairage est activée, tournez le bouton de température de couleur
pour régler la température de couleur progressivement.
• Tournez le bouton de température de couleur dans le sens des aiguilles d'une montre
pour régler la température de couleur progressivement dans l'ordre suivant : Lumière
blanchefroide-Lumièreblancheneutre-Lumièrechaude(6500K→2700K).
• Tournez le bouton de température de couleur dans le sens inverse des aiguilles d'une
montre pour régler la température de couleur progressivement dans l'ordre suivant :
Lumièrechaude-Lumièreblancheneutre-Lumièreblanchefroide(2700K→6500K).
Remarque : le produit est doté d'une fonction de mémorisation de la température de
couleur. Lorsqu'il est réactivé, il accède automatiquement à la température de couleur
Lorsque la fonction d'éclairage est activée ou désactivée :
• Appuyez longuement sur le bouton R pour accéder à la lumière rouge CONSTANTE.
• Lorsque la lumière rouge est allumée, appuyez brièvement sur le bouton R pour
passer de la lumière rouge CONSTANTE à la lumière rouge CLIGNOTANTE.
• Lorsque la lumière rouge est allumée, appuyez longuement sur le bouton R pour
l'éteindre et revenir à l'état précédent.
On : Lorsque la fonction anti-moustiques est désactivée, appuyez brièvement puis
longuement sur le bouton du répulsif pour accéder au mode élevé par défaut.
O : Lorsque la fonction anti-moustiques est activée, appuyez longuement sur le bouton
du répulsif pour la désactiver.
• Lorsque la fonction anti-moustiques est activée, appuyez brièvement sur le bouton
répulsif pour passer du mode haut au mode bas.
• L'indicateur du répulsif devient bleu en permanence pour indiquer le mode haut et
vert en permanence pour indiquer le mode bas.
Remplacement du patch répulsif
Assurez-vous que la fonction anti-moustiques soit désactivée et que le compartiment du
patch répulsif ait refroidi avant de le remplacer. Insérez un nouveau tapis répulsif tout en
poussant le tapis usagé vers l'extérieur.
Le produit peut contenir un patch anti-moustiques NITEOCRE (taille : 34mm x 48mm
/ 1.34« x 1.89 ») d'une durée maximale de 6 heures, et deux patchs anti-moustiques
ordinaires (taille : 35mm x 22mm / 1.38« x 0.87 »).
1. N'insérez ou ne retirez le patch répulsif qu'une fois que la fonction anti-moustiques
est désactivée et que l'appareil a refroidi.
2. En cas de vent, placez le produit dans le sens du vent par rapport à la zone de
3. NE PAS couvrir le compartiment du patch répulsif lors de l'utilisation de la fonction
4. NE PAS laisser le produit sans surveillance lorsqu'il est en cours d'utilisation. Cessez
d'utiliser le produit au moindre signe de dysfonctionnement.
5. Il est recommandé d'utiliser plusieurs NWL30 ensemble pour obtenir une plus grande
6. N'utilisezPASlafonctionanti-moustiquesdansunespaceconné.
7. Ne rangez le produit qu'après avoir éteint la fonction anti-moustiques et l'avoir
Fonction batterie externe
Le produit peut être utilisé comme batterie externe pour charger d’autres appareils.
Connexion à la batterie : Utilisez le câble de charge USB-C pour connecter des
appareils au port USB-C / USB-A du produit pour commencer le processus de charge.
Remarque : Lorsque la fonction de sortie USB est utilisée en même temps que la
fonction d'éclairage ou répulsif anti-moustiques, la fonction d'éclairage ou répulsif anti-
moustiques s'éteint automatiquement si la puissance de sortie est trop élevée.
Lorsque le produit est éteint, appuyez brièvement sur le bouton R. Les indicateurs
d'alimentation bleus correspondants s'allument successivement et s'éteignent au bout de
Remarque : le produit doit être rechargé lorsque la sortie semble être faible ou que le
produit ne répond plus en raison d'une faible puissance.
Thanks for purchasing NITECORE!
Please read this manual carefully before using the product and follow the
This manual contains important safety information and operating instructions. Please
keep it for future reference.
Incaseofupdates,pleaserefertothelatestversionavailableontheocialwebsite.
The product can be used as a power bank to charge external USB devices.
Power Connection: Use the USB-C charging cable to connect external USB devices to
the USB-C / USB-A port of the product to begin the charging process.
Note: When using the USB output function together with the lighting or mosquito repelling
function,thelightingormosquitorepellingfunctionwillautomaticallyturnoiftheoutput
Whentheproductiso,shortpresstheRButton,andthecorrespondingbluepower
indicatorswillturnonsequentiallyandturnoafter2seconds.
Note: The product should be recharged when the output appears to be dim or the product
becomes unresponsive due to low power.
Status of Indicators Power Level
1 Constant-on 5% – 25% (Please recharge the product as soon as possible)
1. Устройствопредназначенодляиспользованиялицамистарше18лет.Храните
устройствовнедоступномдлядетейместе.
2. Прииспользованииустройстварядомсдетьминеобходимовнимательноследить
заегоработойвоизбежаниеожогов.
3. ВНИМАНИЕ!Возможноопасноеизлучение!Несмотритепрямонасветовойлучи
ненаправляйтесветвглазадругимлюдям!
4. Устройствосильнонагреваетсяпридлительнойработе.Будьтеосторожныво
времяиспользования.Рекомендуетсянеиспользоватьмаксимальнуюяркостьв
течениедлительноговременивоизбежаниеожоговиповрежденияустройства.
5. НенакрывайтеустройствоиНЕразмещайтеегоблизкокдругимпредметам,
таккакэтоможетпривестикповреждениюустройстваилинесчастнымслучаям
вследствиевоздействиявысокойтемпературы.
6. Неиспользуйтеустройстводляосвещениялегковоспламеняющихсяили
взрывоопасныхматериалов,таккаквысокаятемператураможетвызвать
7. Используйтеустройствотолькостандартнымобразомвсоответствиис
инструкцией,чтобыизбежатьнесчастныхслучаевприегонеисправности.
8. Еслиустройствопомещеновзакрытоепомещениеилихранитсявместах,в
пределахкоторыхвозможновозгорание,например,вкарманеилирюкзаке,
атакжееслиононеиспользуетсявтечениедлительногопериодавремени,
провернитепереноснуюрукоятьтак,чтобыонанедавалакрутитьручки,
активирующиеустройство.Такимобразом,выобезопаситесебяотслучайной
активацииинесчастныхслучаев,вызванныхперегревом.
9. Непогружайтеустройствовводу.
10.Невставляйтепальцы,металлическиеипрочиепосторонниепредметывпорты
илиотсекдлярепеллентнойпластины.
11.Неподвергайтеустройствовоздействиютемпературвыше60°C(140°F)в
течениедлительноговремени.
12.НЕразбирайтеиНЕвноситекакие-либоизменениявконструкциюустройства,
таккакэтоприведеткегоповреждениюисделаетгарантиюнапродукт
недействительной.Полнуюинформациюогарантийномобслуживаниивы
можетепосмотретьвсоответствующемразделетекущегоруководства.
⚠ Безопасность аккумулятора
Неправильноеиспользованиеустройствсовстроеннымилитий-ионными
аккумуляторамиможетпривестиксерьезномуповреждениюэлементапитания
илиугрозебезопасности,напримервозгораниюидажевзрыву.НЕиспользуйте
устройствоприповреждении.НЕразбирайте,НЕпрокалывайте,НЕрежьте,НЕ
разбивайтеиНЕподжигайтеустройство.Приобнаруженииутечекилинеобычного
запаханемедленнопрекратитеиспользованиеустройства.Утилизируйтеустройство
/элементыпитаниявсоответствиисдействующимзаконодательствомипринятыми
ввашемрегионеправилами.
Устройствооснащеноинтеллектуальнойсхемойзарядки.Незабудьте,пожалуйста,
зарядитьустройствопередпервымиспользованием.
Подключение к источнику питания:снимитезащитнуюкрышкуUSB-порта
иприпомощикабелядлязарядкиUSB-Cподключитеустройствоквнешнему
источникупитания(например,адаптеруилидругомузарядномуустройству)через
портUSB-C.Времязарядкисоставляетприблизительно3часа40минут(при
входныхпараметрах9V/2.22A).Приполнойзарядкевремянахожденияврежиме
ожиданиясоставляетприблизительно12месяцев.
Сообщение уровня заряда:вовремязарядкииндикаторыпитаниябудут
поочереднопереходитьотмиганиякпостоянномусвечению,сообщаятаким
образомтекущийуровеньзаряда.Когдааккумуляторполностьюзарядится,все4
индикаторапитаниябудутгоретьпостоянно.
Примечание.Устройствоможноиспользоватьвовремязарядки.Приэтом
приоритетбудетотданименновнешнемуисточникупитания.
Функция освещения Включение / Выключение
Включение:когдафункцияосвещениявыключена,провернитеручку
регулированияяркостипочасовойстрелкедощелчка,послечегоустройство
активируетсянаНИЗКОМуровнеяркостиустановленнойцветовойтемпературы.
Выключение:когдафункцияосвещенияактивирована,провернитеручку
подсветкипротивчасовойстрелкидощелчка,чтобыеевыключить.
Когдафункцияосвещенияактивирована,вращайтеручкурегулированияяркости
SYSMAX Innovations Co., Ltd.
E-mail: info@nitecore.com
Address: Unit 6355, 5/F, No. 1021 Gaopu Road, Tianhe District, Guangzhou, 510653,
Please nd us on facebook : NITECORE Flashlight
Thanks for purchasing NITECORE!
Capacity 18,000mAh 3.6V (64.8Wh)
Rated Energy 9,900mAh (5V 3A)⎓
5V 2.4A / 9V 2.22A / 12V 1.68A (20W MAX)⎓ ⎓ ⎓
USB-C: 5V 2.4A / 9V 2.22A / 12V 1.68A (20W MAX)⎓ ⎓ ⎓
USB-A: 5V 3.0A / 9V 2.0A / 12V 1.5A (18W MAX)⎓ ⎓ ⎓
Heating Temperature 145°C / 293°F MAX
Mosquito Repelling Function
Low Mode: 11ft Protection Zone Max Runtime: 17h 30min
High Mode: 16ft Protection Zone Max Runtime: 12h 30min
Dimensions 106.4mm x 121.8mm x 52.7mm (4.19" x 4.80" x 2.07")
Weight 515g±5g (18.17 oz±0.1 oz) (Accessories Not Included)
Accessories USB-C to USB-C Charging Cable, Storage Case
products are warranted for quality. Any DOA / defective product can
be exchanged for a replacement through a local distributor/dealer within 15 days of
purchase. After that, all defective / malfunctioning NITECORE
free of charge within 24 months from the date of purchase. Beyond 24 months, a
limited warranty applies, covering the cost of labor and maintenance, but not the cost of
accessories or replacement parts.
Thewarrantywillbenulliedif
1. theproduct(s)is/arebrokendown,reconstructedand/ormodiedbyunauthorized
2. the product(s) is/are damaged due to improper use.
For the latest information on NITECORE
products and services, please contact a local
distributor or send an email to service@nitecore.com
Hinweis: Das Gerät sollte aufgeladen werden, wenn die Leistung nachlässt oder das
Gerät aufgrund einer zu geringen Leistung nicht mehr reagiert.
1 Konstant an 5% – 25% (Bitte laden Sie die Lampe so schnell wie möglich)
Entsorgung von Elektro- und Elektronikgeräten
DiedurchgestricheneMülltonnebedeutet,dassSiegesetzlichverpichtetsind,
diese Geräte einer vom unsortierten Siedlungsabfall getrennten Erfassung
zuzuführen. Die Entsorgung über die Restmülltonne oder die gelbe Tonne ist
untersagt. Enthalten die Produkte Batterien oder Akkus, die nicht fest verbaut sind,
müssen diese vor der Entsorgung entnommen und getrennt als Batterie entsorgt werden.
Statut des indicateurs Niveau de puissance
1 Constant 5% – 25% (Veuillez recharger le produit dès que possible)