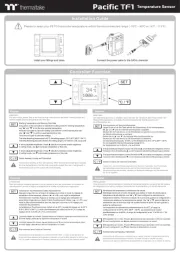
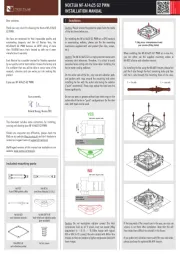
Noctua NH-U9B SE2 Manual

Noctua Hardwarekoeling NH-U9B SE2

Læs gratis den danske manual til Noctua NH-U9B SE2 (4 sider) i kategorien Hardwarekoeling. Denne vejledning er vurderet som hjælpsom af 30 personer og har en gennemsnitlig bedømmelse på 4.1 stjerner ud af 15.5 anmeldelser. Har du et spørgsmål om Noctua NH-U9B SE2, eller vil du spørge andre brugere om produktet?

Side 1/4
NH-U9B SE2
|
Installation Manual INTEL
Removing the mainboard
Step 1:
In case you want to use the cooler on an assembled system,
you first have to remove the mainboard from the case in order
to be able to install the supplied backplate.
plate will install over the mainboard’s stock backplate, so the
mainboard’s stock backplate must not be taken off.
Required mounting parts:
First put the four bolts into the holes appropriate for your
mainboard’s CPU socket.
Setting up the backplate
Step 2:
Thank you very much for choosing a Noctua cooler.
This manual will guide you through the installation process
of the SecuFirm
tm
2 mounting system step by step.
Prior to installing the cooler, please consult the
compatibility list on our website and verify that the cooler
is fully compatible with your motherboard. Should you
encounter any difficulties, please check the FAQs on our
website and don’t hesitate to contact our support team at
support@noctua.at. Noctua cannot be held responsible for
any damage or losses caused by compatibility issues.
Multilingual versions of this manual are available
on our website: www.noctua.at
Caution: Please verify that all four bolts are put into the ap-
propriate holes fully pushed in.
Step 4:
Installing the mounting bars
First put the plastic spacers onto the bolts, then add the mount-
ing bars.
Noctua NH-U9B SE2
Installation Manual
4x plastic spacers 4x thumbscrews
1x 3-in-1 Intel backplate
4x bolts for backplate 2x fastening brackets
4x short screws
2x mounting bars
LGA1366 (80mm)
LGA1156/1155 (75mm)
LGA775 (72mm)
For use on LGA1366 and LGA1156/1155 mainboards, please
remove the rubber inlay. Make sure that the rubber inlay is
in place for LGA775.
LGA1366 & LGA1156/1155 LGA775
Caution: On LGA1156/1155, please make sure that the two
cuts in the supplied backplate align with the screws of the main-
board’s stock backplate.
Caution: Choose the alignment of the mounting bars according
to the desired final orientation of the cooler:
Orientation A
Step 3:
Attaching the backplate
Place the backplate on the rear side of the mainboard so that
the bolts stick through the mounting holes.
Caution: Make sure that the curved sides of the mounting bars
are pointing outwards.
Orientation B
LGA775 rubber inlay
NH-U9B SE2
|
Installation Manual INTEL
For all enquiries concerning your Noctua cooler, both your
retailer and the international Noctua support team at
support@noctua.at are at your service.
Please also consult the FAQ section on our website
www.noctua.at.
Support & FAQs
Caution: Tighten the screws until they stop.
Caution: Make sure to use the correct holes on the mounting bars.
Fix the mounting bars using the 4 thumb screws.
Step 5:
Attaching the fastening brackets to the heatsink
Tightly screw the fastening brackets to the base of the heatsink
using the 4 short screws.
Caution: Make sure to install the fastening brackets in the cor-
rect position:
Connect the fan(s) to the mainboard, power supply or fan con-
troller. Use the supplied y-split cable to connect both fans to
one fan header. Depending on your CPU and the temperature
inside the case, you may interconnect the supplied Low-Noise
Adapter (L.N.A.) or Ultra-Low-Noise Adapter (U.L.N.A.) in or-
der to further reduce the fan’s operating noise.
Caution: Please use one adaptor per fan when running two
fans with adaptors. Never use one adaptor for two fans by
putting it before the y-split cable.
Caution: When using the (U.)L.N.A., check the temperature
of your CPU using appropriate software (e.g. the respective
applications of your mainboard manufacturer), in order to
evade automatic throttling of the CPU due to the increased
temperature. If the cooling performance is insufficient, please
increase case ventilation or remove the (U.)L.N.A.
Attaching the fan
Step 8:
First stick the 2 anti-vibration strips onto the cooling fins in
order to dampen minor vibrations emitted by the fan.
Then attach the fan to the heatsink using the 2 steel clips,
placing it so that it blows onto the heatsink.
Add the second NF-B9 fan sucking air off the rear side of the
heatsink for extra performance (average gains 1-3°C). Please
make sure that both fans are aligned in the same direction.
Step 6:
Applying thermal paste
If there are residual traces of thermal paste or thermal pads
on your CPU, please clean them off first. Then press a small
drop (4-5mm diameter) of NT-H1 onto the centre of the heat-
spreader.
Caution: Applying too much thermal paste will lower the heat
conductivity and cooling performance!
Step 7:
Fastening the heatsink to the CPU
Caution: Please take off the protection cover at the bottom side
of the heatsink first!
Put the heatsink onto the CPU and screw it to the screw threads
of the mounting bars.
Caution: Tighten the screws until they stop.
Low-Noise Adapter (L.N.A.)
1300 RPM, 13.1 dB(A)
Ultra-Low-Noise Adapter (U.L.N.A.)
1000 RPM, 7.9 dB(A)
Black Blue


Produkt Specifikationer

Mærke: Noctua
Kategori: Hardwarekoeling
Model: NH-U9B SE2
Type: Køler
Bredde: 95 mm
Dybde: 120 mm
Højde: 125 mm
Vægt: 640 g
Omdrejningshastighed (min.): 1000 rpm
Omdrejningshastighed (maks.): 1600 rpm
Pakketype: Kasse
Materiale: Aluminium, Copper
Luftstrøm: 64.3 m³/t
Spænding: 12 V
Støjniveau (høj hastighed): 17.6 dB
Antal blæsere: 2 blæser(e)
Passende til rumtype: Processor
Ventilator diameter: 92 mm
Antal ventilatorblade: 7
Understøttede procesorsokler: LGA 1150 (Socket H3), LGA 1155 (Socket H2), LGA 1156 (Socket H), LGA 1366 (Socket B), LGA 2011 (Socket R), LGA 775 (Socket T), Socket AM2, Socket AM2+, Socket AM3, Socket AM3+, Socket FM1, Socket FM2, Socket FM2+
Ventilator dimensioner (BxDxH): 92 x 92 x 25 mm
Middeltid til fejl (MTTF): 150000 t
Lejetype: Self-Stabilising Oil-pressure Bearing (SSO)
Lamelmateriale: Aluminium
Ventilator vægt: 90 g
Rotationshastighed med LNA (maks.): 1300 rpm
Luftgennemstrømning med LNA (maks.): 52.6 m³/t
Lyddæmpende adapter (LNA): Ja

Har du brug for hjælp?

Hvis du har brug for hjælp til Noctua NH-U9B SE2 stil et spørgsmål nedenfor, og andre brugere vil svare dig