Ozito TBS-2000 Manual

Ozito Sav TBS-2000

Læs gratis den danske manual til Ozito TBS-2000 (10 sider) i kategorien Sav. Denne vejledning er vurderet som hjælpsom af 22 personer og har en gennemsnitlig bedømmelse på 5.0 stjerner ud af 11.5 anmeldelser. Har du et spørgsmål om Ozito TBS-2000, eller vil du spørge andre brugere om produktet?

Side 1/10
ONLINE MANUAL
Scan this QR Code with
your mobile device to take
you to the online manual.
A A
R R
L L
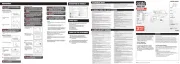
1. Rear Table Extension
2. Rubber Feet x 4
3. Riving Knife
4. Blade Guard
5. Side Table Extensions x 2
6. Height Adjustment Handle
7. Bevel Adjustment Dial
8. Cross Struts x 4
9. Right Table Struts x 2
10. Rear Table Struts x 2
11. Left Table Struts x 2
12. Table Legs x 4
13. Stabilising Brackets
PARTS
FASTENERS
TBS-2000
14. Spanner (10/12mm)
15. Pin Spanner (10mm)
16. Spring Washers x 16
17. Large Washers x 8
18. Small Washers x 32
19. Hex Nuts x 32
20. Round Head Bolts x 16
21. Long Bolts x 8
22. Short Bolts (washers pre-
assembled) x 16
2
12 8 7 6 5 4 313 11 10 9
1
14
22 21 20 19 18 17 16 15
1. Separate the di󰀨erent nuts and bolts
into groups of same components and
check you have the correct quantities.
Note: The spring washers and washers
pre-assembled on the short bolts are not
included in the fastener list count.
2. Remove the screw from the height/
bevel rod and slide the bevel
adjustment dial onto the rod ensuring
the teeth on cogs align.
3. Slide the height adjustment handle
onto the rod by aligning the at
section and secure in place using the
screw that was previously removed.
4. Ensure the blade height is wound fully
down and then turn the table saw upside
down on the oor.
5. Remove any cardboard boxes from
behind the motor; it can be easily
accessed by tilting the blade using the
bevel adjustment dial.
6. Place a large washer onto each long
bolt. Insert the 4 table legs into the
bottom of the table saw and loosely
attach using the long bolts and large
washers from the outside of each leg.
Note: These bolts will need to be
removed later, so only attach loosely.
7. Attach the 4 cross struts by aligning
the holes on the strut and on the leg
(ensure the lip is facing the table saw).
Secure each end using 2 round head
bolt, washer, spring washer and nut
assemblies.
8. Attach the 2 stabilising brackets to the rear legs. Place a short
bolt through the bracket and table
leg, slide a washer onto the bolt and
then secure it with a hex nut. Repeat
for the other mounting point and
stabilising bracket.
9. Mount the rubber feet onto the bottom
of the legs.
1. ASSEMBLING THE FRAME
8x 16x 16x
22.5°
15°
30°
45°
WARNING! BEFORE ASSEMBLING YOUR TABLE
SAW OR REPLACING BLADES, ENSURE THAT THE
MOTOR IS OFF AND THE TOOL IS DISCONNECTED
FROM THE POWER SUPPLY TO PREVENT
ACCIDENTAL STARTING.
TABLE SAW
2000W 254mm
ASSEMBLY MANUAL
0920
TBS-2000
1. Flip the table saw upright onto its
feet, raise the blade to its highest
setting and remove the table
insert by loosening the 2 screws
holding it down.
2. Loosen the riving knife securing
bolt using the supplied spanner.
Ensure the bolt does not come
completely out as this bolt may be
di󰀩cult to ret.
3. Insert the riving knife between the
mounting plate and the securing
bolt so that there is a 3-5mm gap
between the blade and the riving
knife. Tighten the securing bolt
using the supplied spanner.
4 Ret the table insert by sliding it around the blade from the front
of the unit towards the back. Ensure the plastic tab on the table
insert is properly slotted into the groove in the table top. The table
insert should be ush with the surface of the table saw.
5. Secure with its 2 screws.
WARNING! THE BLADE GUARD MUST ALWAYS BE
LOWERED OVER THE WORK PIECE BEFORE YOU
BEGIN TO CUT.
The table saw is supplied with 1
rear table extension and 2 side table
extensions.
For ease of assembly, place the
table saw upside down on a at
surface with space for the table
extensions.
1. Align the bolt holes of the rear
extension with the back edge of
the table saw. Use the bolt holes
and front ruler edge of the table to
align the side extensions.
2. Insert a pre-assembled short bolt
through a bolt hole in the table
saw and extension table, place
a washer onto it and secure with
a hex nut. Repeat this for the
other 5 bolt holes to attach the
extensions tables.
Note: There are 3 pairs of table struts.
The shortest pair (inscribed with ‘R’)
is meant for the right extension table,
the longest (marked ‘L’) for the left
extension; the letter ‘A’ is inscribed on
the rear table struts.
3. Insert a pre-assembled short
bolt through a bolt hole on
the outer edge of the table
extension and then the bolt
hole in one end of the table
strut. Place a washer onto the
short bolt and secure it with
a hex nut. Repeat this for the
other 5 table struts.
4. To attach the table strut to the bottom
of the table saw, you will rst need
to remove the bolt and washer that
connects the leg to the table saw.
Ensure that it is supported by one
other bolt before attaching a strut.
Note: Each table leg and table strut
share the same xing hole.
5. Once all the table
struts have been
attached, tighten
all the nuts on the
base frame and table
extensions to ensure
steadiness. Use the
supplied spanners
where required, but
be careful not to over
tighten as this may
result in damage to
the base frame or the
screw threads.
3. FITTING THE BLADE GUARD2. ATTACHING TABLE EXTENSIONS
3 - 5mm
A A
LEFT
RIGHT
REAR
TABLE STRUTS
R R
L L


Produkt Specifikationer

Mærke: Ozito
Kategori: Sav
Model: TBS-2000

Har du brug for hjælp?

Hvis du har brug for hjælp til Ozito TBS-2000 stil et spørgsmål nedenfor, og andre brugere vil svare dig


Sav Ozito Manualer

Ozito

Ozito PXBCS-1830 Manual

24 December 2024
Ozito

Ozito TBS-254 Manual

8 Marts 2024
Ozito

Ozito OCS-018 Manual

3 Marts 2024
Ozito

Ozito SCMS-1621MS Manual

25 Februar 2024
Ozito

Ozito BSW-2581U Manual

13 Februar 2024
Ozito

Ozito BSW-2581 Manual

27 Januar 2024
Ozito

Ozito JSW-4000 Manual

25 December 2023
Ozito

Ozito PCR-3100U Manual

3 December 2023
Ozito

Ozito PLS-1214 Manual

23 November 2023

Sav Manualer

Nyeste Sav Manualer