PHILIPS and the Philips Shield Emblem are registered trademarks
of Koninklijke Philips N.V. and are used under license.
This product has been manufactured by and is sold under the
responsibility of Versuni Holding B.V., and Versuni Holding B.V. is
the warrantor in relation to this product.
2023 © Versuni Holding B.V.
6608.000.0807.2 (11/07/2023)
Read this user manual carefully before you use the Rice cooker and save it for
• The appliance must not be immersed.
• This appliance shall not be used by children from 0 year to 8 years.
• This appliance can be used by children aged from 8 years and above if
they are continuously supervised and they have been given supervision or
instruction concerning use of the appliance in a safe way and understand
• This appliance can be used by people with reduced physical, sensory or
mental capabilities or lack of experience and knowledge if they have been
given supervision or instruction concerning use of the appliance in a safe
way and understand the hazards involved.
• This appliance is not intended for use by persons (including children) with
reduced physical, sensory or mental capabilities, or lack of experience
and knowledge, unless they have been given supervision or instruction
concerning use of the appliance by a person responsible for their safety.
• Children should be supervised to ensure that they do not play with the
• Keep the appliance and its cord out of reach of children aged less than 8
• Cleaning and user maintenance shall not be made by children.
• This appliance should be positioned in a stable situation with the handles
(if any) positioned to avoid spillage of the hot liquids.
• This appliance is intended to be used in household and similar applications
• Sta kitchen areas in shops, oces and other working environments;
• By clients in hotels, motels and other residential type environments;
• Bed and breakfast type environments.
• If the power cord set is damaged, it must be replaced by a cord set
available from the manufacturer.
• Cooking appliances should be positioned in a stable situation with the
handles (if any) positioned to avoid spillage of the hot liquids.
• The appliance is not intended to be operated by means of an external
timer or a separate remote-control system.
• Check if the voltage indicated on the appliance corresponds to the local
power voltage before you connect it.
• Do not let the power cord hang over the edge of the table or worktop on
which the appliance stands.
• Make sure the heating element and the outside of the inner pot are clean
and dry before you put the plug in the power outlet.
• Do not plug in the appliance or press any of the buttons on the control
• WARNING: Make sure to avoid spillage on the power connector to avoid a
• WARNING: Always follow the instructions and use the appliance properly
to avoid potential injury.
• According to the instructions prescribed in this user manual, use a soft
damp cloth to clean the surfaces in contact with food and make sure to
remove all the food residues stuck to the appliance.
• Don’t place the power cord under the appliance when in use.
• When placing the steaming basket, avoid touching the side wall of the
inner pot, otherwise it may cause deformation due to high temperature.
• CAUTION: Surface of the heating element is subject to residual heat after use.
• Never use any accessories or parts from other manufacturers or that Philips
does not specically recommend. If you use such accessories or parts, your
guarantee becomes invalid.
• Do not expose the appliance to high temperatures, nor place it on a
working or still hot stove or cooker.
• Do not expose the appliance to direct sunlight.
• Place the appliance on a stable, horizontal, and level surface.
• Always put the inner pot in the appliance before you put the plug in the
power outlet and switch it on.
• Do not place the inner pot directly over an open re to cook rice.
• Do not use the inner pot if it is deformed.
• The accessible surfaces may become hot when the appliance is operating.
Take extra caution when touching the appliance.
• Beware of hot steam coming out of the steam vent during cooking or out
of the appliance when you open the lid. Keep hands and face away from
the appliance to avoid the steam.
• Do not lift and move the appliance while it is operating.
• Do not exceed the maximum water level indicated in the inner pot to
prevent overow which might cause potential hazard.
• Do not place the cooking utensils inside the pot while cooking, keeping
• Only use the cooking utensils provided. Avoid using sharp utensils.
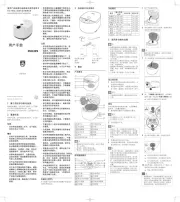
1 Take out all the accessories from the inner pot. Remove the packaging
material of the inner pot.
2 Before rst use, boil water and clean the Rice cooker.
3 Clean the parts thoroughly before using it for the rst time (see chapter
“Cleaning and Maintenance”).
• Make sure all parts are completely dry before you start using the Rice
• Make sure that the outside of the inner pot is dry and clean, and that
there is no foreign residue on the inside of the appliance.
Preparation before cooking
• Make sure that the detachable inner lid is properly installed.
• Do not ll the inner pot with food and liquid less than the minimum of
the water level indications, or more than the maximum of the water
• For rice cooking, follow the water level indications on the inside of
the inner pot. You can adjust the water level for dierent types of rice
and according to your own preference. Do not exceed the maximum
quantities indicated on the inside of the inner pot.
• After the cooking process is started, you can press to terminate the
current work, and the appliance goes to menu selection mode.
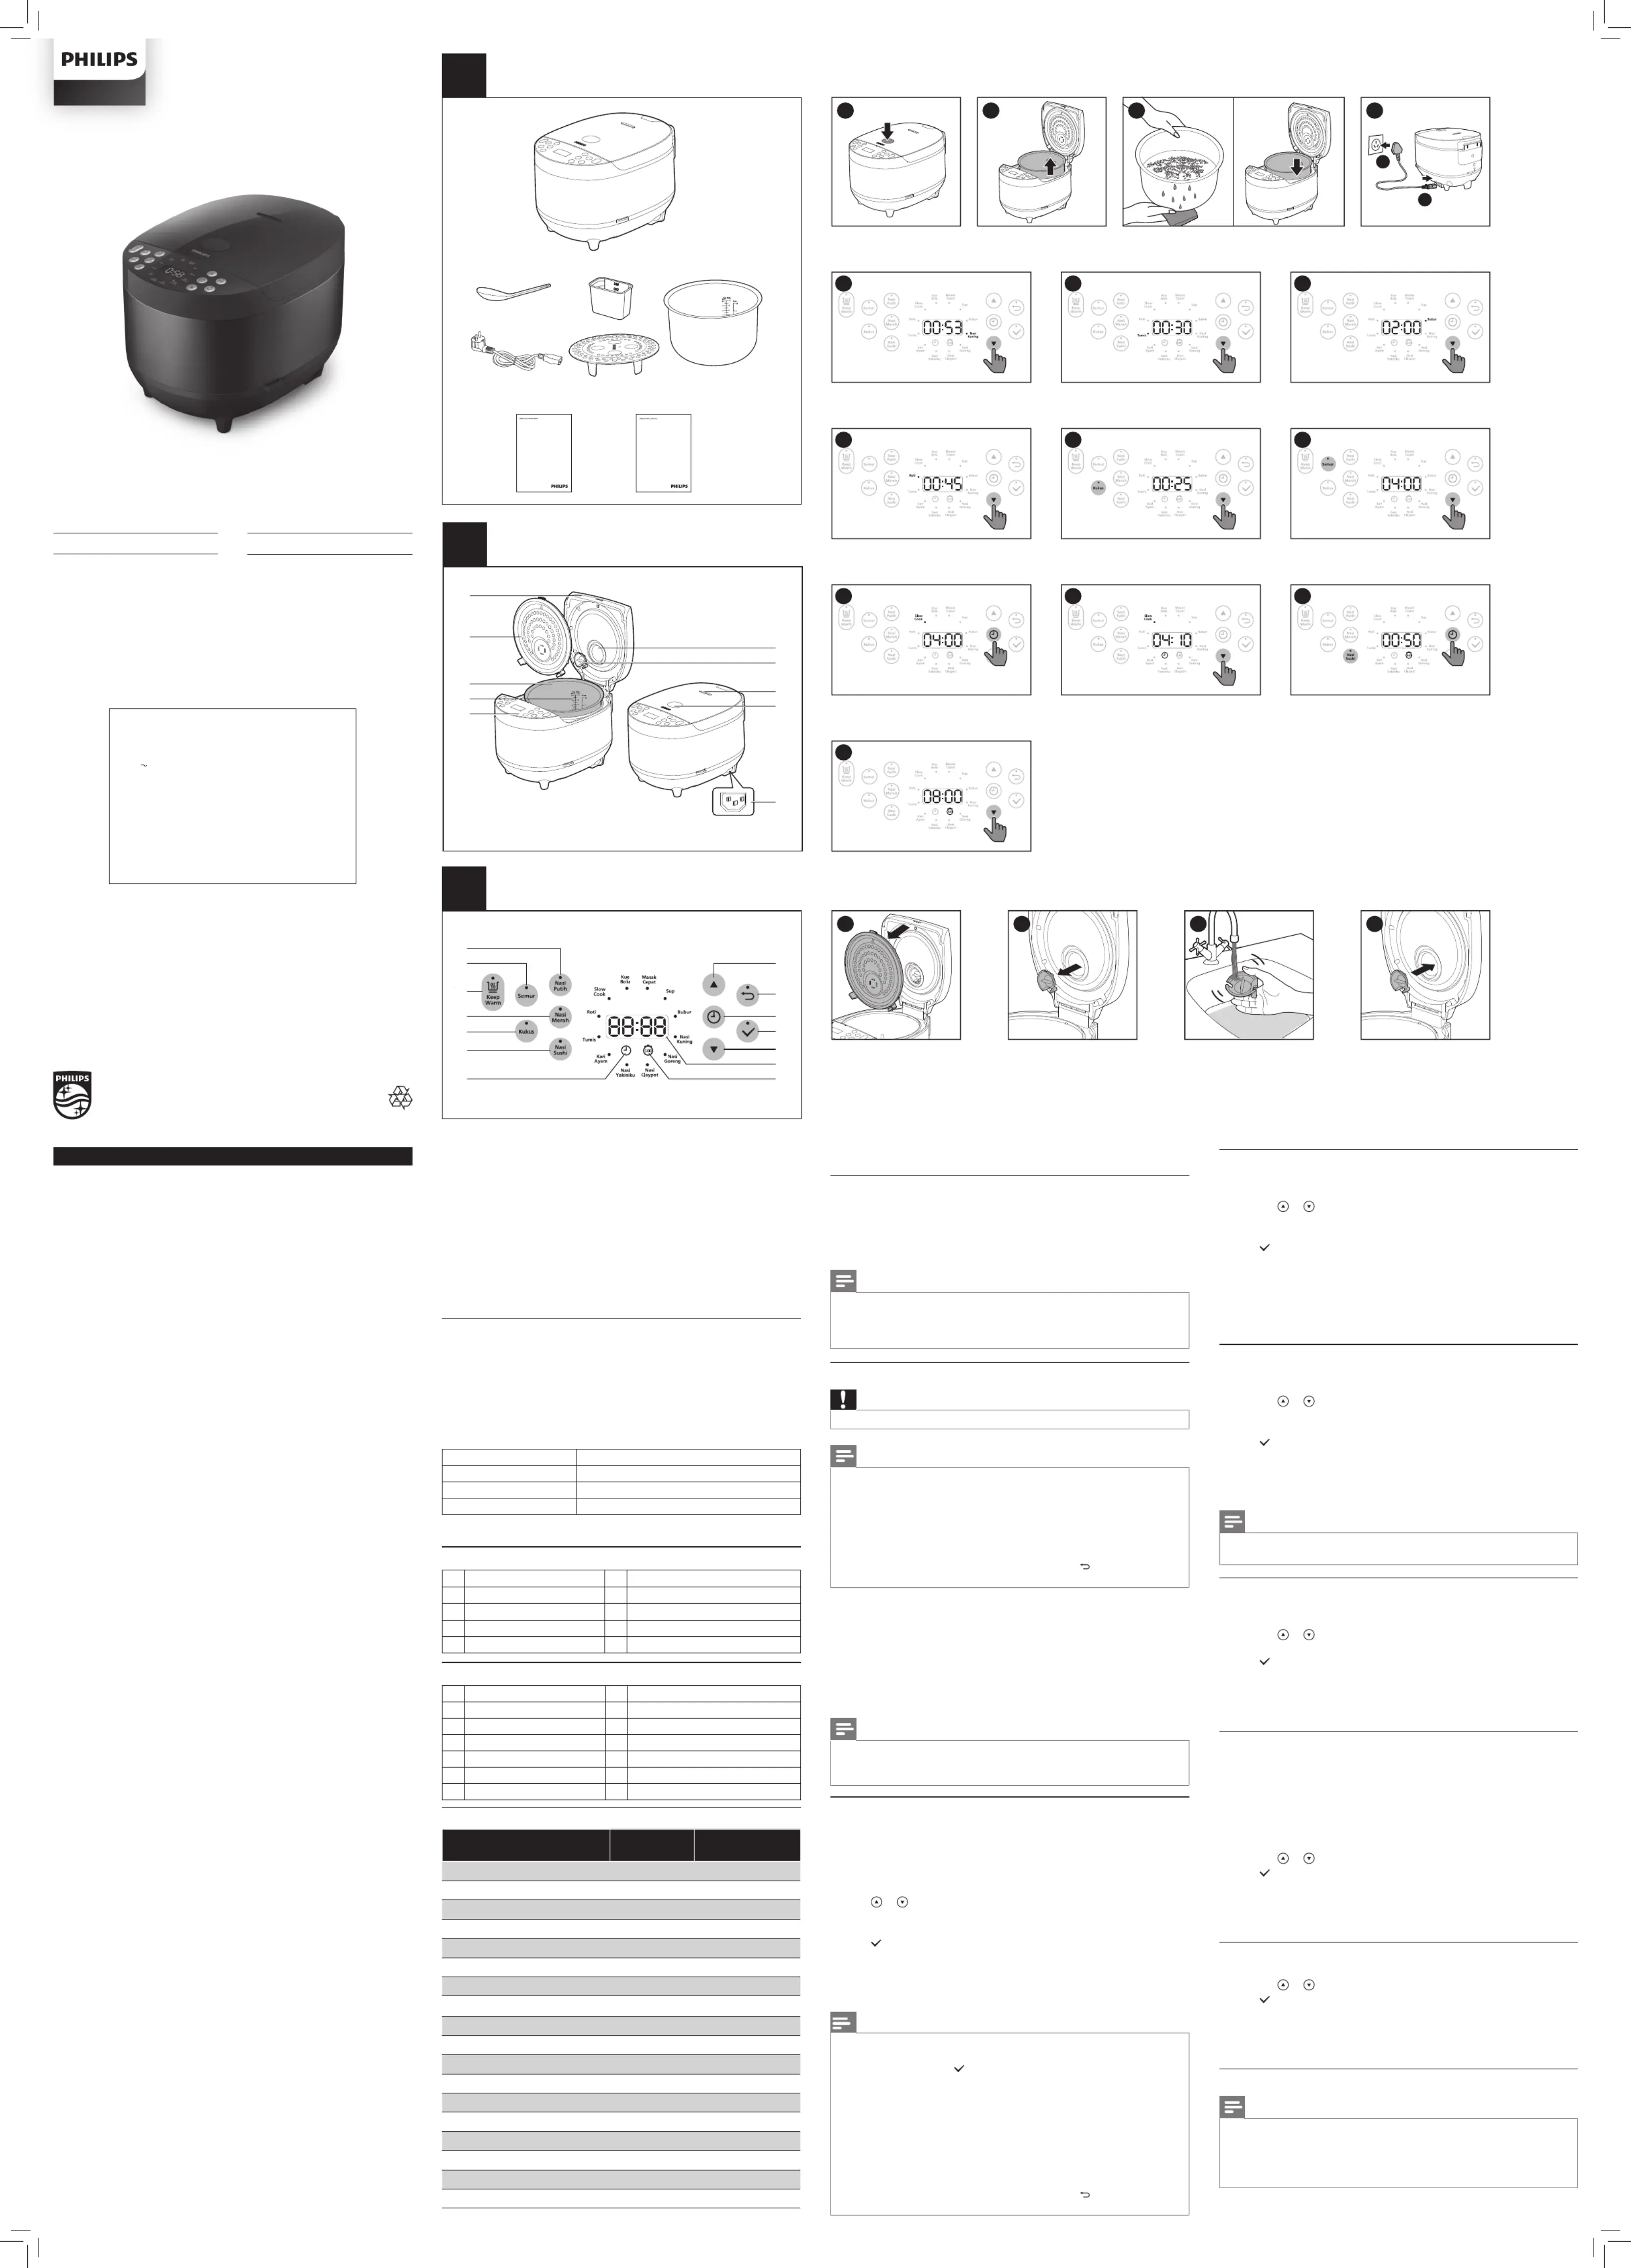
Perform the following preparations before cooking with the Rice cooker:
1 Press the lid release button to open the Rice cooker (g. 4).
2 Take out the inner pot from the Rice cooker (g. 5).
3 Put the pre-washed food in the inner pot, wipe the outside and bottom
of the inner pot dry with soft cloth, then put it back into the Rice cooker
5 Put the plug into the power socket (g. 7).
• Make sure the outside of the inner pot is dry and clean, and that there is
no foreign residue on the heating element.
• Make sure the inner pot is in proper contact with the heating element.
There are 9 cooking function: Yakiniku Rice (Nasi Yakiniku),Claypot rice
( ), Fried rice ( ), Kunning Rice (Nasi Claypot Nasi Goreng Nasi Kunning),
Quick cook ( ), (Masak lambat), White rice (Masak Cepat Slow cook Nasi
Putih Nasi Merah Nasi Sushi),Brown Rice ( ) and Sushi rice ( ).
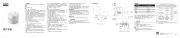
For cooking time range, refer to Chapter “Cooking program”.
1 Follow the steps in “Preparations before cooking”.
2 Press or to select one of the cooking menus (g. 8).
» The indicator chosen cooking function lights up, the default cooking
time is displayed on the screen.
3 Press to conrm, the Rice cooker starts working in the selected mode.
4 When the cooking is nished, you will hear 4 beeps and the selected
cooking function light will be o.
5 The Rice cooker will be in keep-warm mode automatically.
» The keep-warm indicator lights up.
• For Kunning rice and Yakiniku rice, before adding rice for cooking, you
can open the lid and add ingredients/oil for frying (preset time
8 minutes), then press to start the rice cooking.
• You can add more ingredients according to the recipe for dierent rice
• The level marked inside the inner pot is just an indication. You can
always adjust the water level for dierent types of grains and your own
• Besides following the water level indications, you may also add rice and
water at 1:1-1:3 ratio for rice cooking.
• Do not exceed the volume indicated or exceed the maximum water
level, as this may cause the appliance to overow.
• After the cooking process is started, you can press to terminate the
current work, and the appliance goes to menu selection mode.
1 Put chicken wings and other ingredients and water into the inner pot.
2 Follow the steps in “Preparations before cooking”.
3 TumisPress the or to select Soy sauce chicken wings ( )(g. 9).
» The indicator chosen cooking function lights up, the default cooking
time is displayed on the screen.
4 Press to conrm, the Rice cooker starts working in the selected mode.
5 Open the lid, turn the chicken wings over after 15 minutes.
6 Close the lid to continue the cooking process, when the cooking is
nished, you will hear 4 beeps and the selected cooking function light will
7 The Rice cooker will be in keep-warm mode automatically.
» The keep-warm indicator lights up.
1 Put ingredients and water into the inner pot.
2 Follow the steps in “Preparations before cooking”.
3 Bubur SupPress the or to select Porridge ( ) or Soup ( )(g. 10).
» The indicator chosen cooking function lights up, the default cooking
time is displayed on the screen.
4 Press to conrm, the Rice cooker starts working in the selected mode.
5 When the cooking is nished, you will hear 4 beeps and the selected
cooking function light will be o.
6 The Rice cooker will be in keep-warm mode automatically.
» The keep-warm indicator lights up.
• Do not exceed the maximum water level indicated in the inner pot, as
this may cause the Rice cooker to overow.
1 Mix all ingredients well and put it into the inner pot.
2 Follow the steps in “Preparations before cooking”.
3 Kue BoluPress the or to select Cake ( ) or Baking bread ( ) Roti
4 Press to conrm, the Rice cooker starts working in the selected mode.
5 When the cooking is nished, you will hear 4 beeps and the selected
cooking function light will be o.
6 The Rice cooker will be in keep-warm mode automatically.
» The keep-warm indicator lights up.
1 Measure a few cups of water with the measuring cup.
2 Pour the water into the inner pot.
3 Put the steam basket into the inner pot.
4 Put the food into the steam basket.
5 Follow the steps in “Preparations before cooking”.
6 Pour some water onto the food to prevent it from becoming too dry. The
quantity of the water depends on the amount of food.
7 KukusPress the or to Steam ( ) (g.12)
8 Press to conrm, the Rice cooker starts working in the selected mode.
9 When the cooking is nished, you will hear 4 beeps and the selected
cooking function light will be o.
10 The Rice cooker will be in keep-warm mode automatically.
» The keep-warm indicator lights up.
1 Follow the steps in “Preparations before cooking”.
2 Sup SemurPress the or to Soup ( ) or Stew ( ) (g.13)
3 Press to conrm, the Rice cooker starts working in the selected mode.
4 When the cooking is nished, you will hear 4 beeps and the selected
cooking function light will be o.
5 The Rice cooker will be in keep-warm mode automatically.
» The keep-warm indicator lights up.
• You cannot adjust the cooking time for: Baking bread ( ), Soy souce Roti
thicken rice (Tumis Bubur Sup Semur), Porridge ( ), Soup ( ), Stew ( ), Steam
• You can set the delay start time from 1- 24 hours for all cooking
• To avoid scratches, it is not recommended to cook ingredients with
crustaceans and shellsh. Remove the hard shells before cooking.
• Do not insert metallic objects or alien substances into the steam vent.
• Do not place a magnetic substance on the lid. Do not use the appliance
near a magnetic substance.
• Always let the appliance cool down before you clean or move it.
• Always clean the appliance after use. Do not clean the appliance in a
• Always unplug the appliance if not used for a longer period.
• If the appliance is used improperly or for professional or semiprofessional
purposes, or if it is not used according to the instructions in this user
manual, the guarantee becomes invalid and Philips refuses liability for any
Electromagnetic elds (EMF)
This appliance complies with the applicable standards and regulations
regarding exposure to electromagnetic elds.
Congratulations on your purchase, and welcome to Philips!
To fully benet from the support that Philips oers, register your product at
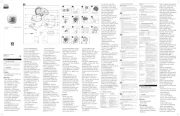
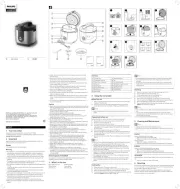
3 What’s in the box (fig.1)
Rice cooker main unit Measuring cup
Rice and soup 2 in 1 spoon Power cord
Steaming basket User manual
Controls overview (g.3)
Cooking time/preset time button
Cake (Kue Bolu) NA45 minutes
Slow cook (Masak lambat) 3- 10 hours4 hours
Baking bread (Roti) 45 minutes 30 minutes- 2 hours
Soy sauce chicken wings (Tumis) 30 minutes 25 minutes- 2 hours
Curry Chicken (Kari Ayam) NA70 minutes
Yakiniku Rice (Nasi Yakiniku) NA55 minutes
Claypot rice (Nasi Claypot)
Kunning Rice (Nasi Kunning)
Soup (Sup) 2 hours 2-4 hours
Quick cook (Masak Cepat) NA25 minutes
Stew (Semur) 4 hours 4-12 hours
Steam (Kukus) 25 minutes 10-59 minutes
White rice (Nasi Putih) NA60 minutes
Brown Rice (Nasi Merah) NA120 minutes
Sushi rice (Nasi Sushi) NA50 minutes
PT Versuni HomeLife Indonesia
Gedung Cibis Nine, lantai 10,
Jl. TB Simatupang No. 2, RT 001/RW 005
Kelurahan Cilandak Timur, Kec. Pasar Minggu, Kota Adm.
Jakarta Selatan, - DKI Jakarta, 12560 - INDONESIA
No. Reg.: IMKG.1236.07.2023