•Read the instructions carefully and look at the illustrations before you start using the
•To avoid damage, check if the voltage indicated on the appliance corresponds to the mains
voltage in your home (220 V) before you connect the appliance.
•Never remove accessories or parts while the appliance is running.
•Do not let the appliance run unattended.
•To prolong the lifetime of this appliance, it is advisable to wait for 2 minutes after you have
processed heavy-duty recipes for 3 minutes, before you let the appliance run again.
•Keep the appliance and its parts out of the reach of children.
•Never immerse the motor unit in water.
•Never use any accessories or parts from other manufacturers or which have not been
specifically advised by Philips. Your guarantee will become invalid if such accessories or
•If the mains cord of the appliance is damaged, it must always be replaced by Philips or
service center authorized by Philips in order to avoid hazardous situations.
•Technical specifications: 220V, 50Hz, 325W.
•Before you start using the blender, make sure that the blade unit is securely fitted to the
•Do not fill the blender jar with ingredients that are hotter than 80 °C (approx. 175 °F).
•To avoid spilling, do not fill the jar above the maximum level indication (i.e. 1.5 litre). When
blending liquid, do not put more than 1.25 litre in the jar. Always insert the stopper into the
lid before you start processing.
•Never put your hand or any objects in the blender jar while the appliance is switched on. If
necessary, use a spatula to remove food from the wall of the jar after you have switched off
•Do not use the filter to process hot ingredients.
•The filter should never be filled beyond its metal part.
•Soak soy beans for 4 hours before processing them.
•Make sure the filter has been properly inserted before you switch the appliance on.
Mill (only type HR 2839):
•The cutting edges of the blade unit are very sharp: avoid touching them!
•Make sure that the blade unit and beaker have been properly assembled before you mount
them onto the motor housing. Never mount the blade unit without the beaker.
•Always make sure that the rubber sealing ring has been correctly placed before you start
using the appliance. Correct assembly of the ring guarantees that the mill is properly
closed and that ground ingredients will not be spilt.
•Do not fill the beaker above the maximum level indication (MAX).
•Never let the mill accessory run for more than 30 seconds without interruption.
•The mill accessory is not suitable for grinding very hard ingredients, such as nutmeg and
•Always process cloves, star anise and aniseed together with other ingredients. If they are
processed separately, they may attack the plastic parts of the mill.
•Never put any liquids in the mill accessory.
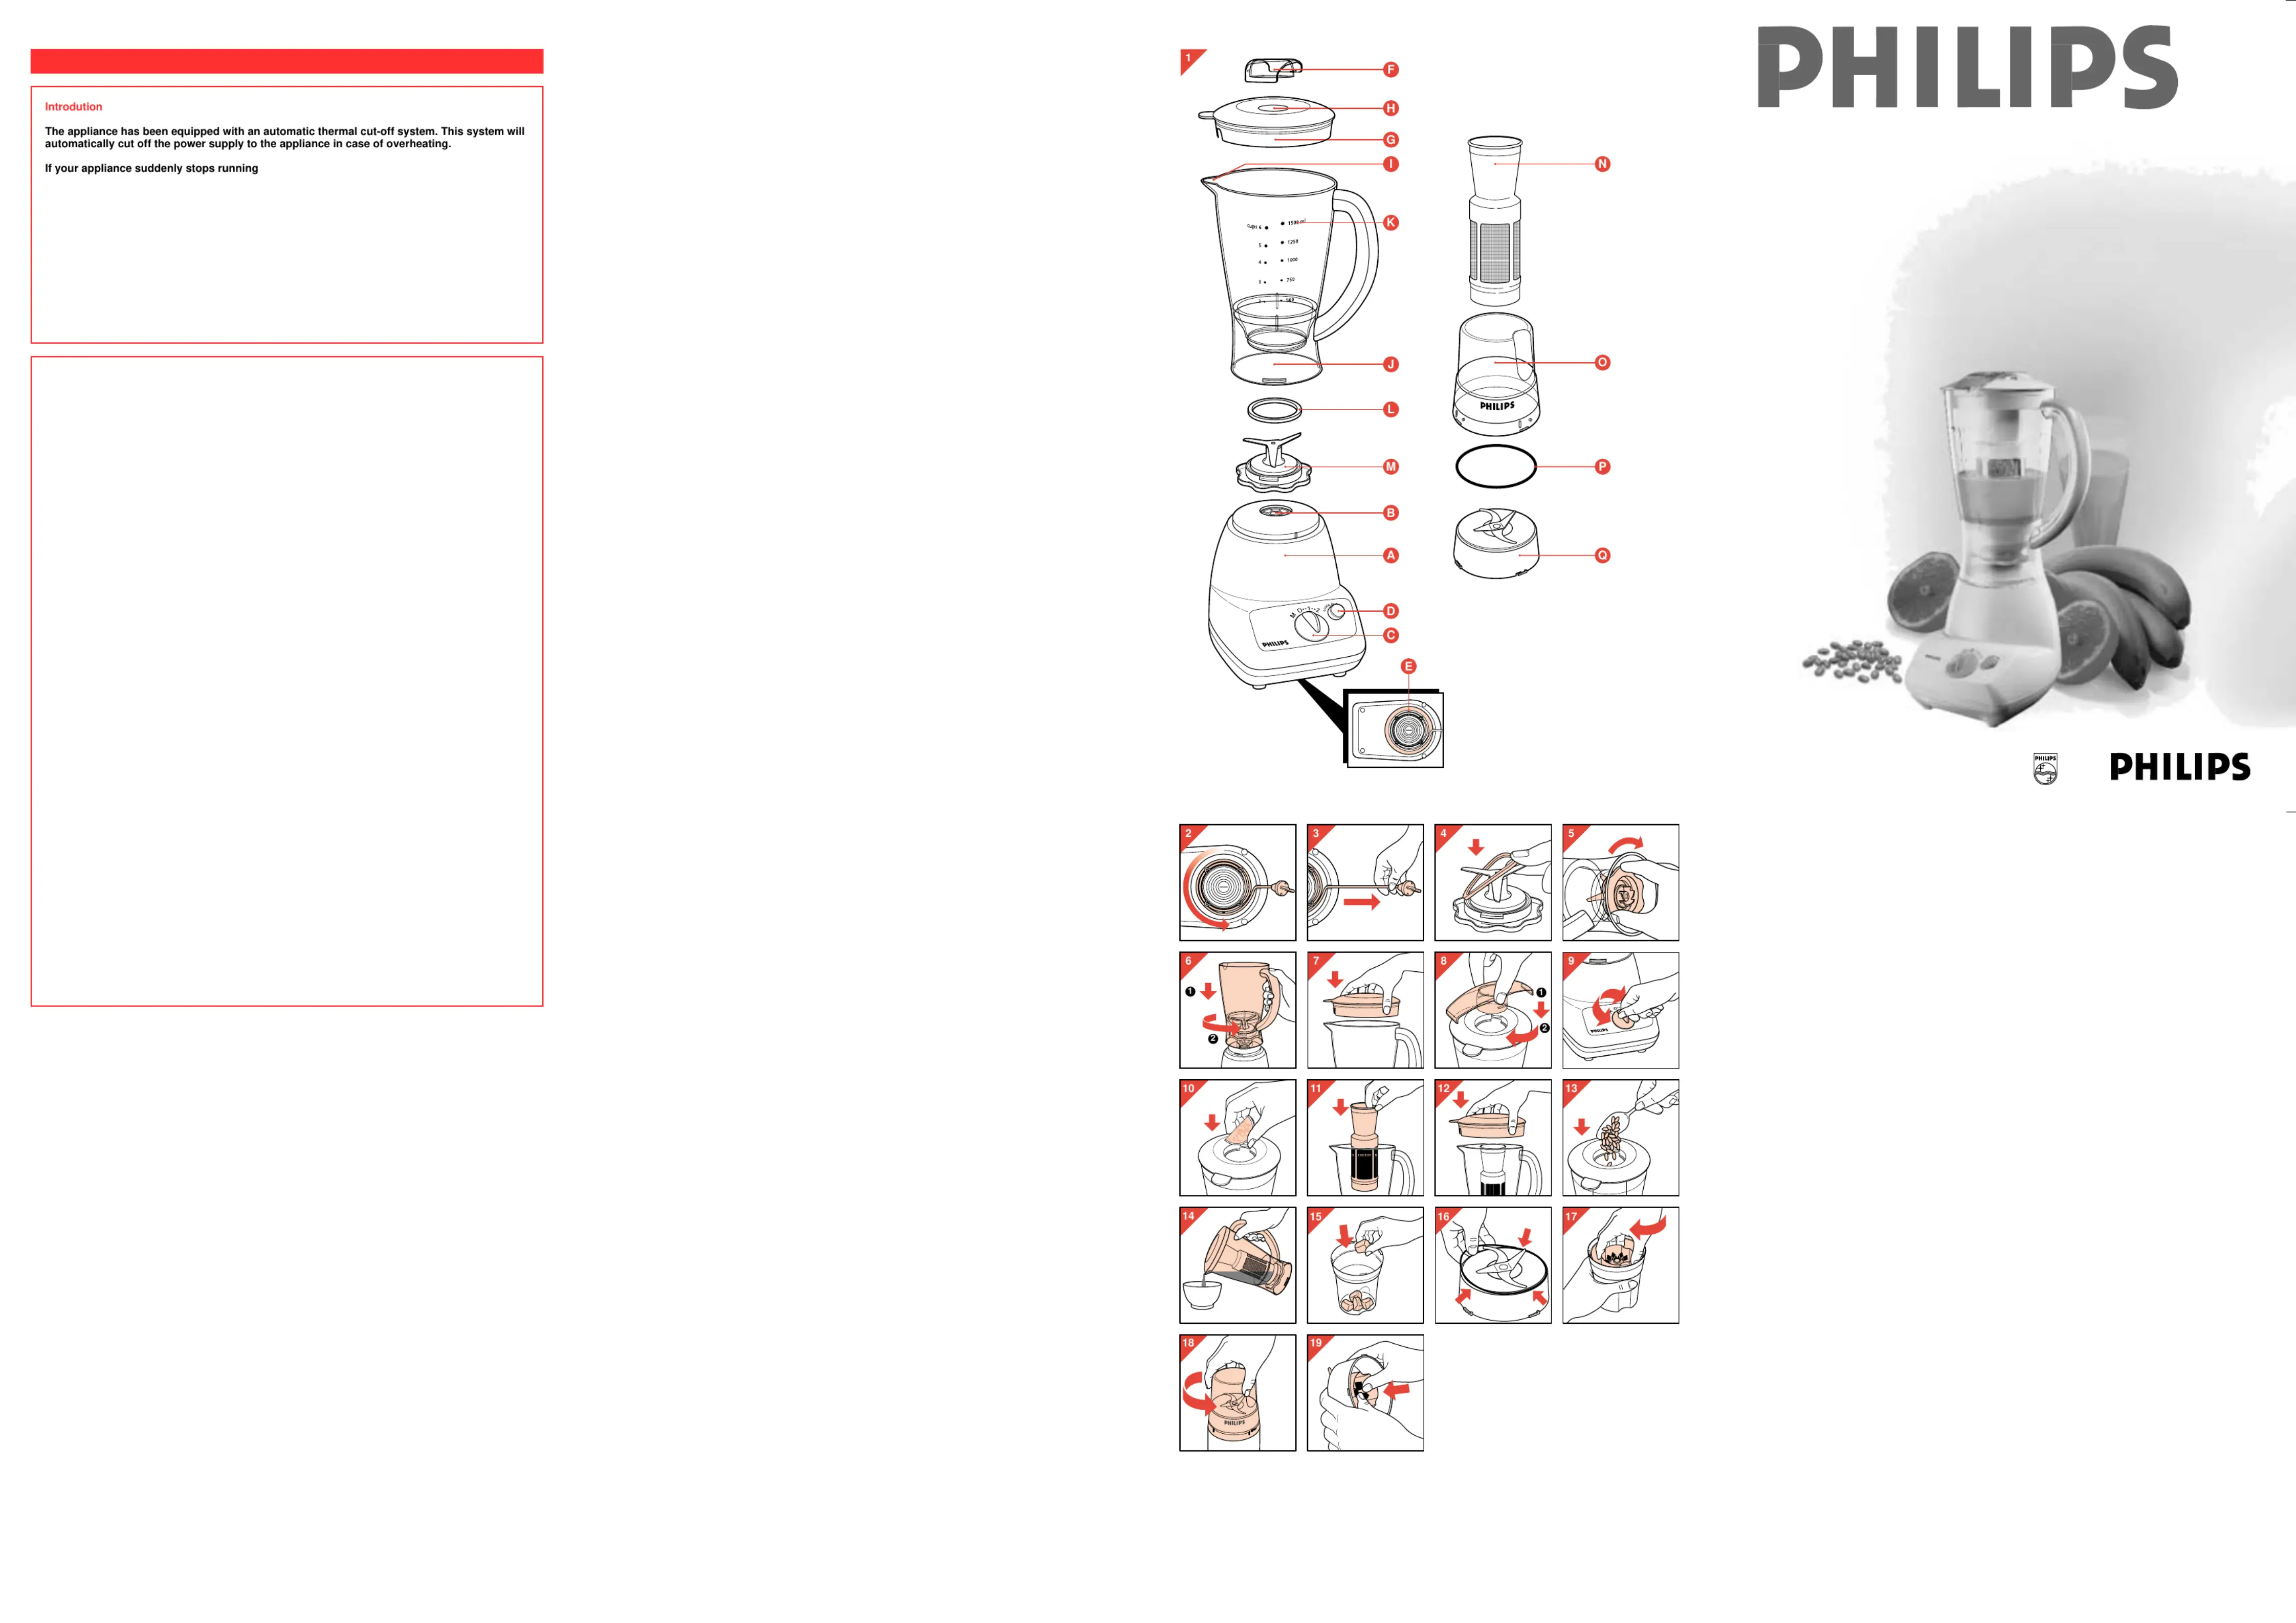
General description (fig 1)
ECord storage compartment
Mill (only with type HR 2839)
You can store excess mains cord by winding it
around the reel in the base of the appliance
(fig. 2). Fix the cord at the required length by
pressing it into the slot at the back of the
The appliance has been equipped with a built-in
safety lock that prevents it from functioning if the
blender jar or the mill have been assembled
incorrectly or have not been assembled at all.
Please note that the blender jar or the mill
should never be used to switch the appliance
- Wash all detachable parts (see section
"Cleaning") before you use the blender for the
- Put the rubber sealing ring around the edge of
- Fix the blade unit to the blender jar by turning it
into the direction of the arrow (fig. 5).
- Mount the assembled jar onto the motor
housing and turn it in the direction of the arrow
until it is firmly fixed (fig. 6).
Warning: Do not exert undue pressure on the
- After putting the ingredients in the jar, fix the lid
onto the jar by pressing it down (fig. 7).
- Insert the stopper by pushing it down gently
and turning it in the direction of the arrow until it
is firmly fixed (fig. 8).
To disassemble the blender, proceed in reverse
order and opposite direction.
- Make sure that the appliance is plugged in and
the blender jar has been properly attached
before you switch the appliance on.
- Select the speed that is most suitable for the
ingredients you want to process (fig. 9):
speed for light processing of mainly liquid1
ingredients, e.g. chocolate milk and
speed for heavy processing of mainly solid2
•If you are not sure which speed to select, you
can always use the highest speed (speed 2).
- To let the appliance run for only a few
moments at a time, set the switch to position M
and release it straightaway. Repeat this
procedure as often as necessary.
- To switch the motor off, set the selector knob to
•The opening in the lid can be used for adding
ingredients while the motor is running (fig. 10).
•The longer you let the appliance run (max. 3
minutes), the finer the blending result will
generally be. Dry ingredients, however, should
not be processed longer than 1 minute.
•Pre-cut meat and other solid ingredients into
smaller pieces before putting them into the
•For optimal blending of solid ingredients, feed a
series of small amounts into the jar rather than
processing a large quantity at once.
•If the appliance is not blending fast enough,
- switch to pulse position M, or
- stir the ingredients with a spatula (not while
the blender is running!), or
- reduce the contents of the jar.
•To make tomato juice, quarter the tomatoes
and drop the pieces into the jar one by one
through the opening in the lid while the motor is
With this filter you will make delicious fresh soy
milk or fruit juices in next to no time. All pips and
skins will remain behind in the filter.
- Assemble the blender jar (see ‘Blender,
- Put the filter in the blender jar (fig. 11). Make
sure that the grooves of the filter fit onto the
- Put the lid in place and turn it to fix the filter
- Put the ingredients in the filter (fig. 13).
Note: The filter should never be filled beyond
its maximum (MAX) level indication!
- Switch the appliance on and select speed 2.
Let the appliance run for 40 seconds.
- Switch the appliance off. Remove the blender
jar and pour out the drink through the spout
- For optimal results, put the jar with the
remaining ingredients back onto the appliance
and let it run for a few more seconds.
- Pour out the rest of the drink.
- Do not process more than 50 g of dry soy beans
with max. 500 ml water at a time.
- Soak soy beans for 4 hours before processing
- When you process fruits, you get the best result
when adding approximately 300 ml water to
- Put the ingredients in the beaker (fig. 15).
Note: Process only dry ingredients. Do not fill
the beaker above the “MAX” indication.
- Put the rubber ring around the edge of the
- Screw the blade unit onto the beaker (fig. 17).
This may require some effort at first. The blade
unit will be easier to fasten if you moisten the
rubber ring with a drop of water.
- The mill is now ready for use. Turn it upside
down and screw it onto the motor unit (fig. 18).
- Preferably use the pulse position M.
What to use the mill for?
The mill is suitable for grinding and chopping e.g.:
Ingredients Optimum quantities
- white beans (haricots) 25 - 75
- dried bread one dried slice of bread
- nuts (shelled) 50 - 100
Never use the mill for crushing ice.
•Cleaning is easier immediately after use.
•Do not clean the appliance or its parts in the
•The motor unit can be cleaned with a soft,
moist cloth. Never immerse the motor unit in
water! Do not use abrasives, scourers, alcohol
•Clean the parts that have come into contact
with food immediately after use.
- Assemble the blender jar properly (see section
on assembly of the blender). Pour lukewarm
water and some washing-up liquid into the
blender jar. Assemble the lid and the stopper.
- Press the Quick Clean button for a few
moments to clean the jar quickly.
- Remove the lid, the stopper, the blender jar
and the blade unit and rinse them with clean,
- If you want to clean the blender more
thoroughly, remove the blade unit and clean all
Note: Be careful with the sharp edges of the
Cleaning the soy bean filter (extra)
- Take the filter out of the blender jar.
- Hold the filter over a waste bin and gently
shake out the contents of the filter.
- Rinse the filter under the tap.
- Disassemble the mill directly after use and
wash the parts in water with some washing-up
Important: The blade unit of the mill is spring-
loaded to enable under-the-edge cleaning
- After washing, rinse the parts with clean water
The appliance has been equipped with an automatic thermal cut-off system. This system will
automatically cut off the power supply to the appliance in case of overheating.
If your appliance suddenly stops running:
•Pull the mains plug out of the wall socket.
•Set the selector knob to position 0 to switch the aplliance off.
•Let the appliance cool down for 60 minutes.
•Put the mains plug in the wall socket.
•Switch the appliance on again.
Please contact your Philips dealer or authorised Philips service centre if the automatic
thermal cut-off system is activaed too often.
CAUTION: In order to avoid a hazardous situation, this appliance must never be connected