PHILIPS and the Philips Shield Emblem are registered trademarks
of Koninklijke Philips N.V. and are used under license.
This product has been manufactured by and is sold under the
responsibility of Versuni Holding B.V., and Versuni Holding B.V. is
the warrantor in relation to this product.
2023 © Versuni Holding B.V.
6608.000.0820.6 (27/04/2023)
Read this user manual carefully before you use the Rice cooker and save it for future
• The appliance must not be immersed.
• This appliance shall not be used by children from 0 year to 8 years.
• This appliance can be used by children aged from 8 years and above if they are
continuously supervised and they have been given supervision or instruction
concerning use of the appliance in a safe way and understand the hazards involved.
• This appliance is not intended for use by persons (including children) with reduced
physical, sensory or mental capabilities, or lack of experience and knowledge, unless
they have been given supervision or instruction concerning use of the appliance by a
person responsible for their safety.
• Children should be supervised to ensure that they do not play with the appliance.
• Keep the appliance and its cord out of reach of children aged less than 8 years.
• Cleaning and user maintenance shall not be made by children.
• This appliance should be positioned in a stable situation with the handles (if any)
positioned to avoid spillage of the hot liquids.
• This appliance is intended to be used in household and similar applications such as:
• Sta kitchen areas in shops, oces and other working environments;
• By clients in hotels, motels and other residential type environments;
• Bed and breakfast type environments.
• If the power cord set is damaged, it must be replaced by a cord set available from the
• Cooking appliances should be positioned in a stable situation with the handles (if
any) positioned to avoid spillage of the hot liquids.
• The appliance is not intended to be operated by means of an external timer or a
separate remote-control system.
• Check if the voltage indicated on the appliance corresponds to the local power
voltage before you connect it.
• Do not let the power cord hang over the edge of the table or worktop on which the
• Make sure the heating element and the outside of the inner pot are clean and dry
before you put the plug in the power outlet.
• Do not plug in the appliance or press any of the buttons on the control panel with
• WARNING: Make sure to avoid spillage on the power connector to avoid a potential
• WARNING: Always follow the instructions and use the appliance properly to avoid
• According to the instructions prescribed in this user manual, use a soft damp cloth to
clean the surfaces in contact with food and make sure to remove all the food residues
• Don’t place the power cord under the appliance when in use.
• When placing the steaming basket, avoid touching the side wall of the inner pot,
otherwise it may cause deformation due to high temperature.
• CAUTION: Surface of the heating element is subject to residual heat after use.
• Never use any accessories or parts from other manufacturers or that Philips does not
specically recommend. If you use such accessories or parts, your guarantee becomes
• Do not expose the appliance to high temperatures, nor place it on a working or still
• Do not expose the appliance to direct sunlight.
• Place the appliance on a stable, horizontal, and level surface.
• Always put the inner pot in the appliance before you put the plug in the power outlet
• Do not place the inner pot directly over an open re to cook rice.
• Do not use the inner pot if it is deformed.
• The accessible surfaces may become hot when the appliance is operating. Take extra
caution when touching the appliance.
• Beware of hot steam coming out of the steam vent during cooking or out of the
appliance when you open the lid. Keep hands and face away from the appliance to
• Do not lift and move the appliance while it is operating.
• Do not exceed the maximum water level indicated in the inner pot to prevent
overow which might cause potential hazard.
• Do not place the cooking utensils inside the pot while cooking, keeping warm or
• Only use the cooking utensils provided. Avoid using sharp utensils.
• To avoid scratches, it is not recommended to cook ingredients with crustaceans and
shellsh. Remove the hard shells before cooking.
• Do not insert metallic objects or alien substances into the steam vent.
• Do not place a magnetic substance on the lid. Do not use the appliance near a
• Always let the appliance cool down before you clean or move it.
• Always clean the appliance after use. Do not clean the appliance in a dishwasher.
• Always unplug the appliance if not used for a longer period.
• If the appliance is used improperly or for professional or semiprofessional purposes,
or if it is not used according to the instructions in this user manual, the guarantee
becomes invalid and Philips refuses liability for any damage caused.
Preparation before cooking
• Make sure that the detachable inner lid is properly installed.
• Do not ll the inner pot with food and liquid less than the minimum of the water
level indications, or more than the maximum of the water level indications.
• For rice cooking, follow the water level indications on the inside of the inner pot.
You can adjust the water level for dierent types of rice and according to your own
preference. Do not exceed the maximum quantities indicated on the inside of the
• After the cooking process is started, you can press to terminate the current
work, and the appliance goes to menu selection mode.
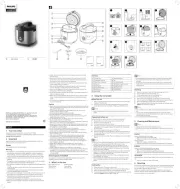
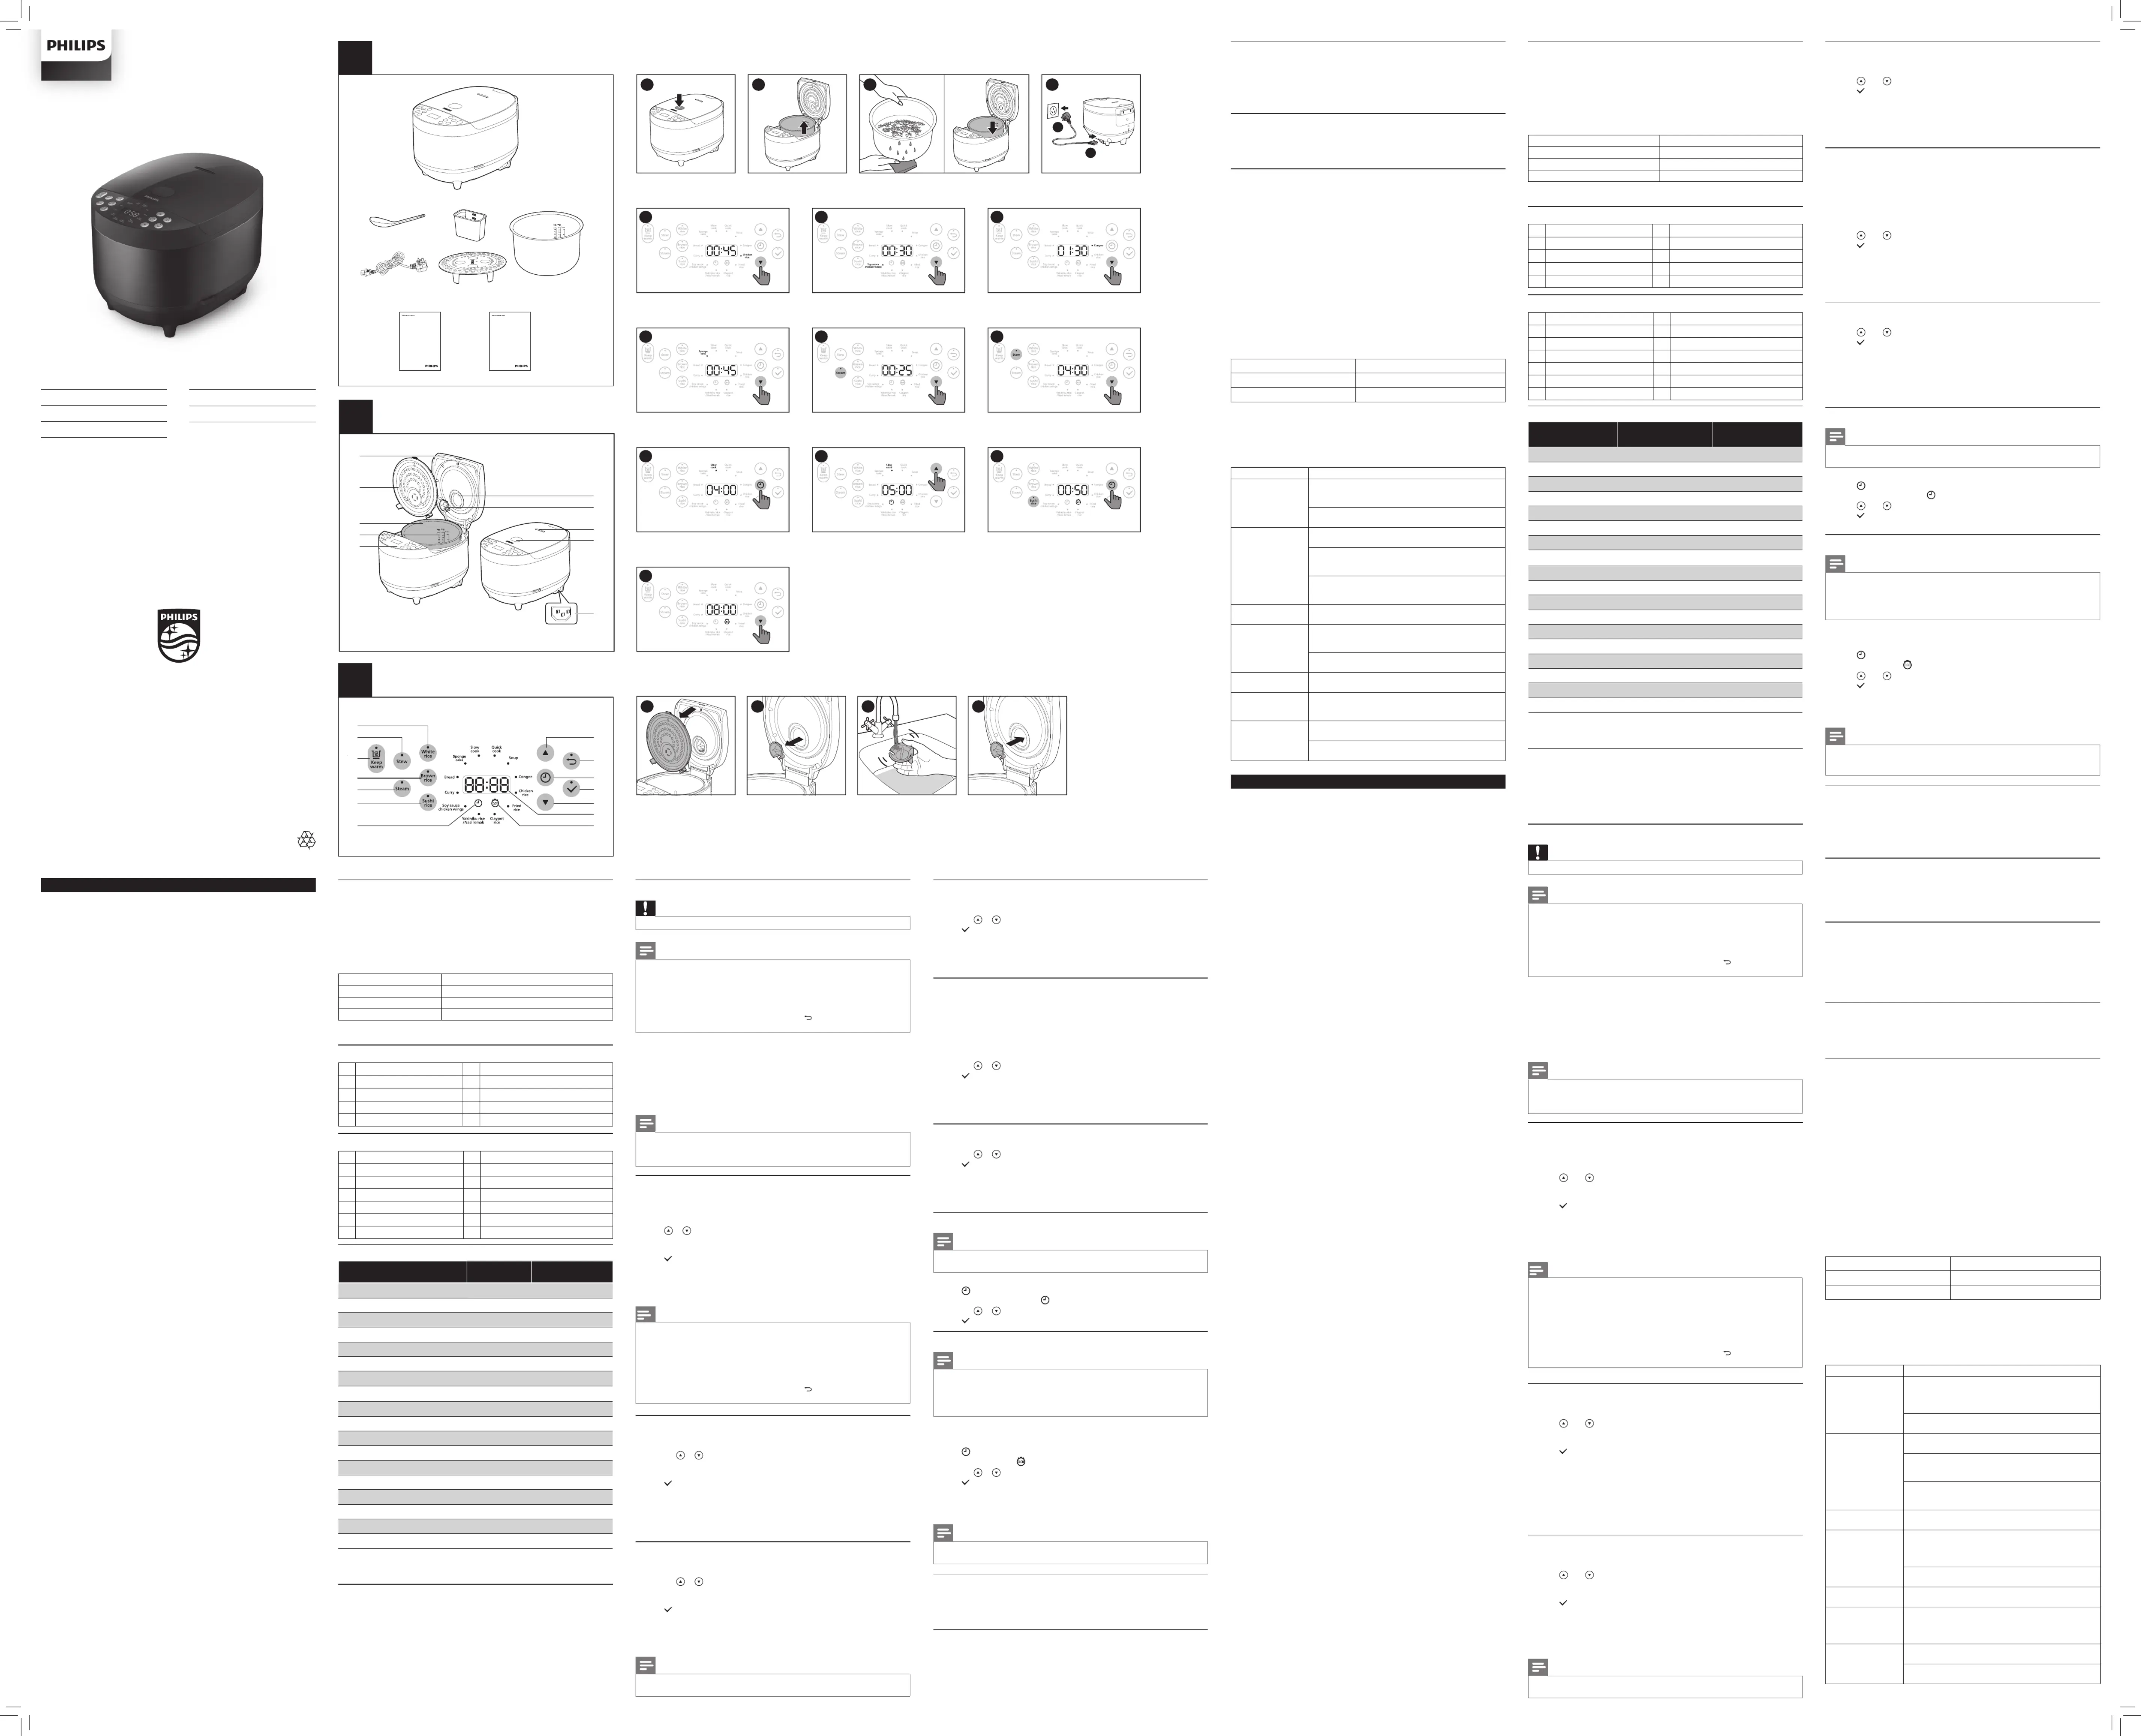
Perform the following preparations before cooking with the Rice cooker:
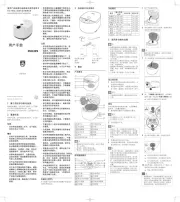
1 Press the lid release button to open the Rice cooker (g. 4).
2 Take out the inner pot from the Rice cooker (g. 5).
3 Put the pre-washed food in the inner pot, wipe the outside and bottom of the inner
pot dry with soft cloth, then put it back into the Rice cooker (g. 6).
5 Put the plug into the power socket (g. 7).
• Make sure the outside of the inner pot is dry and clean, and that there is no foreign
residue on the heating element.
• Make sure the inner pot is in proper contact with the heating element.
There are 8 cooking function: Yakiniku rice/Nasi Lemak Claypot rice Fried rice, , ,
Chicken rice Quick cook White rice Brown Rice Sushi rice, , , and .
For cooking time range, refer to Chapter “Cooking program”.
1 Follow the steps in “Preparations before cooking”.
2 Press or to select one of the cooking menus (g. 8).
» The indicator chosen cooking function lights up, the default cooking time is
3 Press to conrm, the Mutil cooker starts working in the selected mode.
4 When the cooking is nished, you will hear 4 beeps and the selected cooking
function light will be o.
5 The Rice cooker will be in keep-warm mode automatically.
» The keep-warm indicator lights up.
• You can add more ingredients according to the recipe for dierent rice menus.
• The level marked inside the inner pot is just an indication. You can always adjust
the water level for dierent types of grains and your own preference.
• Besides following the water level indications, you may also add rice and water at
1:1-1:3 ratio for rice cooking.
• Do not exceed the volume indicated or exceed the maximum water level, as this
may cause the appliance to overow.
• After the cooking process is started, you can press to terminate the current
work, and the appliance goes to menu selection mode.
1 Put chicken wings and other ingredients into the inner pot.
2 Follow the steps in “Preparations before cooking”.
3 Press the or to select Soy sauce chicken wings (g. 9).
» The indicator chosen cooking function lights up, the default cooking time is
4 Press to conrm, the Mutil cooker starts working in the selected mode.
5 Open the lid, turn the chicken wings over after 15 munites.
6 Close the lid to continue the cooking process, when the cooking is nished, you will
hear 4 beeps and the selected cooking function light will be o.
7 The Rice cooker will be in keep-warm mode automatically.
» The keep-warm indicator lights up.
1 Put ingredients and water into the inner pot.
2 Follow the steps in “Preparations before cooking”.
3 Press the or to select , or Congee Soup Curry (g. 10).
» The indicator chosen cooking function lights up, the default cooking time is
4 Press to conrm, the Mutil cooker starts working in the selected mode.
5 When the cooking is nished, you will hear 4 beeps and the selected cooking
function light will be o.
6 The Rice cooker will be in keep-warm mode automatically.
» The keep-warm indicator lights up.
• Do not exceed the maximum water level indicated in the inner pot, as this may
cause the Rice cooker to overow.
1 Mix all ingredients well and put it into the inner pot.
2 Follow the steps in “Preparations before cooking”.
3 Press the or to select or Sponge cake Bread (g.11).
4 Press to conrm, the Mutil cooker starts working in the selected mode.
5 When the cooking is nished, you will hear 4 beeps and the selected cooking
function light will be o.
6 The Rice cooker will be in keep-warm mode automatically.
» The keep-warm indicator lights up.
1 Measure a few cups of water with the measuring cup.
2 Pour the water into the inner pot.
3 Put the steam basket into the inner pot.
4 Put the food into the steam basket.
5 Follow the steps in “Preparations before cooking”.
6 Pour some water onto the food to prevent it from becoming too dry. The quantity of
the water depends on the amount of food.
7 Press the or to Steam (g.12)
8 Press to conrm, the Rice cooker starts working in the selected mode.
9 When the cooking is nished, you will hear 4 beeps and the selected cooking
function light will be o.
10 The Rice cooker will be in keep-warm mode automatically.
» The keep-warm indicator lights up.
1 Follow the steps in “Preparations before cooking”.
2 Press the or to select Stew (g.13)
3 Press to conrm, the Rice cooker starts working in the selected mode.
4 When the cooking is nished, you will hear 4 beeps and the selected cooking
function light will be o.
5 The Rice cooker will be in keep-warm mode automatically.
» The keep-warm indicator lights up.
• You can adjust the cooking time for , , , Slow cook Bread Soy souce thicken wings
Congee Soup Stew Curry Steam, , , and .
1 Choose a desired function.
2 Press to access the cooking time settings (g. 14).
» The cooking time indicator displays on the screen.
3 Press the or to adjust the cooking time you want (g. 15).
4 Press to conrm. The All-in-One cooker starts working in the selected mode.
• The cooking process will be nished by the time the preset time has elapsed. If the
preset time you set is shorten than the cooking time, the appliance will start the
cooking process immediately.
• You can set the preset from 1-24 hours for all cooking functions except Bread and
You can preset the delayed cooking time. The preset timer is available from 1 hour up to
1 Choose a desired function.
2 Press to access the preset time settings (g. 16).
» The timer indicator displays on the screen.
3 Press the or to set the delayed cooking time (g. 17).
» After the preset time has elapsed, the cooking process will be nished.
6 Cleaning and Maintenance
• Unplug the Rice cooker before starting to clean it.
• Wait until the Rice cooker has cooled down suciently before cleaning it.
• Pull the inner lid out outwards to remove it from the top lid for cleaning (g. 18).
• Soak in hot water and clean with sponge.
• Make sure to remove all the food residues stuck to the Rice cooker.
• Re-install the inner lid back to the top lid.
• Follow the above steps to disassemble the inner lid.
• Disassemble the steam vent cap from the inner lid (g. 19).
• Clean the steam vent cap under tap water (g. 20). Make sure no food residue is
left. Reassemble the steam box to the inner lid after cleaning is completed (g. 21).
Electromagnetic elds (EMF)
This appliance complies withtheapplicable standards and regulations regarding
exposure to electromagnetic elds.
Congratulations on your purchase, and welcome to Philips!
To fully benet from the support that Philips oers, register your product at
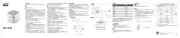
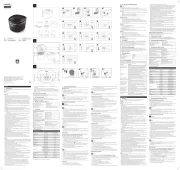
3 What’s in the box (fig.1)
Rice cooker main unit Measuring cup
Rice and soup 2 in 1 spoon Power cord
Steaming basket User manual
Controls overview (g.3)
Cooking time/preset time button
Slow cook 3-10 hours4 hours
Bread 45 minutes 30 minutes-2 hours
Curry 70 minutes 1-2 hours
Soy sauce chicken wings 30 minutes 25 minutes-2 hours
Yakiniku rice/Nasi Lemak NA45 minutes
Steam 25 minutes 10-59 minutes
1 Take out all the accessories from the inner pot. Remove the packaging material of
2 Before rst use, boil water and clean the Rice cooker.
3 Clean the parts thoroughly before using it for the rst time (see chapter “Cleaning
Inside of the top lid and the main body:
• Wipe with a damp cloth.
• Make sure to remove all the food residues stuck to the Rice cooker.
• Wipe with a damp cloth.
• Remove food residues with a damp cloth.
Surface of the top lid and outside of the main body:
• Wipe with a cloth damped with soap water.
• Only use soft and dry cloth to wipe the control panel.
• Make sure to remove all the food residues around the control panel.
• Soak in hot water and clean with sponge.
Do not throw away the product with the normal household waste at the end of its
life, but hand it in at an ocial collection point for recycling. By doing this, you help to
preserve the environment.
Follow your country’s rules for the separate collection of electrical and electronic
products. Correct disposal helps prevent negative consequences for the environment
Versuni oers a two-year warranty after purchase on this product. This warranty is not
valid if a defect is due to incorrect use or poor maintenance. Our warranty does not
aect your rights under law as a consumer. For more information or for invoking the
warranty, please visit our website .www.philips.com/support
See type plate for Specications.
If you encounter problems when using this Rice cooker, check the following points
before requesting service. If you cannot solve the problem, contact the Philips Consumer
Care Center in your country.
There is a connection problem. Check if the power cord is
connected to the Rice cooker properly and if the plug is
inserted rmly into the power outlet.
The light is defective. Take the appliance to your Philips
dealer or a service center authorized by Philips.
There is not enough water. Add water according to the scale
on the inside of the inner pot.
Make sure that there is no foreign residue on the heating
element and the outside of the inner pot before switching
The heating element is damaged, or the inner pot is
deformed. Take the Rice cooker to your Philips dealer or a
service center authorized by Philips.
Add more water to the rice, and cook for a bit longer.
You might have pressed the keep-warm button before
pressing the start button. In this case the Rice cooker will be
in standby mode after the cooking is nished.
The temperature control is defective. Take the appliance to
your Philips dealer or a service center authorized by Philips.
You have not rinse the rice properly. Rinse the rice until the
Make sure that you add water to the level indicated on the
scale inside the inner pot that corresponds to the number of
Clean the inner pot with some washing detergent and warm
After cooking, make sure the steam vent cap, inner lid and
inner pot is cleaned thoroughly.
Baca manual pengguna ini dengan teliti sebelum anda menggunakan Periuk pemasak
serba guna ini dan simpan manual pengguna ini untuk rujukan masa hadapan.
• Perkakas tidak boleh direndam.
• Perkakas ini tidak boleh digunakan oleh kanak-kanak yang berumur 0 hingga 8 tahun.
• Perkakas ini boleh digunakan oleh kanak-kanak berumur 8 tahun ke atas jika mereka
diawasi sepanjang masa atau telah diberikan pengawasan atau arahan berkenaan
penggunaan perkakas dengan cara yang selamat dan memahami bahaya yang
• Perkakas ini tidak dimaksudkan untuk digunakan oleh orang (termasuk kanak-kanak)
yang kurang upaya dari segi zikal, deria atau mental atau kurang berpengalaman
dan pengetahuan, melainkan mereka telah diberikan pengawasan atau arahan
berkenaan penggunaan perkakas ini oleh orang yang bertanggungjawab atas
• Kanak-kanak perlu diawasi untuk memastikan mereka tidak bermain dengan
• Jauhkan perkakas dan kordnya jauh dari jangkauan kanak-kanak yang berumur
• Pembersihan dan penyelenggaraan oleh pengguna tidak boleh dilakukan oleh
• Perkakas ini hendaklah diletakkan di tempat yang stabil iaitu pemegangnya (jika ada)
diletakkan untuk mengelakkan tumpahan cecair yang panas.
• Perkakas ini dimaksudkan untuk digunakan di dalam rumah dan untuk penggunaan
lain yang serupa seperti:
• Kawasan dapur pekerja di kedai, pejabat dan persekitaran kerja yang lain;
• Oleh pelanggan di hotel, motel dan persekitaran tempat menginap yang lain;
• Persekitaran jenis inap-sarapan.
• Jika set kord kuasa rosak, kord perlu digantikan dengan set kord daripada pengeluar.
• Perkakas memasak hendaklah diletakkan di tempat yang stabil iaitu pemegangnya
(jika ada) diletakkan untuk mengelakkan tumpahan cecair yang panas.
• Perkakas ini tidak dimaksudkan untuk dikendalikan menggunakan pemasa luaran
atau sistem kawalan jauh yang berasingan.
• Semak jika voltan yang ditunjukkan pada perkakas sepadan dengan voltan sesalur
kuasa tempatan sebelum anda menyambungnya.
• Jangan biarkan kord kuasa terjuntai dari tepi meja atau permukaan ruang kerja
tempat perkakas itu diletakkan.
• Pastikan elemen pemanasan dan bahagian luar periuk dalam bersih dan kering
sebelum anda memasangkan palam kepada saluran keluar kuasa.
• Jangan masukkan palam perkakas atau tekan sebarang butang pada panel kawalan
dengan tangan yang basah.
• AMARAN: Pastikan anda mengelakkan tumpahan pada penyambung kuasa untuk
mengelakkan kemungkinan bahaya.
• AMARAN: Sentiasa ikuti arahan dan menggunakan perkakas dengan betul untuk
mengelakkan kemungkinan kecederaan.
• Mengikut arahan yang dinyatakan dalam manual pengguna ini, gunakan kain
lembut yang lembap untuk membersihkan permukaan yang bersentuhan dengan
makanan dan pastikan sisa makanan yang melekat pada perkakas dibersihkan juga.
• Jangan letakkan kord kuasa di bawah perkakas semasa sedang digunakan.
• Apabila meletakkan bakul pengukusan, elakkan daripada bersentuh dengan sisi
dinding periuk dalaman, jika tidak kecacatan mungkin akan berlaku akibat suhu yang
• AWAS: Permukaan elemen pemanas mungkin mempunyai baki haba selepas
• Jangan sekali-kali gunakan aksesori atau barang-barang ganti daripada pengilang
lain atau pengilang yang tidak disyorkan oleh Philips. Jika anda menggunakan
aksesori atau barang-barang ganti sedemikian, jaminan anda menjadi tidak sah.
• Jangan dedahkan perkakas pada suhu tinggi, ataupun meletakkannya pada pemanas
atau dapur yang sedang terpasang atau masih panas.
• Jangan dedahkan perkakas pada cahaya matahari langsung.
• Letakkan perkakas pada permukaan yang stabil, mendatar dan rata.
• Letak periuk dalam ke dalam perkakas sebelum anda memasukkan palam pada salur
keluar kuasa dan menghidupkan perkakas.
• Jangan letakkan periuk dalam terus di atas api terbuka untuk memasak nasi.
• Jangan gunakan periuk dalam sekiranya ia cacat.
• Permukaan yang dapat dicapai mungkin menjadi panas apabila perkakas beroperasi.
Ambil langkah lebih berhati-hati apabila menyentuh perkakas.
• Berhati-hati dengan stim panas yang keluar dari bolong stim semasa memasak atau
yang keluar dari perkakas semasa anda membuka tudungnya. Jauhkan tangan dan
muka daripada perkakas untuk mengelakkan daripada stim.
• Jangan angkat atau pindahkan perkakas semasa ia sedang beroperasi.
• Jangan melebihi paras air maksimum yang ditunjukkan pada periuk dalam agar tidak
melimpah kerana ini boleh menyebabkan bahaya.
• Jangan letakkan alat-alat memasak di dalam periuk ketika memasak, menyimpan
panas atau memanaskan semula nasi.
• Hanya gunakan alat-alat memasak yang disediakan. Elakkan daripada menggunakan
• Untuk mengelakkan calar, memasak ramuan seperti krustasea dan kerang-kerangan
adalah tidak disyorkan. Buang kulitnya yang keras sebelum memasak.
• Jangan masukkan barang logam atau barang asing ke dalam bolong stim.
• Jangan letakkan bahan bermagnet pada tudung. Jangan gunakan perkakas
berdekatan bahan bermagnet.
• Biarkan perkakas menyejuk terlebih dahulu setiap kali sebelum anda membersih atau
• Sentiasa bersihkan perkakas selepas digunakan. Jangan cuci perkakas dalam mesin
• Cabut palam perkakas jika tidak akan digunakan untuk tempoh masa yang lama.
• Jika perkakas digunakan dengan cara yang tidak betul atau untuk tujuan profesional
atau separa profesional, atau jika ia tidak digunakan mengikut arahan dalam
panduan pengguna ini, jaminan menjadi tidak sah dan Philips menolak liabiliti
terhadap sebarang kerosakan yang berlaku.
Medan elektromagnet (EMF)
Perkakas ini mematuhi piawaian dan peraturan berkaitan dengan pendedahan kepada
2 Periuk pemasak serba guna anda
Tahniah atas pembelian anda dan selamat menggunakan Philips!
Untuk mendapatkan manfaat sepenuhnya daripada sokongan yang ditawarkan oleh
Philips, daftar produk anda di www.philips.com/welcome.
3 Isi kandungan kotak (raj.1)
Unit utama periuk pemasak serba guna Cawan penyukat
Sudu 2 dalam 1 Kord kuasa
Bakul pengukus Manual pengguna
Gambaran keseluruhan produk (raj.2)
Tudung dalam boleh tanggal
Gambaran keseluruhan kawalan (raj.3)
Butang masa memasak/masa pratetap
Fungsi memasak Masa memasak lalai
Masak perlahan 3-10 jam4 jam
Kek span Tidak Berkenaan45 minit
Roti 45 minit 30 minit-2 jam
Kepak ayam kicap 30 minit 25 minit-2 jam
Nasi Yakiniku/Nasi Lemak Tidak Berkenaan45 minit
Pantas dimasak Tidak Berkenaan25 minit
Stim 25 minit 10-59 minit
Beras putih Tidak Berkenaan45 minit
Beras Perang Tidak Berkenaan60 minit
Beras susyi Tidak Berkenaan50 minit
Simpan panas Tidak Berkenaan24 jam
5 Menggunakan Periuk pemasak serba guna
Sebelum penggunaan pertama
1 Keluarkan semua aksesori dari periuk dalam. Alih keluar bahan pembungkusan
2 Sebelum penggunaan pertama, didihkan air dan bersihkan Periuk pemasak serba
3 Bersihkan bahagian Periuk pemasak serba guna dengan teliti sebelum digunakan
untuk kali pertama (lihat bab “Pembersihan dan Penyelenggaraan”).
Persediaan sebelum memasak
• Pastikan tudung dalam boleh tanggal dipasangkan dengan betul.
• Jangan isi periuk dalam dengan makanan dan cecair kurang daripada penunjuk
paras air minimum atau lebih daripada penunjuk paras air maksimum.
• Untuk memasak nasi, ikut penunjuk paras air di bahagian dalam periuk dalam.
Anda boleh melaraskan aras air untuk jenis beras yang berlainan dan mengikut
keutamaan anda. Jangan melebihi kuantiti maksimum yang ditunjukkan di
bahagian dalam periuk dalam.
• Selepas proses memasak dimulakan, anda boleh menekan untuk menamatkan
proses semasa dan perkakas akan beralih kepada mod pemilihan menu.
Lakukan persediaan berikut sebelum memasak dengan Periuk pemasak serba guna:
1 Tekan butang pelepas tudung untuk membuka Periuk pemasak serba guna (raj. 4).
2 Keluarkan periuk dalam daripada Periuk pemasak serba guna (raj. 5).
3 Masukkan makanan yang telah dicuci ke dalam periuk dalam, lap bahagian luar dan
bawah periuk dalam sehingga kering dengan kain lembut, kemudian masukkan
semula ke dalam periuk pemasak Semua dalam Satu (raj. 6).
5 Pasangkan palam kepada soket kuasa (raj. 7).
• Pastikan bahagian luar periuk dalam kering dan bersih serta tiada sisa asing pada
• Pastikan periuk dalam bersentuhan dengan betul dengan elemen pemanasan.
Terdapat 8 fungsi memasak: Nasi Yakiniku/Nasi Lemak Nasi claypot Nasi goreng, , ,
Nasi ayam Masak pantas Nasi putih Beras Perang Nasi susyi, , , dan .
Untuk mengetahui julat masa memasak, rujuk Bab “Program memasak”.
1 Ikuti langkah dalam "Persediaan sebelum memasak".
2 Tekan atau untuk memilih salah satu daripada menu memasak (raj. 8).
» Penanda fungsi memasak yang dipilih menyala, masa memasak lalai akan
3 Tekan untuk mengesahkan, Periuk pemasak serba guna akan mula beroperasi
4 Apabila selesai memasak, anda akan dengar bunyi bip 4 kali dan lampu fungsi
memasak yang dipilih akan mati.
5 Periuk pemasak serba guna akan berada dalam mod simpan panas secara automatik.
» Penunjuk simpan panas menyala.
• Anda boleh menambahkan lebih banyak bahan mengikut resipi untuk menu nasi
• Paras yang ditandai di dalam periuk dalam hanyalah penunjuk. Anda boleh
melaraskan aras air untuk jenis bijirin yang berlainan mengikut pilihan anda.
• Selain mengikut penunjuk paras air, anda juga boleh menambahkan beras dan air
pada nisbah 1:1-1:3 untuk memasak nasi.
• Jangan melebihi isipadu yang ditunjukkan mahupun melebihi paras air maksimum
kerana ini boleh menyebabkan perkakas melimpah.
• Selepas proses memasak dimulakan, anda boleh menekan untuk menamatkan
proses semasa dan perkakas akan beralih kepada mod pemilihan menu.
1 Masukkan kepak ayam dan bahan lain ke dalam periuk dalam.
2 Ikuti langkah dalam "Persediaan sebelum memasak".
3 Tekan atau untuk memilih Kepak ayam kicap (raj. 9).
» Penanda fungsi memasak yang dipilih menyala, masa memasak lalai akan
4 Tekan untuk mengesahkan, Periuk pemasak serba guna akan mula beroperasi
5 Buka tudung, terbalikkan kepak ayam selepas 15 minit.
6 Tutup tudung untuk meneruskan proses memasak. Apabila selesai memasak, anda
akan mendengar bunyi bip 4 kali dan lampu fungsi memasak yang dipilih akan
7 Periuk pemasak serba guna akan berada dalam mod simpan panas secara
» Penunjuk simpan panas menyala.
1 Masukkan ramuan dan air ke dalam periuk dalam.
2 Ikuti langkah dalam "Persediaan sebelum memasak".
3 Tekan atau untuk memilih , atau (raj. 10).Bubur Sup Kari
» Penanda fungsi memasak yang dipilih menyala, masa memasak lalai akan
4 Tekan untuk mengesahkan, Periuk pemasak serba guna akan mula beroperasi
5 Apabila selesai memasak, anda akan dengar bunyi bip 4 kali dan lampu fungsi
memasak yang dipilih akan mati.
6 Periuk pemasak serba guna akan berada dalam mod simpan panas secara automatik.
» Penunjuk simpan panas menyala.
• Jangan melebihi paras air maksimum yang ditandakan pada periuk dalam kerana
hal ini boleh menyebabkan Periuk pemasak serba guna melimpah.
1 Campurkan semua bahan sehingga sebati dan masukkan ke dalam periuk dalam.
2 Ikuti langkah dalam "Persediaan sebelum memasak".
3 Tekan atau untuk memilih atau (raj.11).Kek span Roti
4 Tekan untuk mengesahkan, Periuk pemasak serba guna akan mula beroperasi
5 Apabila selesai memasak, anda akan dengar bunyi bip 4 kali dan lampu fungsi
memasak yang dipilih akan mati.
6 Periuk pemasak serba guna akan berada dalam mod simpan panas secara automatik.
» Penunjuk simpan panas menyala.
1 Sukat beberapa cawan air dengan cawan penyukat.
2 Tuang air ke dalam periuk dalam.
3 Letakkan bakul kukus di dalam periuk dalam.
4 Letakkan makanan ke dalam bakul mengukus.
5 Ikuti langkah dalam "Persediaan sebelum memasak".
6 Tuangkan sedikit air ke dalam makanan agar makanan tidak menjadi terlalu kering.
Jumlah air bergantung pada jumlah makanan.
7 Tekan atau untuk Mengukus (raj.12)
8 Tekan untuk mengesahkan, Periuk pemasak serba guna akan mula beroperasi
9 Apabila selesai memasak, anda akan dengar bunyi bip 4 kali dan lampu fungsi
memasak yang dipilih akan mati.
10 Periuk pemasak serba guna akan berada dalam mod simpan panas secara automatik.
» Penunjuk simpan panas menyala.
1 Ikuti langkah dalam “Persediaan sebelum memasak”.
2 Tekan atau untuk memilih (raj.13)Stew
3 Tekan untuk mengesahkan, Periuk pemasak serba guna akan mula beroperasi
4 Apabila selesai memasak, anda akan dengar bunyi bip 4 kali dan lampu fungsi
memasak yang dipilih akan mati.
5 Periuk pemasak serba guna akan berada dalam mod simpan panas secara
» Penunjuk simpan panas menyala.
• Anda boleh melaraskan masa memasak untuk , , Masak perlahan Roti Kepak
ayam kicap Bubur Sup Stew Kari Kukus, , , , dan .
1 Pilih fungsi yang dikehendaki.
2 Tekan untuk mengakses tetapan masa memasak (raj. 14).
» Penanda masa memasak dipaparkan pada skrin.
3 Tekan atau untuk melaraskan masa memasak yang anda kehendaki (raj. 15).
4 Tekan untuk mengesahkan. Periuk pemasak Semua dalam Satu mula beroperasi
• Proses memasak akan selesai sebelum masa pratetap berlalu. Jika masa pratetap
yang anda tetapkan lebih singkat daripada masa memasak, perkakas akan
memulakan proses memasak dengan segera.
• Anda boleh menetapkan masa pratetap daripada 1-24 jam untuk semua fungsi
memasak kecuali dan Roti Kukus.
Anda boleh menetapkan dahulu masa memasak tertunda. Pemasa boleh ditetapkan
dahulu daripada 1 jam hingga 24 jam.
1 Pilih fungsi yang dikehendaki.
2 Tekan untuk mengakses tetapan masa pratetap (raj. 16).
» Penanda pemasa dipaparkan pada skrin.
3 Tekan atau untuk menetapkan masa memasak tertunda (raj. 17).
4 Tekan untuk mengesahkan.
» Selepas masa pratetap tamat, proses memasak akan selesai.
6 Pembersihan dan Penyelenggaraan
• Cabut palam Periuk pemasak serba guna sebelum anda mula membersihkan periuk.
• Tunggu sehingga Periuk pemasak serba guna telah sejuk secukupnya sebelum
anda membersihkan periuk.
• Tarik tudung dalam ke luar untuk menanggalkan tudung dalam daripada tudung
atas untuk dibersihkan (raj. 18).
• Rendam di dalam air panas dan bersihkan dengan span.
• Pastikan semua sisa makanan yang melekat pada Periuk pemasak serba guna
• Pasang semula tudung dalam pada tudung atas.
• Ikut langkah di atas untuk menanggalkan tudung dalam.
• Tanggalkan tukup bolong stim daripada tudung dalam (raj. 19).
• Bersihkan tukup bolong stim dengan air paip (raj. 20). Pastikan tiada sisa
makanan tertinggal. Pasang semula kotak stim pada tudung dalam selepas
pembersihan selesai (raj. 21).
Di bahagian dalam tudung atas dan badan utama:
• Lap dengan kain lembap.
• Pastikan semua sisa makanan yang melekat pada Periuk pemasak serba guna
• Lap dengan kain lembap.
• Buang sisa makanan dengan kain lembap.
Permukaan tudung atas dan bahagian luar badan utama:
• Lap dengan kain yang dilembapkan dengan air sabun.
• Hanya gunakan kain lembut dan kering untuk mengelap panel kawalan.
• Pastikan semua sisa makanan di sekeliling panel kawalan dibuang.
Spatula dan periuk dalam:
• Rendam di dalam air panas dan bersihkan dengan span.
Jangan buang produk dengan sampah rumah biasa di akhir hayatnya. Sebaliknya, bawa
perkakas ke pusat pungutan rasmi atau kitar semula. Dengan melakukan ini, anda
membantu memelihara alam sekitar.
Ikut peraturan negara anda untuk pengumpulan berasingan produk elektrik dan
elektronik. Cara membuang yang betul akan membantu mencegah akibat negatif
terhadap alam sekitar dan kesihatan manusia.
Versuni menawarkan jaminan dua tahun selepas pembelian produk ini. Jaminan
ini tidak sah jika terdapat kerosakan yang disebabkan oleh penggunaan salah atau
penyelenggaraan yang tidak dilakukan dengan baik. Jaminan kami tidak menjejaskan
hak anda menurut undang-undang sebagai pengguna. Untuk maklumat lanjut atau
menggunakan jaminan, sila lawati laman web kami . www.philips.com/support
Lihat plat jenis untuk Spesikasi.
Jika anda menghadapi masalah semasa menggunakan Periuk pemasak serba guna ini,
periksa perkara berikut sebelum meminta servis. Jika anda tidak dapat menyelesaikan
masalah ini, hubungi Pusat Layanan Pelanggan Philips di negara anda.
Terdapat masalah sambungan. Periksa sama ada kord kuasa
telah disambungkan pada Periuk pemasak serba guna
dengan betul dan sama ada palam telah dimasukkan dengan
kukuh pada saluran keluar kuasa.
Lampu rosak. Bawa perkakas ke penjual Philips anda atau
pusat servis yang disahkan oleh Philips.
Air tidak mencukupi. Tambah air mengikut skala pada
bahagian dalam periuk dalam.
Pastikan tiada sisa asing pada elemen pemanasan dan
bahagian luar periuk dalam sebelum menghidupkan Periuk
Elemen pemanasan rosak, atau periuk dalam cacat. Bawa
Periuk pemasak serba guna kepada pengedar Philips anda
atau pusat servis yang diluluskan oleh Philips.
Tambah lebih banyak air pada beras dan masak lebih lama.
Anda mungkin telah menekan butang simpan panas
sebelum menekan butang mula. Dalam keadaan ini, Periuk
pemasak serba guna akan berada dalam mod siap sedia
Kawalan suhu rosak. Bawa perkakas ke penjual Philips anda
atau pusat servis yang disahkan oleh Philips.
Anda telah tidak membilas beras dengan betul. Bilas beras
sehingga air yang mengalir bersih.
Pastikan anda menambahkan air sehingga aras yang
ditunjukkan pada skala di dalam periuk dalam yang sepadan
dengan bilangan cawan beras yang digunakan.
Bersihkan periuk dalam dengan sedikit bahan cuci dan air
Selepas memasak, pastikan tukup bolong stim, tudung
dalam dan periuk dalam dibersihkan dengan menyeluruh.