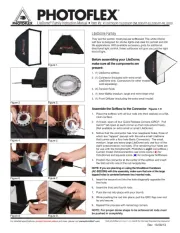
Photoflex LiteDome Manual

Photoflex Lys LiteDome

Læs gratis den danske manual til Photoflex LiteDome (2 sider) i kategorien Lys. Denne vejledning er vurderet som hjælpsom af 3 personer og har en gennemsnitlig bedømmelse på 4.7 stjerner ud af 2 anmeldelser. Har du et spørgsmål om Photoflex LiteDome, eller vil du spørge andre brugere om produktet?

Side 1/2
PROFESSIONAL PHOTOGEAR
Visit photoexlightingschool.com® for the best free learning resource!
For detailed specifications, product tutorial videos and more, please visit www.photoflex
®
.com
Rev 10/28/13
LiteDome
®
Family Instruction Manual • Item #s: XT-20XTXS/XT-1SLD293/XT-2MLD293/XT-3LLD293/XT-4XLLD293
Before assembling your LiteDome,
make sure all the components are
present:
1. (1) LiteDome softbox
2. (1) Connector (Included with extra small
LiteDome only. Connectors for other models
sold separately)
3. (4) Tension Rods
4. (1) Inner Bafe (medium, large and extra large only)
5. (1) Front Diffuser (excluding the extra small model)
Assemble the Softbox to the Connector Figures 1-9
1. Place the softbox with all four rods into their sleeves on a at,
clean surface.
2. If closed, open all four Quick Release Corners (QRC)
®
. Pull
Velcro
®
tab open at each corner so that rods extend freely.
(Not available on extra small or small LiteDome.)
3. Notice that the connector has nine receptacle holes, three of
which are "tapped" (except with the extra small LiteDome
that comes with a four hole Basic Connector). The small,
medium, large and extra large LiteDome only use four of the
eight octoconnector rod holes. (The remaining four holes are
for use with the OctoDome®, Photoex's eight rod softbox.)
Current model OctoConnectors use circle icons ( ) for
OctoDomes and squares icons ( ) for rectangular Softboxes.
4. Position the connector at the center of the softbox and insert
the rst rod into one of the rod receptacles.
NOTE: If you are planning on using the ShoeMount hardware
(AC-B222SM) with this assembly, make sure that one of the large
tapped holes is centered between two inserted rods.
5. Insert the second rod into the hole diagonally opposite the
rst hole.
6. Insert the third and fourth rods.
7. Push the rod into place with your thumb.
8. While pushing the rod into place, pull the QRC ap over rod
tip and secure.
9. Repeat this process with remaining corners.
NOTE: For proper dome shape to be achieved all rods must
be pushed in completely.
LiteDome Family
They are the worlds' most popular softboxes! This white interior
soft box is designed for strobe lights and ideal for portrait and still
life applications. With available accessory grids for additional
directional light control, these softboxes will give you just the right
kind of light.
Figure 1.
Figure 2. Figure 3.
Figure 4.
Figure 5.
Figure 6.
Figure 7.
Figure 8.
Figure 9.
PROFESSIONAL PHOTOGEAR
Visit photoexlightingschool.com® for the best free learning resource!
For detailed specifications, product tutorial videos and more, please visit www.photoflex
®
.com
Rev 10/28/13
Attaching Rear Flaps (optional) Figure 10-11
10. The rear aps can be closed by pulling them toward the
connector and attaching with the Velcro that is sewn into each
ap. The softbox is built and ready to attach to your strobe
light head. Finally, with the softbox face down, press rmly on
the connector to be sure that all the rods are seated properly.
Attaching Your Light Head to the Connector and
LiteStand
®
Figures 12-13
In most cases, the softbox connector is designed to connect
with your strobe light head in the same manner as your light
head's accessories.
11. Connect the light to the softbox connector making sure that your
lights locking mechanism is securely attached. Figure 12
12. Carefully lift the softbox and light assembly and position it over
your LiteStand. Line up the LiteStand's riser (stud) with the
stand receptacle hole on your light head. Place the light head
on the LiteStand and secure the light's tilt bracket to securely
attach the light to the stand. Figure 13
Installing the Internal Baffle and Diffusion Face
Figures 14-17
13. The inner bafe has elastic bands with metal clips at each of
the four corners. The interior of the LiteDome softbox has four
white Nylon loops. Secure one metal clip to each of these loops
(Not available on the extra small or small LiteDomes) Figure 14
14. Here is an example of the inner bafe correctly installed. Figure 15
15. The face diffuser is rimmed with Velcro that attaches to its
counterpart lining the front of the LiteDome. Find the long edge
of the diffuser and line it up with the long edge of the LiteDome
front. Starting at one corner, press the face diffuser into place.
Work your way around the rim of the softbox until the diffuser is
in place. Figure 16
16. Congratulations! Your softbox is now fully constructed! Figure 17
PHOTOFLEX
®
6 YEAR WARRANTY
Warranties only cover manufacturer’s defects and workmanship.
• Wereservetherighttoinspectallmerchandisereturned(endusersand
dealers) for warranty fulfillment.
• ForreturnscontactPhotoflexfirsttoobtainareturnauthorization
numberandinstructionsforreturn.
• Freightmustbepaidbothwaysbythecustomerordealer.
• Warrantiesarevalidonlyfromdateoforiginalpurchase.
• Warrantiesarecannotcoverdamagecausedbyaccidents,impropercare
or use.
Customer Support (800) 486-2674
E-mail: sales@photoflex.com
CorporateOffice(831)786-1370•FAX(831)786-1372
97HangarWay,Watsonville,CA95076
©2013 Photoex, Inc. ALL RIGHTS RESERVED. LiteDome
®
, QRC
®
, LiteStand
®
, Photoex
®
and the
Photoex logo are trademarks or registered trademarks of Photoex and/or its afliates in the U.S. and
other countries. Third party trademarks are the property of their respective owners.
Figure 12.
Figure 11.
Figure 10.
Figure 14.
Figure 13.
Figure 16.
Figure 15.
Figure 17.


Produkt Specifikationer

Mærke: Photoflex
Kategori: Lys
Model: LiteDome

Har du brug for hjælp?

Hvis du har brug for hjælp til Photoflex LiteDome stil et spørgsmål nedenfor, og andre brugere vil svare dig


Lys Photoflex Manualer

Photoflex

Photoflex LiteDome Manual

15 Oktober 2025

Lys Manualer

Nyeste Lys Manualer

Emos

Emos D4AW25 Manual

15 Oktober 2025
Lucide

Lucide Safiya Manual

15 Oktober 2025
Emos

Emos D5AC25 Manual

15 Oktober 2025
Lucide

Lucide Livia Manual

15 Oktober 2025
Lucide

Lucide Castello Manual

15 Oktober 2025
Lucide

Lucide Conos Manual

15 Oktober 2025
Emos

Emos D5AC24 Manual

15 Oktober 2025
Lucide

Lucide Balloon Manual

15 Oktober 2025