En En
PIONEER CORPORATION
4-1, MEGURO 1-CHOME, MEGURO-KU, TOKYO 153-8654, JAPAN
PIONEER ELECTRONICS (USA) INC.
P.O. Box 1540, Long Beach, California 90801-1540, U.S.A.
TEL: (800) 421-1404
PIONEER EUROPE NV
Haven 1087, Keetberglaan 1, B-9120 Melsele, Belgium
TEL: (0) 3/570.05.11
PIONEER ELECTRONICS ASIACENTRE PTE. LTD.
253 Alexandra Road, #04-01, Singapore 159936
TEL: 65-6472-7555
PIONEER ELECTRONICS AUSTRALIA PTY. LTD.
178-184 Boundary Road, Braeside, Victoria 3195, Australia
TEL: (03) 9586-6300
PIONEER ELECTRONICS OF CANADA, INC.
300 Allstate Parkway, Markham, Ontario L3R 0P2, Canada
TEL: 1-877-283-5901
PIONEER ELECTRONICS DE MEXICO, S.A. de C.V.
Blvd. Manuel Avila Camacho 138 10 piso
Col. Lomas de Chapultepec, Mexico, D.F. 11000
TEL: 55-9178-4270
Published by Pioneer Corporation.
Copyright © 2007 by Pioneer Corporation.
All rights reserved.
Publicado por Pioneer Corporation.
Copyright © 2007 Pioneer Corporation.
Todos los derechos reservados.
Printed in Japan
Impreso en Japón
<CZR5083-A> E<KKNNX> <07D00000>
Digital Parking Assistance Camera
Cámara digital de auxilio de estacionamiento
Owner’s Manual
Manual del Propietario
ND-BC20PA
This device complies with Part 15 of the FCC
Rules.
Operation is subject to the following two
conditions:
(1) This device may not cause harmful interference,
and (2) this device must accept any interference
received, including interference that may cause
undesired operation.
Information to User
Alteration or modifications carried out without
appropriate authorization may invalidate the user’s
right to operate the equipment.
If you want to dispose this product, do
not mix it with general household waste.
There is a separate collection system for
used electronic products in accordance with
legislation that requires proper treatment,
recovery and recycling.
Private households in the member states of the EU,
in Switzerland and Norway may return their used
electronic products free of charge to designated
collection facilities or to a retailer (if you purchase a
similar new one).
For countries not mentioned above, please contact
your local authorities for the correct method of
disposal.
By doing so you will ensure that your disposed
product undergoes the necessary treatment, recovery
and recycling and thus prevent potential negative
effects on the environment and human health.
WARNING:
Handling the cord on this product or cords associated
with accessories sold with the product may expose
you to chemicals listed on proposition 65 known to
the State of California and other governmental enti-
ties to cause cancer and birth defects or other repro-
ductive harm. Wash hands after handling.
IMPORTANT
SAFEGUARDS
Do not wash your car with an automatic car wash
or high-pressure water as it may result in water
entering the camera or the camera falling off.
Do not attempt to heat the surface of the camera
lens or camera lens itself with a lighter and so on
when they have become frozen. This can cause a
malfunction.
This product is a rear view camera for checking
the view at the rear of a car.
A rear view camera is a camera that provides sym-
metrical images in the same way as rear and side
view mirrors.
•
•
•
Connection to a TV with an RCA video input is
possible, but confirm whether the TV you use has
a reverse gear connection function.
Direct sunlight or strong light (sunlight reflected
from a bumper etc) on the camera may result in
smear above and below the location where the
light strikes, but this is not a malfunction.
This product is designed to supplement the driv-
er’s rear view, but the camera images do not show
all dangers and obstacles. Be sure to look behind
you when reversing to confirm the view.
Since this product uses a wide-angle lens, objects
nearby appear wider and objects far away appear
narrower, and distance may seem different than
the actual distance. Always make sure to visually
check behind your car when backing up.
This product is required to be set individually for
each type of vehicle. When reinstalling this prod-
uct on a different car such as after purchasing a
different car, always make sure to change the set-
tings prior to use.
Always drive carefully without relying too much
on this product.
Check camera stand installation before driving.
Are the screws loose?
Is the camera stand firmly secured?
If the rear view camera comes loose while you
are driving it may cause an accident.
This device is designed for use ONLY with
Pioneer unit with rear camera input. Before con-
tinuing setup, please confirm you are using the
“Reverse mode” to view this screen.
Those Pioneer models compatible with the screen
display (guide, menu, etc.) of this product are as
listed below. When combining with other prod-
ucts, the screen display displayed by the combined
product may be superimposed on the screen dis-
play displayed by this product.
•
•
•
•
•
•
•
–
–
•
•
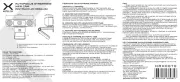
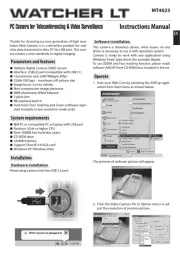
What's What
Button Unit
➀
➂
➃
➁
➀ MODE Button
This is used when changing the screen
display mode. This is also used to return
to the previous screen or discontinue an
operation on the setup screen.
➁ + Button
This is used when selecting an item on the
setup screen or when adjusting position or
angle.
➂ – Button
This is used when selecting an item on the
setup screen or when adjusting position or
angle.
➃ ENTER Button
This is used to finalize a display or item on
the setup screen.
Preparations Before
Beginning Setup
The setup procedure for this product consists
of taking photographs of images of the rear
view camera when viewed from the location
where the rear view camera is installed, and
then setting up the camera based on those
photographs after moving the vehicle to a
safe location provided with tire blocks. Move
the vehicle to the location where photographs
are to be taken before beginning the setup
procedure.
1. Park the vehicle.
Park the vehicle in the center of the parking
space indicated with the white lines.
White lines Center of parking
space
2. Move the vehicle forward.
Move the vehicle forward from the location
where it has been parked to the location
where the photographs are to be taken.
Take photographs at the location where
the white lines cross the dotted lines while
referring to the photograph above.
Note:
Perform setup at a parking space having white
lines and tire blocks. The setup will not be correct
if the vehicle is not located in the center of the
parking space.
•
First Time Setup
An initial setup is required when using this
product for the first time.
Begin the setup procedure after parking the
vehicle at the location where photographs
are to be taken by referring to the section on
“Preparations Before Beginning Setup”.
1. Put the car in reverse.
Note:
When performing setup, always make sure to set
the parking brake and step on the brake to make
sure the car is stopped.
2. Simultaneously press the ENTER
and + buttons on the button unit.
3. Press the ENTER button four times.
4. Take the photograph.
Take the photograph to be used for setup.
Take the photograph while referring to the
section on “Taking Photographs”.
5. Set the basic settings.
Set the basic settings in the order of items
A to F of “Basic Settings” based on the
photograph taken. Make the settings by
referring to “Basic Settings”.
6. Select OK and press the ENTER
button.
The initial setup is completed and the
settings are stored in memory.
Note:
Please make sure to read the caution and then
press the ENTER button to go to the next step.
Photograph data is deleted when setup is ended.
This camera and associated electronic guides are
intended solely as a driving aid. This unit is not
a substitute for you attentiveness, judgement, and
care while driving, moving, or parking your vehi-
cle. Always observe safe driving rules and driving
laws, even if they contradict the unit instructions.
•
•
•
•
Taking Photographs
A photograph to be used for setup is taken.
(Refer to “First Time Setup” and “Changing
Basic Settings or Other Settings” for
information to get started with photographing
procedure.)
1. Press the ENTER button twice.
2. Press the ENTER button again.
A photograph of the image of rear view
camera is taken.
3. Press the ENTER button.
Press the ENTER button if the photograph
taken is satisfactory. Press the MODE
button to retake the photograph.
4. Press the ENTER button twice.
5. Move the car to a safe location pro-
vided with tire blocks.
Move the car from the location where
the photograph was taken to a location
provided with tire blocks.
Note:
Always make sure that the car has come to a com-
plete stop and parked after moving.
Do not turn off the engine. Photograph data will
be deleted if the engine is turned off.
6. Press the ENTER button.
7. Press the ENTER button.
When performing this procedure starting
from “First Time Setup”, proceed to step 5
of “First Time Setup”.
When performing this procedure starting
from “Changing Basic Settings or Other
Settings”, proceed to step 5 of “Changing
Basic Settings or Other Settings”.
•
•
AVIC-Z1 / AVIC-Z2 / AVIC-HD1BT / AVIC-HD3 /
AVIC-D3 / AVH-P5900DVD / AVH-P5950DVD /
AVH-P7900DVD / AVH-P7950DVD
En
ENGLISH
ESPAÑOL