Pryme BT-583APX-V2 Manual
Pryme
Ikke kategoriseret
BT-583APX-V2
Læs nedenfor 📖 manual på dansk for Pryme BT-583APX-V2 (2 sider) i kategorien Ikke kategoriseret. Denne guide var nyttig for 3 personer og blev bedømt med 4.7 stjerner i gennemsnit af 2 brugere
Side 1/2

Pairing with a Wireless PTT Button
The PRYMEBLU Advanced Adapter is compatible
with a few different wireless PTT buttons:
• PRYMEBLU BT-PTT2, which uses conventional BT.
• PRYMEBLU BT-PTT-Z or PRYMEBLU BT-PTT-ZU, which use a
special form of BT called BT Low Energy (BLE).
To pair the adapter with a PTT button, follow these steps:
* Power off any wireless headset or audio accessory that
has previously been paired to the PRYMEBLU Advanced Adapter.
* Power off the BT PTT button that you intent to use with the PRYMEBLU Advanced Adapter.
* Power off the radio that the PRYMEBLU Advanced Adapter is connected to. Wait at least three seconds.
* Turn the radio on while holding down the Talk button on the PRYMEBLU Advanced Adapter.
* Continue to hold the Talk button down until the status LED begins to flash two times per second.
(You may need to angle your finger off to the side of the Talk button to see the LED.) Note that the
LED on the adapter may show several single flashes before shows double flashes. This can take
approximately three to five seconds.
* Release the Talk button. The PRYMEBLU Advanced Adapter is now in audio accessory pairing mode.
To enter PTT pairing mode, proceed to the next step.
* Press and release the Talk button again. The LED on the PRYMEBLU Advanced Adapter will now change
to three flashes per second. The PRYMEBLU Advanced Adapter is now in Push-to-Talk pairing mode.
* IF YOU ARE USING A CONVENTIONAL PTT BUTTON (BT-PTT2): Place the button into pairing mode by
pressing down the PTT button and pressing the power switch. Continue to hold the button down
until the LED on the BT-PTT2 flashes two times per second.
* IF YOU ARE USING A BT LOW ENERGY BUTTON (BT-PTT-Z, BT-PTT-ZU): Power the button on
using the slide switch and then press and release the PTT button two to three times.
* Keep the PRYMEBLU Advanced Adapter and wireless PTT button close to each other and wait a few seconds.
* Once the devices are paired with each other, the LED on the PRYMEBLU Advanced Adapter will revert to
one flash every second.
* You can now power back on the headset or audio accessory that you previously paired with the
PRYMEBLU Advanced Adapter and let it reconnect.
* Once the audio accessory has reconnected, pressing the PTT on the wireless button will cause the radio
to transmit.
Reconnecting to a Previously Paired Headset or PTT Button
Once the PRYMEBLU Advanced Adapter has been successfully paired to a wireless audio accessory and/or
PTT button, it will remember that connection. You only need to complete the pairing process for each
device once.
If the wireless accessory is powered off or loses connection, the adapter will attempt to re-establish the
link as long as both turned on and in within range of each other. Re-establishing this connection can take
10-60 seconds.
QUICK START
1. Connect the PRYMEBLU Radio Adapter to a compatible two-way radio.
2. Pair the PRYMEBLU Radio Adapter with a compatible wireless audio accessory.
3. Pair a PRYMEBLU Wireless Push-to-Talk button with the PRYMEBLU Advanced Adapter (optional).
4. Connect a wired Push-to-Talk button or wired audio accessory to the Quick-Disconnect accessory
port on the PRYMEBLU Radio Adapter (optional).
5. Test and use.
2
3 4
Advanced BT Adapter
Applicable Models: All multipin BT-5xx-V2 models
Made in Taiwan
FCC ID: N2E-xxxxx
PRYME® and PRYMEBLU® are trademarks owned by PRYME Radio Products,
Brea CA. All other product or service names are the property of their respective owners.
© 2021 PRYME Radio Products, Brea CA. All Rights Reserved
Federal Communication Commission Interference Statement
This equipment has been tested and found to comply with the limits for a Class B
digital device, pursuant to Part 15 of the FCC Rules. These limits are designed to
provide reasonable protection against harmful interference in a residential
installation. This equipment generates uses and can radiate radio frequency
energy and, if not installed and used in accordance with the instructions, may
cause harmful interference to radio communications. However, there is no
guarantee that interference will not occur in a particular installation. If this
equipment does cause harmful interference to radio or television reception, which
can be determined by turning the equipment off and on, the user is encouraged to
try to correct the interference by one of the following measures:
-Reorient or relocate the receiving antenna.
-Increase the separation between the equipment and receiver.
-Connect the equipment into an outlet on a circuit different from that to which
the receiver is connected.
-Consult the dealer or an experienced radio/TV technician for help.
FCC Caution: Any changes or modifications not expressly approved by the party
responsible for compliance could void the user's authority to operate this
equipment.
This device complies with Part 15 of the FCC Rules. Operation is subject to the
following two conditions: (1) This device may not cause harmful interference, and
(2) this device must accept any interference received, including interference that
may cause undesired operation.
This equipment complies with FCC RF radiation exposure limits set forth for an
uncontrolled environment. To maintain compliance with FCC RF exposure
compliance requirements, please avoid direct contact to the transmitting antenna
during transmitting.
RF Exposure Warning!
Please keep product 20cm away from your
body or bystander during the radio operation.
The typical handheld two-way radios were
certified under mobile usage condition
(i.e. keep 20cm away from the user body)
and use of such radio closer than 20cm may
exceed the US RF exposure limit
and shall be avoided.
Version 2.00 FEBRUARY 2021
911 Mariner St., Brea, CA 92821
PH: 714.257.0300 FAX: 714.257.0600
TOLL FREE: 800.666.2654
WWW.PRYME.COM
Controls and Connection
Radio Connector
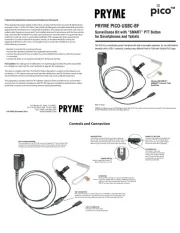
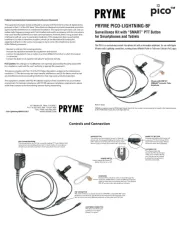
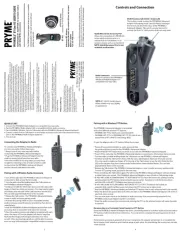
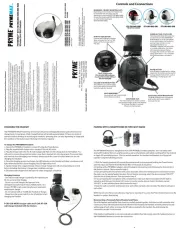
This port connects the PRYMEBLU
Advanced AdapterAdapter to a
compatible two-way radio.
NOTE: BT-583-V2 model shown.
Other models may vary slightly
in appearance.
Multi-Function Talk Switch / Status LED
This button is used to place the PRYMEBLU Advanced
Adapter into pairing mode. The LED flashes messages
that let the user knowthe status of the PRYMEBLU
Advanced Adapter. This switch can also be used to
activate the Push-To-Talk function of the two-way radio.
BT-583
BT-PTT-Z (mini)
(Optional Push-To-Talk button sold separately.)
PRYMEBLU® BT-5xx-V2 USER’S GUIDE
ADVANCED BT ADAPTER portable radios for
with MULTIPIN connectors
The PRYMEBLU advanced adapter allows you to use a compatible
wireless headset or other audio accessory with your
portable two-way radio.
Quick Disconnect Accessory Port
Allows the connection of a PRYME QD
series wired accessory such as a
remote Push-to-Talk button, or an
audio accessory such as an earphone.
NOTE: Quick Disconnect Port is not
available on all models.
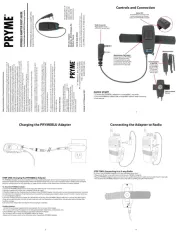
Connecting the Adapter to Radio
To connect your PRYMEBLU Advanced Adapter
to a two-way radio, follow these steps:
* Always turn off your two-way radio before
connecting the PRYMEBLU Advanced Adapter.
* Plug the PRYMEBLU Advanced Adapter into the
audio accessory jack of your two-way radio.
* On some models of two-way radio, you may need
to tighten a retaining screw or fasten a latch in order
to ensure that the PRYMEBLU Advanced Adapter
remains securely attached to the radio
Pairing with a Wireless Audio A essorycc
* Turn off the radio that the PRYMEBLU Advanced Adapter is
connected to. Wait at least three seconds.
* Turn the radio on while holding down the Talk button on
the PRYMEBLU Advanced Adapter.
* Continue to hold the Talk button down until the status LED
begins to flash two times per second. (You may need to angle
your finger off to the side of the Talk button to see the LED.)
This can take approximately three to five seconds.
* Release the Talk button. The PRYMEBLU Advanced Adapter
is now in audio accessory pairing mode.
* Activate the pairing mode on your compatible wireless
audio accessory using the process provided by that device’s
manufacturer.
* Keep the PRYMEBLU Advanced Adapter and wireless audio
accessory close to each other and wait a few seconds.
* Once the audio accessory and adapter are paired with each
other, the status LED on the adapter will show a long blue
flash and then begin to flash approximately once every
second. Once successfully paired, you will be able to operate
your two-way radio using your compatible wireless accessory.

Connecting a Wired Audio Accessory to the PRYMEBLU Adapter
The Quick-Disconnect port on the PRYMEBLU Adapter allows the connection Advanced
of a compatible wired PRYME QD series accessory. This includes compatible Push-to-Talk
buttons, earphones, surveillance kits, remote microphones, and other accessories.
* To connect a wired accessory, first turn off the two-way radio that the PRYMEBLU
Advanced Adapter is connected to.
* Lift up and remove the protective cap covering the Quick-Disconnect port on the
PRYMEBLU Advanced Adapter.
* Align the Quick-Disconnect connector of the wired accessory with the
Quick-Disconnect port on the PRYMEBLU Advanced Adapter.
Then, push the two connectors together gently until they click into place.
NOTE: the male and female connectors are keyed so they must
be properly aligned before the two halves can be pushed together.
* To remove a wired accessory that has been installed,
gently pull up on the outer barrel of the Quick-Disconnect
connector until the accessory is released.
Then pull the accessory upwards to remove it from the adapter.
NOTE: The Quick Disconnect Port is not available on all models.
AUDIO ACCESSORY CONFIGURATIONS
All of the following are valid ways to use the PRYMEBLU Advanced Adapter:
• A PRYMEBLU wireless audio accessory with a built-in PTT button
(BTH-600, BTH-550, or BTH-300)
• A PRYMEBLU wireless audio accessory (BTH-600, BTH-550, or BTH-300)
with a PRYMEBLU wireless PTT button (PRYMEBLU BT-PTT2, BT-PTT-Z, or BT-PTT-ZU)
• A PRYMEBLU wireless audio accessory (BTH-600, BTH-550, or BTH-300)
with a wired PTT button* (PRYME PTT-5)
• A wireless headset with no PTT button
• A wireless headset with a PRYMEBLU wireless PTT button
(PRYMEBLU BT-PTT2, BT-PTT-Z, or BT-PTT-ZU)
• A wireless headset with a wired PTT button* (PRYME PTT-5)
• A wired PRYME Quick Disconnect audio accessory* (with built in wired PTT button)
• A wired PRYME Quick Disconnect audio accessory* with a PRYMEBLU wireless PTT button
(PRYMEBLU BT-PTT2, BT-PTT-Z, or BT-PTT-ZU)
* Useable only on adapter models which have a built-in QuickDisconnect accessory port.
STATUS LED MESSAGES
The meanings of the various status LED messages shown by the
PRYMEBLU Radio Adapter are shown on the following table:
Status LED
6
8
5
7
SUPPORT AND WARRANTY
PRYME Radio Products warrants this product against defects in materials or workmanship
for a period of one year from the date of retail purchase. PRYME will repair or replace a
defective unit, at our option, without charge for parts or labor. The limited warranty is
extended only to the original purchaser and is valid only to consumers in the United
States and Canada. It does not cover damage or failure caused by or attributable to Acts
of God, abuse, misuse, improper or abnormal usage, faulty installation, improper
maintenance, lightning, or other incidences of excessive voltage, or any tampering or
repairs by other than a PRYME authorized repair facility. It does not cover replacement of
consumable parts, transportation costs, or damage in transit.
Repair or replacement under the terms of this warranty does not extend the terms of this
warranty. This warranty can only be modified by an officer of PRYME Radio Products, and
then, only in writing. Should this product prove defective in workmanship or material, the
consumer’s sole remedies shall be such repair or replacement as provided by the terms of
this warranty. Under no circumstances shall PRYME Radio Products be liable for any loss or
damage, direct, consequential, or incidental, arising out of the use of or inability to use this
product. Some states do not allow limitations on how long an implied warranty lasts or
the exclusions or limitations of incidental or consequential damages, so the above
limitations or exclusions may not apply to you. This warranty gives you specific legal rights.
You may also have other rights, which may vary, from state to state.
For support or warranty service on your PRYME product, contact us at 1-800-666-2654
or visit us on the web at www.PRYME.com.
COPYRIGHT AND TRADEMARK INFO
© 2021 PRYME Radio Products, Brea CA. All rights reserved.
PRYME® and PRYMEBLU® are trademarks owned by PRYME Radio Products. All other
product or service names are the property of their respective owners.
DISCLAIMER: The wireless link used by PRYMEBLU products is an open standard,
unsecured technology. Additionally, this product can mute the portable radios internal
speaker and microphone if used with no wireless or wired audio accessory connected.
This product is not recommended for first-responder or other mission critical users.
USING THE ADAPTER
The PRYMEBLU Advanced Radio Adapter will automatically route radio calls based on the following
priority:
Transmit and Receive Operation
* If a wired audio accessory is connected to the Quick-Disconnect Port of the PRYMEBLU Advanced
Radio Adapter, radio calls (transmit and receive) will be routed to this accessory.
* If no wired accessory is connected, calls (transmit and receive) will be routed to a wireless accessory, if
one is paired with the PRYMEBLU Advanced Radio Adapter.
When a new accessory is connected, paired, disconnected, or powered off, it may take several seconds
for the audio from received radio calls to be routed appropriately.
IMPORTANT NOTE: On some radios, if no wired or wireless audio accessory is connected to the
PRYMEBLU Advanced Adapter, then the radio’s receive audio may be muted, causing you to miss radio
calls. However, on most radios, when no audio accessory is connected, the radio’s speaker will be
unmuted so that calls can be heard. This feature varies from radio model to radio model and is a
function of the radio itself rather than of the PRYMEBLU Advanced Adapter.
In the event that you cannot hear radio calls when no accessory is connected to the adapter, you should
detach the PRYMBLU Advanced Adapter during times when you do not wish to use a compatible wired
or wireless audio accessory.
Push-to-Talk can be activated by any of the following methods:
* Pressing and holding the Talk button of the PRYMEBLU Radio Adapter
* Using the PTT button on a wired PRYME Quick-Disconnect accessory (if one is connected to the
PRYMEBLU Advanced Radio Adapter)
* Wirelessly using an optional wireless PRYMEBLU wireless Push-to-Talk button
TROUBLESHOOTING
My wireless audio accessory or PTT button will not pair with the PRYMEBLU Adapter.
If you are correctly following the pairing processes shown on page 3 and 4 of this manual and cannot
get the devices to connect, the most likely problem is that another nearby wireless device is interfering
with the pairing process. Please disable BT in all nearby devices other than the adapter and accessory
that you are attempting to pair. This includes phones, tablets, wireless headsets, keyboards, printers,
and other consumer devices. If you cannot disable (or locate) the wireless device that might be
interfering, than we recommend taking the radio, adapter, and accessory to a different area at least 50
feet away from the original location and trying again.
My radio shows "Keyloader" on the LCD when I press the Talk button of the PRYMEBLU Adapter.
When your press the Talk key with no wireless headset paired, the radio believes a keyloader is attached
to the radio. Disable the keyloader function in the radio's programming software or pair a wireless
accessory with the adapter.
Pressing the Talk button on the PRYMEBLU Advanced Adapter activates the “emergency” or “man
down” feature of my two-way radio
This can happen on some radios which are programmed to use an external wired speaker microphone
that has a built-in emergency button. To prevent this from happening, you should reprogram the radio,
so the “External Emergency Button” feature is disabled. Doing so will not affect the operation of an
emergency button that is built into the radio itself.
When the PRYMEBLU Advanced Adapter is connected to my radio but no audio accessory is
connected, I cannot send/receive radio calls.
On some radios, if no wired or wireless audio accessory is connected to the PRYMEBLU Advanced
Adapter, then the radio’s audio may be muted, causing you to miss radio calls. This is a function of the
radio itself rather than of the PRYMEBLU Advanced Adapter. In the event that you cannot hear radio
calls when no accessory is connected to the adapter, you should detach the PRYMBLU Advanced
Adapter during times when you do not wish to use a compatible wired or wireless audio accessory.
LED INDICATION
One flash per second
Two flashes per second
Three flashes per second
One long flash
No indication
MEANING
Normal operation
Adapter is in pairing more for BT audio accessories
Adapter is in pairing more for PTT devices
BT accessory connected or reconnected successfully
Radio is powered off
CHOOSING A WIRELESS HEADSET FOR USE WITH THE ADPATER
The PRYMEBLU Advanced Adapter should work well with most cellular style
wireless headsets. To be compatible with the adapter, we recommend that
the headset should meet all the following specifications:
* BT version 3.0 or higher
* Supports BT profiles HSP (Headset) and HFP (Hands Free)
* Has a battery rating in excess of the amount of time you intend talk time
to use it between charges. (For example, 9 or 10 hours if you intend to use the
headset for an 8-hour period.) Note that the specification is different talk time
than the battery time.standby
Produkt Specifikationer
Mærke: | Pryme |
Kategori: | Ikke kategoriseret |
Model: | BT-583APX-V2 |
Har du brug for hjælp?
Hvis du har brug for hjælp til Pryme BT-583APX-V2 stil et spørgsmål nedenfor, og andre brugere vil svare dig
Ikke kategoriseret Pryme Manualer

4 Juni 2025

3 Juni 2025
Ikke kategoriseret Manualer
- Ikke kategoriseret IRIS
- Ikke kategoriseret Platypus
- Ikke kategoriseret Clingo
- Ikke kategoriseret DreamGEAR
- Ikke kategoriseret Joy-It
- Ikke kategoriseret Kettler
- Ikke kategoriseret Thermomate
- Ikke kategoriseret Perel
- Ikke kategoriseret Coline
- Ikke kategoriseret Aprilia
- Ikke kategoriseret BDI
- Ikke kategoriseret Aquatic AV
- Ikke kategoriseret Escene
- Ikke kategoriseret GBC
- Ikke kategoriseret Ravelli
Nyeste Ikke kategoriseret Manualer

6 Juni 2025

6 Juni 2025

6 Juni 2025

6 Juni 2025

6 Juni 2025

6 Juni 2025

6 Juni 2025

6 Juni 2025

6 Juni 2025

6 Juni 2025