RC DINO ASSEMBLY OF TREX:
OPERATION OF 2.4G CONTROLLER:
• Always read the instructions with your children before using the
product for the first time.
• Before picking up the T-Rex, turn it off using the controller.
• Keep your hands, hair, and clothing away from moving parts while the
• Do not use the RC Dino out on the street. Avoid collisions with people,
• The wires must not be inserted into electrical outlets.
• Rechargeable batteries must be removed before recharging.
• Rechargeable batteries must be recharged under adult supervision.
• Do not mix different types of batteries or combine new and used
• Only use the recommended type of batteries, inserting them with the
correct positive (+) and negative (-) polarity.
• Used batteries must be removed from the product.
• LED Indicator Blinking – Frequency connection issue or weak
• LED Indicator Constantly On – Successful connection without any
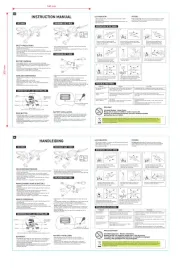
Press and hold the forward and left
buttons simultaneously to walk forward
Press and hold the back and right
buttons simultaneously to walk
backwards towards the right side.
Press and hold the forward and right
buttons simultaneously to walk forward
Use the container to fill the head of the
Press the lower jaw- button to activate
the roaring and spraying functions.
Press the head-button for an automatic
demonstration with movement, sound
For automatic demonstration without
using the controller, press the button on
the T-Rex' back. This will activate
movement, sound effects, and mist spray.
Press and hold the back and left
buttons simultaneously to walk
backwards towards the left side.
Power saving mode: The controller will automatically turn off after
a period of inactivity. To resume using the toy, simply press the
power button on the controller.
• Always remove the batteries from the product if it is not used for a
• Wipe the toy gently with a clean cloth.
• Keep the toy away from direct sources of heat.
• Do not immerse the toy in water, as this could damage electronic
• Replace batteries when they become weak.
(Press once for ON. Long press 2 seconds for OFF)
• Press the button once: The T-Rex will demonstrate its movements,
including walking forward, backward, turning left and right, while
wagging its tail, swaying its body, and playing different sounds
• To turn off the sound effects: Long press the button for 3 seconds.
• To turn the sound effects back on: Long press the button for 3
• Arm assembly: Align the top connection of the arm with the body
connection port and insert it.
• Tail assembly: Press the button to plug out the tail. Plug in the tail to
• Plug the Micro USB into the USB socket found on the bottom of the
• Connect the other end of the USB cable to a USB port on your
computer or to an adapter (such as a phone charger).
• The T-Rex will take approximately 2 hours to fully charge and will
operate for approximately 15 minutes.
• During charging, the indicator light on the bottom of the T-Rex will
glow a steady red. When fully charged, the indicator light will turn off.
• Disconnect the USB cable and turn on the power switch to start
Use 2x 1.5V “AA” batteries
• Low batteries in the RC Dino and/or the controller.
• System malfunction due to possible interference
of the RC Dino or controller.
• Recharge the RC Dino or replace the batteries in the controller.
• Try resetting the system by removing and reinserting the batteries.
• Try moving to an area with less wireless interference.
• If there are other RC Dinos nearby, turn them off and then restart
• Carefully remove any hair, threads, or other debris stuck in the
• If the problem persists after trying these steps, contact the
distributor for repair information.
• Another RC Dino nearby might be interfering with
your signal, or your RC Dino might be out of
• Hair, threads or other debris stuck in the wheels.
• Weak battery or worn-out motor.
Choking Hazard - Small Parts.
Keep out of reach of children under 3 years old.
Remove all packaging materials and wire fasteners before
giving this toy to a child.
RC DINO MONTAGE VAN TREX:
BEDIENING VAN 2.4G CONTROLLER:
• Lees altijd samen met je kinderen de instructies voordat je het product
• Schakel de T-Rex uit met de controller voordat je hem oppakt.
• Houd je handen, haar en kleding uit de buurt van bewegende delen
wanneer het speelgoed in werking is.
• Gebruik de RC Dino niet op straat. Vermijd botsingen met mensen,
• De draden mogen niet in stopcontacten worden gestoken.
WAARSCHUWING VOOR DE BATTERIJ:
• Oplaadbare batterijen moeten worden verwijderd voordat ze worden
• Oplaadbare batterijen moeten worden opgeladen onder toezicht van
• Gebruik geen verschillende soorten batterijen door elkaar en
combineer geen nieuwe en gebruikte batterijen.
• Gebruik alleen het aanbevolen type batterijen en plaats ze met de
juiste positieve (+) en negatieve (-) polariteit.
• Gebruikte batterijen moeten uit het product worden verwijderd.
• LED Indicator Knippert - Probleem met de frequentieverbinding of
zwak signaal van de controller.
• LED Indicator Constant Aan - Succesvolle verbinding zonder enige
Houd de knoppen vooruit en links
tegelijkertijd ingedrukt om vooruit te
lopen naar de linkerkant.
Houd de knoppen terug en rechts
tegelijkertijd ingedrukt om achteruit
naar de rechterkant te lopen.
Houd de knoppen vooruit en rechts
tegelijkertijd ingedrukt om vooruit te
lopen naar de rechterkant.
Gebruik de kleine watercontainer om
het hoofd van de T-Rex met water te
Druk op de onderkaak-knop om de brul-
en spuitfuncties te activeren.
Druk op de hoofd-knop voor een
automatische demonstratie met beweging,
geluidseffecten en mistverstuiving.
Voor een automatische demonstratie zonder de
controller te gebruiken, druk op de knop op de
rug van de T-Rex. Dit activeert beweging,
geluidseffecten en nevelspray.
Houd de knoppen terug en links
tegelijkertijd ingedrukt om achteruit
naar de linkerkant te lopen.
Energiebesparende modus: De controller wordt automatisch
uitgeschakeld na een periode van inactiviteit. Om het speelgoed
weer te gebruiken, druk je gewoon op de aan/uit-knop op de
• Verwijder altijd de batterijen uit het product als deze lange tijd niet
• Veeg het speelgoed voorzichtig af met een schone doek.
• Houd het speelgoed uit de buurt van directe warmtebronnen.
• Dompel het speelgoed niet onder in water, omdat dit de elektronische
onderdelen kan beschadigen.
• Vervang batterijen als ze zwak worden.
(eenmaal indrukken voor AAN. 2 seconden ingedrukt houden voor UIT)
• Druk één keer op de knop: De T-Rex demonstreert zijn bewegingen,
zoals vooruit lopen, achteruit lopen, naar links en rechts draaien,
terwijl hij met zijn lichaam en staart beweegt en automatisch
verschillende geluiden afspeelt.
• De geluidseffecten uitschakelen: Houd de knop 3 seconden ingedrukt.
• De geluidseffecten weer inschakelen: Houd de knop opnieuw 3
• Zoek het batterijvak aan de onderkant van de controller.
• Schroef het batterijklepje los met een schroevendraaier (niet
• Plaats 2x 1,5V “AA”-batterijen in het batterijvak en zorg dat ze
overeenkomen met de positieve (+) en negatieve (-) markeringen.
• Sluit het batterijklepje en draai de schroef stevig vast.
• Montage van de arm: Lijn de bovenste aansluiting van de arm uit met
de aansluitpoort van het lichaam en verbind de 2 delen.
• Staartmontage: Druk op de knop om de staart eruit te halen. Steek de
staart erin om hem weer aan te sluiten.
• Steek de Micro USB in de USB-aansluiting aan de onderkant van de
• Sluit het andere uiteinde van de USB-kabel aan op een USB-poort van
je computer of op een adapter (zoals een telefoonoplader).
• Het duurt ongeveer 2 uur om de T-Rex volledig op te laden en het
apparaat werkt ongeveer 15 minuten.
• Tijdens het opladen brandt het indicatielampje aan de onderkant van
de T-Rex continu rood. Wanneer het apparaat volledig is opgeladen,
• Koppel de USB-kabel los en zet de aan/uit-schakelaar aan om te
batterijen (niet meegeleverd).
• Lege batterijen in de RC Dino en/of de controller.
• Systeemstoring door mogelijke connectie
interferentie met de RC Dino of controller.
• Laad de RC Dino op of vervang de batterijen in de controller.
• Probeer het systeem te resetten door de batterijen te verwijderen
• Probeer te verhuizen naar een gebied met minder draadloze
• Als er andere RC Dinos in de buurt zijn, schakel ze dan uit en start
• Verwijder voorzichtig haren, draden of ander vuil dat in de wielen
• Als het probleem aanhoudt na het proberen van deze stappen,
neem dan contact op met de distributeur voor reparatie-informatie.
• Het kan zijn dat een andere RC Dino in de buurt je
signaal verstoort, of dat je RC Dino buiten bereik
• Haar, draden of ander vuil zit vast in de wielen.
• Zwakke batterij of versleten motor.
Verstikkingsgevaar - Kleine onderdelen.
Buiten bereik van kinderen jonger dan 3 jaar bewaren.
Verwijder alle verpakkingsmaterialen en draadbevestigingen
voordat je dit speelgoed aan een kind geeft.
Waste electrical and electronic equipment (WEEE]: When this device reaches the end of its life please remove all
batteries and dispose of them separately at designated collection points. Take the entire device to a collection center
for electronic equipment and household appliances. Other components can be disposed of with household waste
according to local regulations.