Box Contents
VPXT6 or VPXT6R or VPXT8R
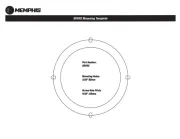
(1) Quickstart guide / cutout template
(2) Speakers
(2) Paintable grilles
Or
VPXT6R SST
(1) Quickstart guide / cutout template
(1) Speaker
(1) Paintable grille
EXTREME SPEAKERS INSTRUCTION MANUAL
VPXT6 | VPXT6R | VPXT6R SST | VPXT8R
SONANCE VISUAL PERFORMANCE SERIES
Introduction
Thank you for purchasing Sonance Visual Performance
Series Speakers. This guide covers the following speaker
models: VPXT6 (6” Rectangular), VPXT6R (6” Round),
VPXT6R SST (6” Round, Single-Stereo Technology®) and
VPXT8R (8” Round).
Before Installation: Retro-t
1. Determine the location for the speaker.
2. Perform an obstruction survey to be certain that there are
no studs, conduit, pipes, heating ducts, pocket doors
or air returns in the wall cavity that will interfere with
the speaker.
3. Position the included cutout template where the
speaker is to be located and pencil an outline on the
wall or ceiling.
• If you are unsure about obstructions, drill a small hole
in the center of the outline and insert a coat hanger wire
into the hole to feel-around for possible obstructions.
4. Cut the mounting hole using tools appropriate for the
construction, and run the speaker wires from the
mounting hole to the amplier location.
Installation
Sonance Visual Performance Series Extreme speakers
feature an exclusive integral RotoLock® mounting system for
quick mounting directly into existing walls and ceilings.
1. Strip 1/4” – 1/2” (6mm – 13mm) of insulation from each
speaker lead. Twist the strands or tin the exposed wire
with solder to ensure that there are no stray strands.
1
NOTE: CONSULT LOCAL BUILDING CODES BEFORE RUNNING
SPEAKER WIRES THROUGH WALLS.
NOTE: STRAY STRANDS THAT TOUCH EACH OTHER CAN CAUSE A
SHORT- CIRCUIT THAT CAN DAMAGE THE AMPLIFIER.
2. The speaker’s connector posts are spring-loaded.
Push the top of each connector post down to open the
connector and insert the exposed wires into the holes in
the posts (see Figure 1).
3. The speaker’s positive post is labeled with a red dot; the
negative post is labeled with a black dot.
• The VPXT6R SST has two sets of connection terminals,
located on opposite sides of the crossover board.
4. After making all connections, double-check that you
connected amplier “+” to speaker “+” and amplier “–”
to speaker “–”.
5. Make sure all the Roto-Lock toggle feet are retracted so
that they are tucked within the mounting hole’s border.
Figure 1: Connection Terminals
Figure 2: Roto-Lock Toggle Feet Retracted
Connection Terminals
NOTE: THE ROTO-LOCK SYSTEM CAN ACCOMMODATE A WALL
MATERIAL THICKNESS OF 1 1/4” (32MM) WITH THE TOGGLE
FOOT CAP REMOVED THE SYSTEM CAN ACCOMMODATE A WALL
MATERIAL THICKNESS OF 1 3/4” (44MM). TO REMOVE THE
CLAMP FEET, USE A SMALL SCREWDRIVER TO GENTLY RELEASE
THE LOCKING LEVERS (FIGURE 3, LEFT). THEN REMOVE THE FEET
FROM THE CLAMPS (FIGURE 3, RIGHT).
Figure 3: Removing the Roto-Lock Clamp Feet