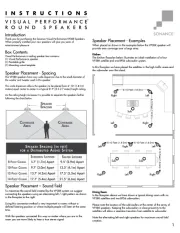
Sonance Visual Performance VP87R Manual

Sonance Højttaler Visual Performance VP87R

Læs gratis den danske manual til Sonance Visual Performance VP87R (4 sider) i kategorien Højttaler. Denne vejledning er vurderet som hjælpsom af 14 personer og har en gennemsnitlig bedømmelse på 3.5 stjerner ud af 7.5 anmeldelser. Har du et spørgsmål om Sonance Visual Performance VP87R, eller vil du spørge andre brugere om produktet?

Side 1/4
Introduction
Thank you for purchasing Sonance Visual Performance®
Series Large round or square speakers. When properly installed
your new speakers will give you years of entertainment pleasure.
Box Contents
Sonance Visual Performance Series in-ceiling speaker boxes
contain (2) Visual Performance Large round or square speakers,
(2) paint plugs (installed on the fronts of the speakers),
(2) paintable grilles and (1) mounting cut-out template.
Speaker Placement
Distributed Audio Placement (Mono signal)
All Sonance Visual Performance Series in-ceiling speaker models
provide excellent coverage in distributed audio systems from a
wide variety of installation locations.
The table and illustration in
Figure 1
show how far apart the
speakers can be placed at various ceiling heights while still
providing good coverage for all listeners.
Home Theater Speaker Placement
Left, Center & Right Speakers (see Figure 2)
Place the left, center and right speakers 1 2 feet (0.3m 0.6m)
in front of the video screen, 6 10 feet (1.8m 3m) apart,
with the center channel speaker as close to midway between
the left and right speakers as possible.
The main listening position should be 4 10 feet (1.2m 2m)
away from the speakers.
Surround Speakers 5.1-Channel System (see Figure 2)
Locate the left and right surround speakers 2 6 feet (0.6m
1.8m) behind the listening position. The speakers should be
6 10 feet (1.8m 3m) apart.
Surround Speakers 7.1-Channel System (see Figure 3)
Left & Ri ght Surround Spe akers:
Left & Right Surround Speakers:
Left & Right Surround Speakers:Left & Right Surround Speakers: Place the left and right
surround speakers directly to the sides of the listening position,
6 10 feet (1.8m 3m) apart.
Surround Back Speakers:
Surround Back Speakers:Surround Back Speakers: Place the surround back speakers
2 6 feet (0.6m 1.8m) behind the listening position. The
surround back speakers should be closer together than the left
and right surround speakers, 3 6 feet (0.9m 1.8m) apart.
I N S T A L L A T I O N M A N U A L
V I S U A L P E R F O R M A N C E ® S E R I E S
L A R G E R O U N D A N D
S Q U A R E S P E A K E R S
S W :AFETY ARNING
THESE SPEAKERS HAVE AST OUNTF M ® TABS THAT PREVENT THE
SPEAKER FROM FALLING OUT OF THE MOUNTING HOLE DURING THE
INSTALLATION PROCESS.
T F MHE EDGES OF THE AST OUNT TABS ARE VERY SHARP.
U SE CAUTION WHEN HANDLING THE SPEAKER.
TV
3' – 6'
(0.9m – 1.8m)
Apart
2' – 6'
(0.6m – 1.8m)
Less than 2’ (0.6m)
Surround
Back
Speakers
Left, Center
& Right
Speakers
Left & Right
Surround Speakers
6'– 10'
(1.8m – 3m)
Apart
1'– 2'
(0.3m – 0.6m)
F H T S PIGURE 3: 7.1-CHANNEL OME HEATER PEAKER LACEMENT
TV
6'– 10'
(1.8m – 3m)
Apart
6'– 10'
(1.8m – 3m)
Apart
1'– 2'
(0.3m – 0.6m)
Left, Center
& Right
Speakers
Less than 2’ (0.6m) 2' – 6'
(0.6m – 1.8m)
Left & Right
Surround
Speakers
F H T S PIGURE 2: 5.1-CHANNEL OME HEATER PEAKER LACEMENT
C
OVERAGE
A
REA
C
OVERAGE
A
REA
S
PEAKER
S
PACING
S
PEAKER
S
PACING
(
IN
FEET
)
FOR
A
D
ISTRIBUTED
A
UDIO
S
YSTEM
S
TANDING
L
ISTENER
S
EATED
L
ISTENER
10-
F
OOT
C
EILING
12-
F
OOT
C
EILING
14-
F
OOT
C
EILING
8-
F
OOT
C
EILING
9.5’ (2.9m) Apart
13.5’ (4.1m) Apart
17.5’ (5.3m) Apart
21.5’ (6.6m) Apart
5.7’ (1.7m) Apart
9.7’ (3.0m) Apart
13.7’ (4.2m) Apart
17.7’ (5.4m) Apart
F A S SIGURE 1: DISTRIBUTED UDIO PEAKER PACING
2
SONANCE VISUAL PERFORMANCE®LARGE ROUND AND SQUARE
Stereo Placement (2-Channel)
Place the left and right speakers anywhere from 6 feet to 10
feet apart, with the main listening position as close to midway
between the speakers as possible.
In most cases pivoting the woofer and/or midrange/tweeter
assembly of each speaker directly towards the main listening
position will help maximize the stereo soundstage.
Use the Left and Right speaker placement in
Figures 2
and
3
, on
page 1, as a guide.
Before Installation
1. Determine the location for the speaker (see
Speaker Placement
on page 1).
2. Perform an obstruction survey to be certain that there are no
studs, conduit, pipes, heating ducts, pocket doors or air returns
in the ceiling cavity that will interfere with the speaker.
3. Mounti ng space requirem en ts:
Mounting space requireme nts:
Mounting space requireme nts:Mounting space requireme nts:
Large round speakers: 101
/8 (257mm) diameter cut-out;
57/8 (149mm) mounting depth.
Large square speakers: 10¼ x 10¼ (260mm x 260mm)
cut-out; 5 7/8 (149mm) mounting depth.
4. Position the included cut-out template where the speaker is to
be located and pencil an outline on the ceiling. If you are
unsure about obstructions, drill a small hole in the center of
the outline and insert a coat hanger wire into the hole to feel-
around for possible obstructions.
5. Cut the mounting hole using a keyhole or drywall saw, and run
the speaker wires from the mounting hole to the amplifier
location.
NOTE : CONSU LT LOCAL BUILDING CODES BEFORE RUNNING
SPEAKER WIRES THROUGH CEILINGS.
Installation
Sonance Visual Performance Series speakers feature exclusive
FastMount tabs and an integral Roto-Lock®mounting system for
quick mounting directly into existing ceilings.
WARNING: THE EDGES OF THE FASTMOUNT TABS
ARE VERY SHARP. USE CAUTION WHEN HANDLING
THE SPEAKER.
1. Remove the paint plug from the speaker.
2. Strip ¼ ½ (6mm 12mm) of insulation from each speaker
lead. Twist the strands or tin the exposed wire with solder to
ensure that there are no stray strands. (Stray strands that touch
each other can cause a short-circuit that can damage the
amplifier.)
3. The speaker’s connector posts are spring-loaded. Push the top
of each connector post down to open the connector and insert
the exposed wires into the holes in the posts.
The speaker’s positive post is labeled with a red dot; the
negative post is labeled with a black dot. Double-check that
you connected amplifier + to speaker + and amplifier
to speaker .
4. Make sure all the
RotoLock clamps are
retracted so that
they are tucked within
the mounting holes bor-
der. Insert the speaker
into the hole in the ceil-
ing (
Figure 4
). The
RotoLock system can
accommodate a maxi-
mum ceiling material
thickness of 1¼
(32mm).
The FastMount tabs
will prevent the speak-
er from falling out of
the mounting hole,
allowing you to let go
of the speaker to pick-
up tools or other items
(
Figure 5
).
N F MOTE : THE AST OUNT
TABS ARE DESIGNED FOR
ONE TIME USE ONLY- . IF
THE SPEAKER IS REMOVED
F R OM TH E M O U N T I N G
HOLE THE ASTF MOUNT
TABS WILL DISCONNECT
AND REMAIN INSIDE THE
CEILING.
5. Tighten the four screws
on the front of the
speaker baffle. The
Roto-Lock clamps will
automatically rotate
into position and begin
clamping the speaker
(
Figure 6
).
When you notice
resistance on the
screws the speaker
has been clamped
successfully.
I M P O R T A N T :
Always use low-
torque settings;
NEVER over-tighten.
N ROTE : ADJUST THE TENSION OF THE OTO-LOCK CLAMPS SO
THAT THE SPEAKER FRAME IS FLAT. THIS WILL HELP ENSURE THAT
THE GRILLE CONTACTS THE CEILING ALL THE WAY AROU ND THE
SPEAKER FOR A PROPER FIT.
FastMount Tabs
Roto-Lock Clamps
(retracted)
F SIGURE 4: INSERTING THE PEAKER
INTO THE OUNTING OLEM H
F 5:IGURE
FAST OUNTM TABS
Roto-Lock Screws
F 6:IGURE
T IGHTENING THE ROTOLOCK CREWSS


Produkt Specifikationer

Mærke: Sonance
Kategori: Højttaler
Model: Visual Performance VP87R

Har du brug for hjælp?

Hvis du har brug for hjælp til Sonance Visual Performance VP87R stil et spørgsmål nedenfor, og andre brugere vil svare dig