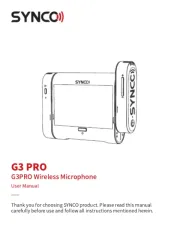
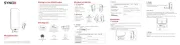
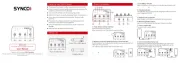
Synco WAir-G2-A2 Manual

Synco Mikrofon WAir-G2-A2

Læs gratis den danske manual til Synco WAir-G2-A2 (2 sider) i kategorien Mikrofon. Denne vejledning er vurderet som hjælpsom af 47 personer og har en gennemsnitlig bedømmelse på 4.6 stjerner ud af 24 anmeldelser. Har du et spørgsmål om Synco WAir-G2-A2, eller vil du spørge andre brugere om produktet?

Side 1/2
RX Receiver x1 TX Transmitter x2 Carrying & Charging Box x1
Type-C to Type-C Cable x1
External Lav Mic (With Wind Mu󽗈) x2
3.5mm TRRS Phone Cable x1
3.5mm TRS Camera Cable x1
Mic Windshield x2
Type-C to USB-A Adapter X1
User Manual X1
1. TX Transmitter
2. RX Receiver
3. Carrying & Charging Case
① External Mic Input
② Type-C Charging Port
③ On/ O󽗈 Button
④ Built-in Mic
⑤ Display Screen
① Type-C Charging Port / Digital Output
② On/ O󽗈 Button (Mono / Stereo / Safety Channel)
③ 3.5mm TRS Output
④ 3.5mm Monitoring Port
⑤ Display Screen
⑥ Gain Adjustment of TX A
⑦ Gain Adjustment of TX B
⑧ Magnet Pocket Clip
⑨ Contacts
① Contacts
Caring For Your SYNCO Product Product Instruction Operations
Packing List
· Please keep the product in a dry, clean, dust-free environment.
· Keep corrosive chemicals, liquids and heat source away from the
product to prevent mechanics damage.
· Use only a soft and dry cloth for cleaning the product.
· Malfunction may be caused by dropping, impact of external force.
· Do not attempt to disassemble the product. Doing so voids warranty.
· Please have the product checked or repaired by authorized technicians
if any malfunctions happened.
· Failure to follow all the instructions may result in mechanics damage.
· Warranty does not apply to human errors.
Microphone G2A2 MEGA
User Manual
Thank you for choosing SYNCO product.
Please read this manual carefully before use and follow all instructions
mentioned herein.
⑥ Noise Reduction
⑦ Gain Adjustment of TX/ Internal Storage
Recording Button
⑧ Magnet Pocket Clip
⑨ Contacts
② Power Indicator ③ Type-C Port
4. Display Screen
Recording
TX A
Gain of TX A
Audio Dynamic
Display of TX A
Noise Reduction on
TX Transmitter
RX Receiver
Muting
Recording Mode:
Mono/ Stereo/ Safety
Disconnected
Connecting
Connected
Audio Dynamic
Display
Power Indicator
TX B
Gain of TX B
Audio Dynamic
Display of TX B
Power Indicator
1. Power On/ O󽗈
Power On
Method 1: The TX and RX automatically turn on after taken out from the
charging Case.
Method 2:The TX and RX automatically turn on when long press the
power button for 3 seconds, and the display screen lights up.
Power O󽗈
Method 1: After put the transmitter/receiver into the charging box, the
display screen shows [charging] and enters automatic charging. After fully
charged, the display screen goes out and automatically power o󽗈.
Method 2:The TX and RX automatically turn o󽗈 when long press the
power button for 3 seconds, and the display screen lights o󽗈.
2. Pairing
Automatic Pairing
Automatically pairing after the TX/RX turns on when taken out from the
charging case.
Manual Pairing
① Long press the transmitter and receiver at the same time for 3 seconds
to power o󽗈 .
② After shutdown, long press the power button of the transmitter and
receiver for 8 seconds at the same time to enter the [connecting ] state.
Disconnected Connecting
Connected
③ Successfully Connected show as the picture
*Note: Before successful connection, the transmitter channel displays
A by default. The transmitter connected to the receiver 󽗉rst is the
transmitter A, and the later one is the transmitter B.
*Note: When using an external microphone, please insert it correctly
into the microphone input jack. Only TRS interface microphones are
supported.
4. Channel output connection
3.5mm OUT output
The receiver outputs the audio signal to the recording device via either a
3.5mm TRRS phone cable or a 3.5mm TRS camera cable. Please use the
appropriate cable according to your device.
Apple Adapter (With MFI Certi󽗉cation)
3.5mm TRRS Phone Cable
3.5mm TRS Camera Cable
Type-C port digital output
The receiver Type-C port has a digital output function, which can directly
use the Type-C to Type-C cable to output mobile phones or computers
and other devices.
Magnet x2
3. Internal Storage Recording Function
On/O󽗈:
Long press the internal storage recording button on TX for 3 seconds to
turn on or o󽗈 the internal storage recording function. Once the function
is on, a red point will be displayed on the screen and will disappear once
the function is o󽗈.
Red point on the RX's screen:
Internal storage recording on
Red point on RX is 󽗊ashing:
Storage is full
"!" on TX: Storage is full
Red point on the TX's screen:
Internal storage recording on


Produkt Specifikationer

Mærke: Synco
Kategori: Mikrofon
Model: WAir-G2-A2

Har du brug for hjælp?

Hvis du har brug for hjælp til Synco WAir-G2-A2 stil et spørgsmål nedenfor, og andre brugere vil svare dig


Mikrofon Synco Manualer

Synco

Synco WAir P1S Manual

11 September 2025
Synco

Synco MIC-D1 Manual

11 September 2025
Synco

Synco WAir P2S Manual

11 September 2025
Synco

Synco G3 Pro Manual

8 Juli 2025
Synco

Synco P1S Manual

5 Juli 2025
Synco

Synco G2 Pro Manual

23 Juni 2025
Synco

Synco G2A1 Manual

2 April 2025
Synco

Synco PX Manual

2 April 2025
Synco

Synco MC3 LITE Manual

2 April 2025
Synco

Synco G2A2 Manual

2 April 2025

Mikrofon Manualer

Nyeste Mikrofon Manualer

TOA

TOA S4.10-RXA Manual

6 December 2025
AKG

AKG CM311 XLR Manual

4 December 2025
FoneStar

FoneStar MCH-205 Manual

4 December 2025
AKG

AKG CS5 DU Manual

2 December 2025
Icon

Icon M1 Manual

2 December 2025
Icon

Icon HyperDrive Manual

1 December 2025
Neewer

Neewer KM19 Manual

30 November 2025