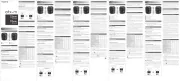
How to attach and remove lens
Please follow the camera instruction manual for attaching and removing
※Take care to not touch or hit electrical contacts on the mounting face
of the lens while attaching or removing.
Please set the aperture settings on the camera side in accordance with
Set your camera’s focus mode to Auto Focus (AF).
The camera will automatically focus when the shutter button is
Set your camera’s focus mode to manual Focus (MF).
Adjust focus by turning the focus ring while observing the camera
monitor and finder image.
It is also possible to conduct precision focusing using the display
[Full-time Manual Function]
With this lens, it is possible to make slight focal adjustments manually
while the camera is in use with autofocus mode without switching the
Set the focus mode of the camera to Direct Manual Focus (DMF). Then,
focus using the autofocus function, and with the shutter button still in
the half-pushed position, make slight focal adjustments by turning the
focus ring. This is for precision focusing when taking portraits and when
conducting macro photography.
The focus ring spins in the same direction as other genuine lenses
In macro photography, the subject and lens become very close and the
magnification increases as a result. Therefore, even a slight vibration or
movement of the camera can affect image quality. In macro photogra-
phy, hold the camera securely to eliminate vibrations. For vibration-free
photographs Tokina highly recommends the use of a tripod, cable
release and/or a wireless remote control and an external flash.
Note on Macro Photography
Note for using a built-in flash
When shooting using the camera's built-in flash or the small specialized
flash included with the camera, the lens may block some of the light
causing a noticeable shadow in the picture. In such cases please use an
When the lens hood is attached, it can sometimes block the light from
even large-size flashes. If this happens, please remove the lens hood
while the camera is in use.
Please use round screw-in filters. If there is grime or water drops on the
filter, it will cause lens flare and ghosting. Be sure to clean the filter
thoroughly before taking pictures.
※Please use only one filter at a time. If more than one is used at the same
time, it may cause vignetting.
※ Please do not touch directly with hands.
When conducting macro photography, the lens barrel extends and the
effective F-value changes based on the photographing magnification
ratio, but when photographing under normal conditions, the camera
automatically compensates.
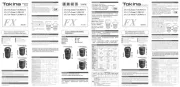
Line up the mark on the lens
hood’s side with the white hood
attachment mark on the lens
barrel, then turn the hood
clockwise unlike you feel and hear
the hood click into place.
Vignetting may occur if the hood is
⑥Photographing distance (m)
⑦Photographing magnification
⑧Photographing distance (ft)
Exposure Magnification for Macro Photography
The included lens hood prevents strong angular light from the side from
striking the front lens element and causing lens flare or ghosting that
would impact image quality.
Please be sure to always use the lens
hood when photographing to achieve
the best results possible.
Line up the mark on the lens hood’s side
with the white hood attachment mark on
the lens barrel, then turn the hood
clockwise unlike you feel and hear the
Vignetting may occur if the hood is not
Photographing Distance and Magnification Index when the lens
The table shown at right lists
the exposure magnications
dierent macro magnications
of 1:10 and above. If you don’t
want to change the aperture
setting, correct the exposure by
changing the shutter speed.
※The marking (certication mark for conformance with the European export
inspection requirements) is shown on lenses containing electronic parts. The mark
also declares compliance with environmental performance standards for products
stipulated in the RoHS directive.
※ A display mark indicating inclusion in the China RoHS directive (Administra-
tive Measure on the Control of Pollution Caused by Electronic Information
(When front lens element is extended)
Maximum macro magnication
Please note that specications and appearance may be changed without notice to
Avoid any shock or impact to the lens or exposure to extremely high or
low temperature or high humidity.
To prevent outbreak of the mold, keep lens surface clean after use of
lens. Do not use paint thinner, benzene, or other organic agents to
remove dirt or finger prints from the lens elements. Clean with a soft
moistened lens cloth or lens tissue.
In caring for the exterior of the lens, always wipe any dirt, dust or debris
with a chamois or silicone cloth. Make sure the barrels of the lens are
clean, not only the front and rear elements.
Select a cool and dry place for extended storage, preferably with good
ventilation. To avoid damage to the lens coating, keep the lens away
from mothballs or naphthalene gas.
This lens is not waterproof. If using this lens in the rain or near water,
keep it from getting wet. It is often impractical to repair a lens or its
components when damaged by water.
Sudden changes in temperature may cause condensation or fog on
the lens elements. When entering a warm room from the cold, it is
advisable to keep the lens in a case until the temperature of the lens
reaches the temperature of the room.
① Anbringungsmarkierung für die Streulichtblende
④ Befestigungsmarkierung Montieren
※ Bitte nicht direkt mit den Fingern berühren.
Stellen Sie die Blende bitte je nach Aufnahmeart an der Kamera ein.
Objektiv ansetzen und abnehmen
Bitte befolgen Sie die Bedienungsanleitung für das Anbringen und
Entfernen des Objektivs an der Kamera.
※Achten Sie darauf, beim Ansetzen und Abnehmen des Objektivs nicht
die elektrischen Kontakte an der Fassungsfläche zu berühren oder
Grundlegende Pflege und Lagerung
Jegliche Erschütterungen oder Stöße gegen das Objektiv sowie
extrem hohe oder tiefe Temperaturen und hohe Feuchtigkeit
Reinigen Sie das Objektiv nach Gebrauch, um Schimmelbildung zu
vermeiden. Keinen Verdünner, Benzin oder andere organische Mittel
verwenden, um Schmutz oder Fingerabdrücke auf dem Objektiv zu
beseitigen. Verwenden Sie ein weiches, angefeuchtetes Optikreini-
gungstuch oder Optik-Reinigungspapier.
Bei der Pflege der äußeren Linse Schmutz oder Rückstände immer mit
einem Chamois- oder Silikontuch abwischen. Achten Sie darauf, dass
auch der Objektivtubus sauber ist und nicht nur die vorderen und
Wählen Sie einen kühlen und trocken, vorzugsweise gut gelüfteten
Ort, um das Objektiv langfristig zu lagern. Halten Sie das Objektiv fern
von Mottenkugeln oder Naphthalengas, um Beschädigungen der
Linsenbeschichtung zu vermeiden.
Das Objektiv ist nicht wasserfest. Achten Sie darauf, dass das Objektiv
nicht nass wird, wenn Sie es im Regen oder in der Nähe von Wasser
verwenden. Es ist oft unmöglich ein Objektiv oder deren Teile zu
reparieren, wenn diese durch Wasser geschädigt wurden.
Plötzliche Temperaturänderungen können zur Bildung von Kondensa-
tionswasser auf den Objektivelementen führen.
Es ist ratsam, das Objektiv in einem Etui zu belassen bis es Raumtem-
peratur erreicht hat, wenn Sie aus der Kälte in einen warmen Raum
Hinweise betreffs Makrofotografie
Bei der Makrofotografie kommen sich Linse und Bildgegenstand sehr
nahe, so dass sich die Vergrößerung erhöht. Daher können selbst
geringfügige Erschütterungen oder Bewegungen die Bildqualität
beeinflussen. Halten Sie die Kamera bei Makroaufnahmen gut fest, um
Erschütterungen zu minimieren. Tokina empfiehlt, für erschütterungs-
freie Fotos ein Stativ, einen Kabelauslöser oder eine kabellose Fernsteuer-
ung und ein externes Blitzgerät zu verwenden.
Bitte verwenden Sie runde Einschraubfilter. Wenn der Filter verschmutzt
ist oder Wasser darauf tropft, kann es zu Streulichteffekten oder
Geisterbildern kommen. Achten Sie bitte darauf, vor dem Fotografieren
den Filter sorgfältig zu reinigen.
※Bitte verwenden Sie immer nur einen Filterzur gleichen Zeit. Wenn
gleichzeitig mehr als ein Filter verwendet wird, kann es zu
Vorsichtsmaßnahmen bei der Verwendung des
Bei Aufnahmen mit in der Kamera eingebautem Blitzlicht oder einem mit
der Kamera mitgelieferten Spezialmini Blitzlicht kann ein Teil des Lichtes
vom Blitzlicht verdeckt werden und ein Schatten des Objektives mit
abgebildet werden. Verwenden Sie in diesem Fall bitte ein externes
Wenn man die Gegenlichtblende verwendet, kann es vorkommen, dass
bei einem großen Blitzlicht, das Licht blockiert wird. In so einen Fall soll
man bei der Benutzung die Gegenlichtblende entfernen.
■Fokuseinstellung mit Autofokus
Bitte stellen Sie vor dem Gebrauch, den Fokusmodus von Ihrer Kamera
auf „AF“ ein. Bitte drücken Sie den Auslöserknopf halb durch und stellen
Sie automatisch den Fokus ein.
■Manuelle Fokuseinstellung
Bitte stellen Sie vor dem Gebrauch den Fokusmodus von Ihrer Kamera
Drehen Sie den Fokusring. Vergewissern Sie sich das Bild durch den
Kameramonitor oder den Sucher und stellen Sie den Fokus ein.
Durch das verwenden einer "Anzeige-Vergrösserungsfunktion", ist eine
sehr exakte Fokuseinstellung möglich.
[Vollzeit-Manuellfunktion]
Mit dieser Linse kann man, während man mit Autofokus fotografiert,
ohne den Autofokus von der Kamera umzustellen, manuell den Fokus
Man stellt den Autofokus von der Kamera auf „DMF“ und stellt mit
Autofokus den Fokus ein. Während man den Auslöseknopf halb gedrückt
hält, kann man am Fokusring drehen, um den Fokus sehr fein einzustel-
Die Drehrichtung von dem Fokusring ist genau die selbe Richtung wie
bei der herstelleroriginalen Linse.
Die mitgelieferte Streulichtblende verhindert, dass starkes Seitenlicht auf
die vordere Linse fällt und Lichtreflexe oder Geisterbilder hervorruft,
welche die Bildqualität beeinflussen würden.
Bitte achten Sie darauf, beim Fotografieren immer diese Streulichtblende
zu verwenden, um die bestmöglichen Ergebnisse zu erhalten.
※Wir empfehlen, immer die mitgelieferte Streulichtblende zu
verwenden, um Streulicht abzuschirmen, welches sonst zu Lichtreflex-
en oder Geisterbildern führen könnte.
■Anbringen der Streulichtblende
Die Markierung auf der Seite der
Streulichtblende auf die weiße
Anbringungsmarkierung auf dem
Objektivtubus ausrichten und
anschließend die Blende im
Uhrzeigersinn drehen, bis Sie sie
Vignettierung kann auftreten, wenn die
Streulichtblende nicht richtig angebracht
Bei der Makroaufnahme wird das Objektivrohr Herausgezogen. Durch
die Aufnahmevergrößerung wird sich der ausgeführte F-Wert verändern.
Bei normalen Aufnahmen, wird der veränderte Wert automatisch von der
Wenn man für Makroaufnahmen
die Linse herausgezogen hat, kann
man die Aufnahmeentfernung
und die Vergrößerung ablesen.
Bitte benutzen Sie diese Tabelle als
Maßstab für Ihre Aufnahme. Wenn
man den Belichtungsmesser für
Draußen benutzt, wird eine
Belichtungskorrektur notwendig.
Bitte verwenden Sie die unten
angegebene Liste, um nachzus-
chauen, welche Verbersserungs-
menge Sie einstellen sollten.
⑧Aufnahmeentfernung (ft)
Der Belichtungsfaktor bei der Makroaufnahme
Die rechts stehende Tabelle zeigt
die Belichtungsverlängerungen
Vergrößerungen von 1:10 und
darüber. Korrigieren Sie bitte die
Belichtung durch Änderung der
Verschlusszeit, falls Sie die
Blendeneinstellung ändern
Wenn die vordere Kugel herausgezogen ist
Bitte beachten Sie, dass die technischen Daten und das Aussehen zur
Verbesserung des Produktes ohne vorherige Ankündigung geändert
※Die Kennzeichnung wird auf Objektiven mit elektronischen Teilen
(Zertikationsmarke zur Bestätigung der Übereinstimmung mit den
europäischen Anforderungen an die Exportinspektion) angebracht.
Diese Markierung erklärt gleichzeitig auch die Übereinstimmung mit in
den RoHS Richtlinien vorgegebenen Umweltleistungsnormen.
Diese Markierung zeigt den Einschluss in die China RoHS Richtlinien
Markierung (verwaltungstechnische Maßnahme zur Kontrolle von
durch elektronische Informationsprodukte verursachte Verschmutzu-
① Repère de montage du pare-soleil
② Bague de mise au point manuelle
③ Prise de maintien de l’objectif
④ Repère de montage de l’objectif
※ Ne pas toucher directement avec les doigts
Réglage de l’ouverture du diaphragme
Veuillez régler l’ouverture sur votre appareil photo en fonction du mode
Montage / démontage de l’objectif
Veuillez suivre les instructions fournies avec votre appareil photo
concernant le montage de l'objectif sur l'appareil et son démontage.
* Lorsque vous montez ou démontez l'objectif, veillez à ne pas toucher
les contacts électroniques et préservez-les des chocs.
Remarque sur la macrophotographie
La macrophotographie consiste à fortement rapprocher le sujet et
l'objectif pour augmenter le grossissement. Par conséquent, une
vibration ou un mouvement même infime de l'appareil peut avoir un
impact négatif sur la qualité d'image. Pour la macrophotographie, veillez
donc à tenir fermement l'appareil pour éliminer toute vibration. Pour des
photographies sans vibration, Tokina recommande fortement d'utiliser
un trépied, un déclencheur souple et/ou une télécommande et un flash
■Mise au point automatique
Réglez le mode de mise au point de votre appareil photo sur « AF ».
L'appareil photo règle automatiquement le la mise au point en appuyant
à mi-course sur le déclencheur.
Réglez le mode de mise au point de votre appareil photo sur « MF ».
Tournez la bague de mise au point et effectuez la mise au point tout en
vérifiant l'image sur le moniteur de l'appareil photo et le viseur.
Il est également possible de faire une mise au point rigoureuse en
utilisant la fonction d’agrandissement de l’affichage.
[Mise au point manuelle directe (DMF)]
Cet objectif vous permet de régler manuellement la mise au point sans
changer de mode de mise au point lors de la prise de vue avec mise au
Réglez le mode de mise au point de l'appareil photo sur « DMF »,
effectuez une mise au point avec mise au point automatique, tournez la
bague de mise au point tout en appuyant à mi-course sur le déclencheur
et effectuez un réglage précis. Utilisez-le pour un rendu de portrait et
pour la mise au point sur une prise de vue macro.
Le sens de rotation de la bague de mise au point est le sens de rotation
avec l'objectif d'origine.
Le pare-soleil est conçu pour éviter la formation de flare ou d'images
fantôme, qui apparaissent quand les rayons lumineux obliques
atteignent la lentille frontale et qui auraient un impact sur la qualité de
Utilisez toujours un pare-soleil lorsque vous photographiez afin d'obtenir
les meilleurs résultats possibles.
* Nous recommandons de laisser le pare-soleil fixé en permanence sur
l'objectif afin de bloquer les rayons parasites, qui dans le cas contraire
causeraient du flare ou des images fantôme.
■Comment fixer le pare-soleil
Monter le pare-soleil sur l'objectif en
alignant la flèche de repère du pare-soleil
avec le point de repère blanc de montage
du pare-soleil de l'objectif.
Fixer le pare-soleil en le tournant dans le
sens des aiguilles d’une montre jusqu'au
Il peut y avoir un effet de vignettage si le
pare-soleil n’est pas fixé correctement.
Le barillet de l'objectif est déployé pendant la prise de vue macro et la
valeur F change en fonction de l'agrandissement, mais en mode de prise
de vue normal, l'appareil photo le corrige automatiquement.
Vous pouvez vérifier la distance de
prise de vue et le grossissement
lorsque l'objectif est déployé avec
la distance macro. Utilisez-le
comme guide pour la prise de vue.
La compensation d'exposition est
nécessaire lors de l'utilisation d'un
posemètre externe. Reportez-vous
au tableau ci-dessous et définissez
la quantité de correction.
⑥Distance de prise de vue (m)
⑦Ratio de grossissement macro
⑧Distance de prise de vue (ft)
Compensation d'exposition pour prise de vue macro
Distance de prise de vue, indice de grossissement lorsque
Lors de l'utilisation d'un flash
externe, il est nécessaire de
prendre en compte l'ajout
d'exposition (multiple d'exposi-
tion) à la diminution de la luminos-
ité due au facteur de grossisse-
ment de l'image. Corrigez
l'exposition en vous reportant au
Veuillez utiliser des filtres filetés. Vous ne pourrez pas prendre de
photographies parfaites si le filtre est sale ou présente des gouttes d’eau
ou d’autres particules étrangères. Nettoyez soigneusement le filtre avant
* N’utiliser qu’un filtre à la fois. Si deux filtres ou davantage sont utilisés en
même temps, un effet de vignettage (assombrissement aux coins de
l'image) peut se produire.
Avertissement au sujet de l’utilisation d’un flash intégré
Lors de la prise de photo avec un flash intégré à l’appareil photo ou avec
un petit flash inclus avec l’appareil, il est possible que la lumière du flash
soit obstruée par l’objectif et que l’ombre de l’objectif apparaisse dans
l’image. Il est recommandé d’utiliser un flash externe.
Lorsque le pare-soleil est fixé, même la lumière d’un gros stroboscope
sera bloquée. Dans ce cas, veuillez retirer le pare-soleil avant utilisation.
Conseils d’entretien et de stockage
Évitez tout choc, impact sur l'objectif ou exposition à des températures
extrêmement élevées ou extrêmement basses, ainsi qu'à une
Pour éviter la moisissure, nettoyez la surface de l’objectif après son
utilisation. Ne pas utiliser de diluant à peinture, benzène, ou d'autres
agents biologiques pour éliminer les traces de saleté ou de doigts des
éléments de l’objectif. Nettoyer avec un chiffon doux humide ou un
Pour nettoyer l'extérieur de l’objectif, essuyez toujours la saleté, la
poussière ou les débris avec une peau de chamois ou un chiffon à base
de silicone. Assurez-vous que le fût de l'objectif soit propre, pas
seulement les éléments avant et arrière.
Choisissez un endroit frais et sec pour le stockage prolongé, de
préférence avec une bonne ventilation. Afin d’éviter d'endommager le
revêtement de l’objectif, éloigner l’objectif de la naphtaline ou du gaz
Cet objectif n'est pas étanche. Si vous utilisez cet objectif en cas de
pluie ou à proximité de l’eau, ne le mouillez pas. Il est souvent impossi-
ble de réparer un objectif ou ses composants lorsqu'ils sont
Les changements brusques de température peuvent provoquer de la
condensation sur les éléments de l’objectif.
Lorsque vous entrez dans une pièce chaude quand il fait froid dehors,
il est conseillé de garder l’objectif dans une housse jusqu'à ce que la
température de l’objectif atteigne la température de la pièce.
*La marque (marque de certication de conformité pour les
produits Européens) est achée sur les optiques contenant des
composants électroniques. La marque déclare également respecter les
normes de performance environnementales pour les produits stipulés
* L'objectif porte une marque indiquant l'inclusion dans la directive
RoHS de la Chine (mesure administrative sur le contrôle de la pollution
causée par les produits électroniques).
Veuillez noter que les spécications et l'aspect peuvent être modiés
sans préavis pour améliorer le produit.
Ratio de grossissement macro
Pare-soleil monture baïonnette BH-553
(Quand le barillet de l'objectif est déployé)
① Marca de ajuste del parasol
③ Empuñadura para sujetar el objetivo
④ Indicador de la montura del objetivo
⑤ ※ Contactos del objetivo
※ No tocar directamente con la mano.
El ajuste de la apertura se realiza en la cámara de acuerdo al modo de
Notas sobre Macro Fotografía
En macro-fotografía, el sujeto y el objetivo están en una posición muy
cercana, de ahí la ampliación. Por tanto, cualquier vibración o movimien-
to de la cámara afectará la calidad de la fotografía. Para este tipo de fotos,
hay que asegurar bien la cámara a fin de eliminar las vibraciones. Por ello
Tokina recomienda el uso de un trípode, cable disparador y/o control
remoto así como flash externo.
Forma de acoplar y retirar el objetivo
Por favor siga el manual de instrucciones para acoplar y retirar el objetivo.
* Tenga cuidado para no tocar o golpear los contactos electrónicos del lado
de la montura de la lente, en el momento de acoplar o retirar el objetivo.
Cuidados al utilizar el flash incorporado
En caso de utilizar el flash incorporado o un flash pequeño especial para
la cámara, el objetivo puede obstruir la luz de este, pudiendo aparecer
una sombra del objetivo en la imagen. En estos casos, utilizar un flash de
Cuando se tiene instalado el parasol del objetivo, este puede bloquear el
destello de la luz estroboscópica, inclusive una de gran tamaño.
Utilizar filtros con rosca circular. Si hay suciedad o gotas de agua en el
filtro, puede causar reflejos indeseados e imágenes superpuestas.
Asegúrese de limpiar bien el filtro antes de tomar fotografías.
* Por favor utilizar solo un filtro a la vez. Si se utiliza más de uno a la vez,
El parasol incluido con el objetivo, previene que una fuerte luz angular
proveniente de los lados, impacte directamente en la parte frontal de la
lente, lo que puede ocasionar halo o imágenes fantasma, afectando la
calidad de las fotografías.
Por favor asegurarse de usar siempre el parasol en el momento de hacer
tomas, para obtener los mejores resultados posibles.
* Recomendamos que siempre tenga el parasol acoplado al objetivo,
para evitar la luz directa que puede causar halo o imágenes fantasma.
Alinee la marca del parasol del objetivo
con la marca blanca de la parte del
acoplamiento en el cañón del objetivo,
luego hacer rodar el parasol en sentido
horario hasta escuchar o sentir que el
parasol se p1-ha ajustado en el lugar
Puede ocurrir viñeteado si el parasol no
está ajustado adecuadamente.
Utilizar configurando la cámara en enfoque automático (AF).
Presionando el disparador hasta la mitad, el sistema de la cámara realiza
Utilizar configurando la cámara en enfoque manual (MF).
Ajustar el enfoque moviendo el anillo de enfoque, mientras se verifica la
imagen en el visor o del monitor de la cámara
Se puede lograr un enfoque más preciso utilizando la función de
[Función de enfoque manual todo el tiempo]
Con este objetivo, mientras se toma en modo de enfoque automático, se
puede ajustar manualmente sin cambiar el modo de enfoque.
Colocar el modo de enfoque de la cámara en “DMF”, utilizar el enfoque
automático para realizar el enfoque, luego puede realizar ajustes al
enfoque presionando el disparador hasta la mitad, haciendo girar el
anillo de enfoque. Se puede usar para tomas que necesitan un enfoque
preciso, como retratos o tomas macro.
La dirección de rotación del anillo de enfoque es la misma que la del
■Forma de colocar el parasol del objetivo
Durante una toma macro, el cilindro del objetivo se extiende y el número
F cambia según la ampliación de la toma, sin embargo, en condiciones
normales el sistema de la cámara realizará la corrección automática-
Se puede verificar la distancia de
enfoque y la macro-magnificación
de la distancia macro cuando el
objetivo está extendido. Le puede
servir como referencia al momento
Cuando se utiliza un fotómetro
externo es necesario compensar la
exposición. Para configurar la
cantidad de compensación,
consultar con la tabla a continu-
⑥Distancia de enfoque (m)
⑦Coeficiente de magnificación
⑧Distancia de enfoque (ft)
Distancia de enfoque y coeficiente de magnificación cuando
el objetivo está extendido
Cuando se utiliza luz estroboscópi-
ca para el control de luz externa, es
necesario tomar en cuenta la
compensación para aumentar la
exposición (factor de aumento de
la exposición), por la pérdida de la
magnificación de la toma.
Compensar la exposición tomando
como referencia la tabla a continu-
Tenga en cuenta que las especicaciones y la apariencia del objetivo
pueden ser cambiadas sin previo aviso, para la mejora del producto.
* El marcado se muestra en lentes que contienen partes electróni-
cas (marca de certicación de acuerdo con los requerimientos
Europeos de inspección para la exportación). La marca también indica
la declaración del cumplimiento de las normas de comportamiento
medioambiental de los productos estipulados en la directiva RoHS.
* Marca indicando la inserción en la directiva RoHS de China (Medición
Administrativa para el Control de Polución Causada por Productos de
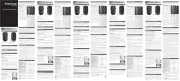
Tabla de especificaciones
Conguración del objetivo
Distancia mínima de enfoque
Máxima macro-magnicación
Parasol tipo bayoneta BH-553
Cuidados básicos y almacenamiento
Evite cualquier golpe o impacto en la lente o la exposición a tempera-
turas extremadamente altas o bajas, así como también evitar la
Para prevenir deterioro, mantener limpia la superficie de la lente
después de utilizarla. No usar disolvente para pintura, benceno u otros
agentes orgánicos para limpiar la suciedad o las huellas digitales
impregnadas en el lente. Limpiar con una tela suave y humedecida o
Cuando se saca el objetivo a exteriores, limpiar constantemente la
suciedad, polvo o residuos, con una tela de gamuza o silicona.
Asegurarse que las paredes del objetivo estén limpias, no solamente
de la parte frontal o posterior.
Seleccionar un lugar frío y fresco cuando lo que se quiere es almacenar
por un largo periodo de tiempo, además debe tener de preferencia
una buena ventilación. Para evitar daños en el revestimiento de la
lente, mantener la lente alejada de la naftalina o de gas naftaleno.
Este objetivo no es resistente al agua. Por lo tanto, cuando se usa el
objetivo durante la lluvia o clima parecido, debe evitar que se moje.
Normalmente no se recomienda la reparación del objetivo o sus
componentes cuando han sido dañados por agua.
Cambios repentinos de temperatura, pueden causar condensación en
las lentes componentes. Cuando ingrese a un ambiente cálido desde
un ambiente frío, es recomendable dejar el objetivo en un estuche
hasta que la temperatura del objetivo alcance la temperatura del
(Lente frontal totalmente contraído)
Con questo obiettivo è possibile utilizzare solo filtri circolari “a vite”. La
presenza di sporco o di condensa sulla superficie del filtro può causare
bagliori (flare) o immagini fantasma (ghosting) nella foto. Si raccomanda
pertanto di detergere e asciugare accuratamente la superficie del filtro
prima di qualsiasi ripresa.
Nota: utilizzare un solo filtro alla volta. L’utilizzo di più filtri contempora-
neamente può causare la presenza di vignettature (vignetting).
Note sull’uso del flash incorporato
Quando si usa il flash incorporato nella fotocamera, oppure un piccolo
flash dedicato innestato sul corpo macchina, parte della luce emessa
potrebbe colpire l’obiettivo e creare così una zona d’ombra sull’inquadra-
tura. Per impedire che ciò accada si suggerisce di usare un flash esterno.
In presenza del paraluce, si potrebbe verificare un’ostruzione della luce
anche con un flash di grandi dimensioni. In tale evenienza, si prega di
Avvertenze per gli scatti Macro
Negli scatti Macro la distanza tra il soggetto e l’obiettivo è estremamente
ravvicinata e l’ingrandimento risulta elevato. Per questo, anche il più
piccolo movimento della mano può influire notevolmente sulla posa. Si
prega di mantenere la macchina fotografica ben ferma al momento dello
scatto. Per un’immagine stabile, si consiglia di utilizzare un treppiede, un
comando di scatto remoto e il flash.
Sulla base del modo di scatto desiderato regolare l’apertura
Regolazione dell’apertura
①Indice di montaggio del paraluce
②Anello di messa a fuoco
④Indicatore di montaggio sul corpo macchina
Applicazione e rimozione dell’ obiettivo
Per l’applicazione e la rimozione dell’obiettivo, consultare attentamente il
manuale di istruzioni della macchina fotografica.
Nota: durante l’applicazione o la rimozione dell’obiettivo, non toccare o
urtare i contatti elettrici sulla superficie di montaggio, nè forzare
l’installazione dell’obiettivo stesso.
■Messa a fuoco in modalità Autofocus
Impostate il fuoco della macchina fotografica in vostro possesso in
modalità Autofocus (AF) prima di utilizzarla.
La messa a fuoco avverrà automaticamente premendo il pulsante
dell’otturatore fino a metà corsa.
■Messa a fuoco in modalità Manuale
Impostate il fuoco della macchina fotografica in vostro possesso in
modalità Focus (MF) prima di utilizzarla.
Regolate la messa a fuoco ruotando l’anello di messa a fuoco e
controllando l’immagine del mirino.
È anche possibile effettuare una messa a fuoco di precisione utilizzando
la funzione di ingrandimento della visualizzazione.
[Funzione Full Time Manual]
Questa macchina fotografica permette la regolazione manuale di
precisione della messa a fuoco anche durante le inquadrature in
modalità Autofocus, senza dover cambiare modalità.
Impostate la modalità del fuoco della macchina fotografica su (DMF),
effettuate la messa a fuoco automatica tramite Autofocus e, mantenendo
premuto il pulsante dell’otturatore in posizione di metà corsa, effettuate
la regolazione manuale di precisione della messa a fuoco ruotando
l’anello di messa a fuoco.
Utilizzate questa funzione per gli scatti in modalità Portrait o Macro.
La direzione di rotazione dell’anello di messa a fuoco deve essere la stessa
Il paraluce incluso con questo obiettivo permette di proteggere la lente
dalla luce diretta che, penetrando sia frontalmente che obliquamente,
potrebbe causare bagliori (flare) o immagini fastasma (ghosting),
influendo negativamente sulla qualità dell’immagine. Utilizzare pertanto
il paraluce in ogni circostanza, sia a protezione della lente che per
mantere alta la qualità delle foto.
Nota: a differenza dei rullini analogici, con macchine digitali a sensore di
immagine fisso il rischio di riverbero è maggiore. Si raccomanda
pertanto di montare il paraluce anche in caso di riprese interne.
Allineare l’indice di montaggio sull’obiet-
tivo con l’indicatore di montaggio sul
paraluce (simbolo bianco) e ruotare il
paraluce in senso orario fino a sentire un
“click”. Assicurarsi quindi che il paraluce sia
avvitato fermamente e fino in fondo. La
non corretta installazione del paraluce
può causare la presenza di vignettature
(vignetting) nell’immagine.
Modalità di installazione del paraluce:
In caso di scatti Macro, i valori di F vengono modificati azionando il
barilotto, mentre in caso di scatti normali la macchina fotografica effettua
la regolazione automaticamente.
È possibile controllare la distanza e
l’ingrandimento dell’inquadratura
quando l’obiettivo è esteso per
distanza Macro. Si prega di
utilizzare l’indicatore come
riferiemento al momento dello
Se si utilizza un esposimetro
esterno, è necessario compensare
l’esposizione. Si prega di impostare
i valori di compensazione
consultando la tabella seguente.
⑥distanza di inquadratura (m)
ingrandimento dell’inquadratura
⑧distanza di inquadratura (ft)
Maggiorazione di esposizione per gli scatti Macro
Indicatore di ingrandimento e distanza in scatti con
Quando si utilizza il flash esterno è
necessario effettuare una compen-
sazione dell’esposizione che
esposizione (maggiorazione dell’
esposizione) pari alla quantità di
luminosità diminuita in funzione
dell’ingrandimento dell’inquadra-
tura. Regolare l’esposizione
※La marcatura ( certicazione di Conformità Europea) è apposta su
tutte le componenti contenenti parti elettroniche e altersì dichiara la
conformità alle norme per la prevenzione ambientale stabilite dalla
※Il simbolo indica inoltre il rispetto delle norme previste dalla
direttiva China RoHS (misure amministrative di controllo del livello di
inquinamento causato dall’emissione di prodotti elettronico-informatici).
Note: si prega di prendere atto che le caratteristiche o l’aspetto del
prodotto potrebbero variare senza preavviso in caso di migliorie
Manutenzione e corretta conservazione
Evitare l’esposizione dell’obiettivo a temperature eccessivamente alte
o basse, o ad ambienti con alto tasso di umidità. Proteggere l’obiettivo
da forti impatti o urti accidentali. In caso di non utilizzo per periodi
prolungati, conservare l’obiettivo in un contenitore ermetico sufficien-
temente capiente, possibilmente allegando un sacchetto disidratante.
Per prevenire la formazione di muffa procedere alla pulizia della
superficie della lente dopo ogni utilizzo. Evitare l’utilizzo di solventi,
prodotti contenenti benzene, o sostanze organiche per rimuovere
eventuale sporco o impronte digitali dalle componenti dell’obiettivo.
Utilizzare esclusivamente un panno morbido leggermente umidificato
con apposito liquido per la pulizia delle lenti, o un panno apposito per
Per una buona cura e manutenzione delle componenti esterne,
rimuovere abitualmente eventuali macchie, polvere o sporcizia con un
panno di camoscio o in silicone. Assicurarsi di non limitare la pulizia
solo alla parte anteriore e posteriore dell’obiettivo, p1-ma di pulirne
accuratamente anche il barilotto.
In caso di non utilizzo per periodi prolungati, riporre l’obiettivo in un
luogo fresco, asciutto e preferibilmente ventilato. Per prevenire il
deterioramento del rivestimento della lente, si raccomanda di porre
l’obiettivo lontano da antitarmici o gas contenenti naftalene.
Questo obiettivo non è dotato di elementi impermeabili o resistenti
all’acqua. In caso di pioggia o di utilizzo in luoghi in prossimità di fonti
d’acqua, fare attenzione affinché la lente non si bagni. Infiltrazioni
d’acqua all’interno dell’obiettivo possono causare gravi malfunziona-
menti o danni irreparabili.
Violenti o improvvisi sbalzi di temperatura possono causare l’insorgere
di condensa all’interno dell’obiettivo. Qualora sia necessario spostare
l’obiettivo da un luogo freddo a un luogo caldo, si raccomanda di
inserire preventivamente l’obiettivo in un astuccio e in seguito in una
busta di plastica, nonché di procedere all’utilizzo solo una volta la
temperatura dell’ambiente si sia stabilizzata.
Luminosità (apertura massima)
Distanza minima del soggetto
Paraluce a baionetta BH-553