To configure the device using a smartphone proceed
1. Check that the phone you are using is connected to the
home Wi-Fi network where the device will be connected.
2. Launch the , press the key on the Home page, App “+”
enter a name for the building to be created and press
3. Press the key to add a new device and select an “+”
area that helps to easily identify it from those proposed.
4. In the list of configurable devices, locate and press on
the image of the model.Oikos
5. . On the briefly press the Oikos Wi-Fi, T key
The will start to flash quickly for a few green LED
seconds, then it will flash slowly for approximately 5
minutes (configuration mode).
6. On the check in the settings that you havephone
activated the Bluetooth connection.
a. follow the instructions in the wizard and press .“Next”
b. find and select in the list the device “OW_...” Oikos Wi-Fi to connect to the
(the will become a steady light to indicate the connection between green LED
c. choose (with Android) or enter (with iOS) the full name of the Wi-Fi network to
connect the device to, being sure to faithfully type in all the component characters
(uppercase, lowercase, spaces, digits).
d. now enter the password of the Wi-Fi network to which the device is connected,
being sure to faithfully type in all the component characters (uppercase, lowercase,
8. On the the will start to flash quickly for a few seconds, then it Oikos Wi-Fi orange LED
will flash slowly to indicate the correct connection with the home network.
9. On the , press to complete the configuration. App “Connect”
The configuration procedure has ended. At this point:
the displays the list of zones associated with your account in which the newly App
associated device must also appear.
on the after the device connects with the Vemer Cloud, Oikos Wi-Fi
the LED will turn off (this may take a few minutes).
NOTE: If the configuration operation is unsuccessful and the continues to flash, orange LED
repeat the configuration procedure of the device with remote control, paying particular
attention to entering the required data, faithfully respecting upper and lower case characters,
REMOTE CONTROL CONFIGURATION
For the correct operation and use of the device through the remote control
via the App, carefully follow the points below:
• Install and connect the device according to the connection diagrams in this
1. the Router and/or the Wi-Fi Access Point are correctly switched on and at a
distance such as to guarantee a stable communication signal with the device
2. the Router has full access to the Internet and there are no browsing restrictions
(firewall settings, parental control,...)
3. The 2.4 GHz frequency band is also enabled in the Router settings
(the devices do not support the 5 GHz band)
4. the smartphone used for configuration is connected to the same Wi-Fi network
to which the device is connected
• Create a Vemer account:
1. Install and launch the app on your smartphone (or tablet)Clima
2. Choose and fill in the "e-mail" “REGISTER NOW”
Nota: for security reasons, it is advisable to choose
a password different from the one used
to access your e-mail inbox
confirm activation of the account by clicking
on the link contained in the e-mail sent by
4. Log in by entering the e-mails and passwords
chosen during registration
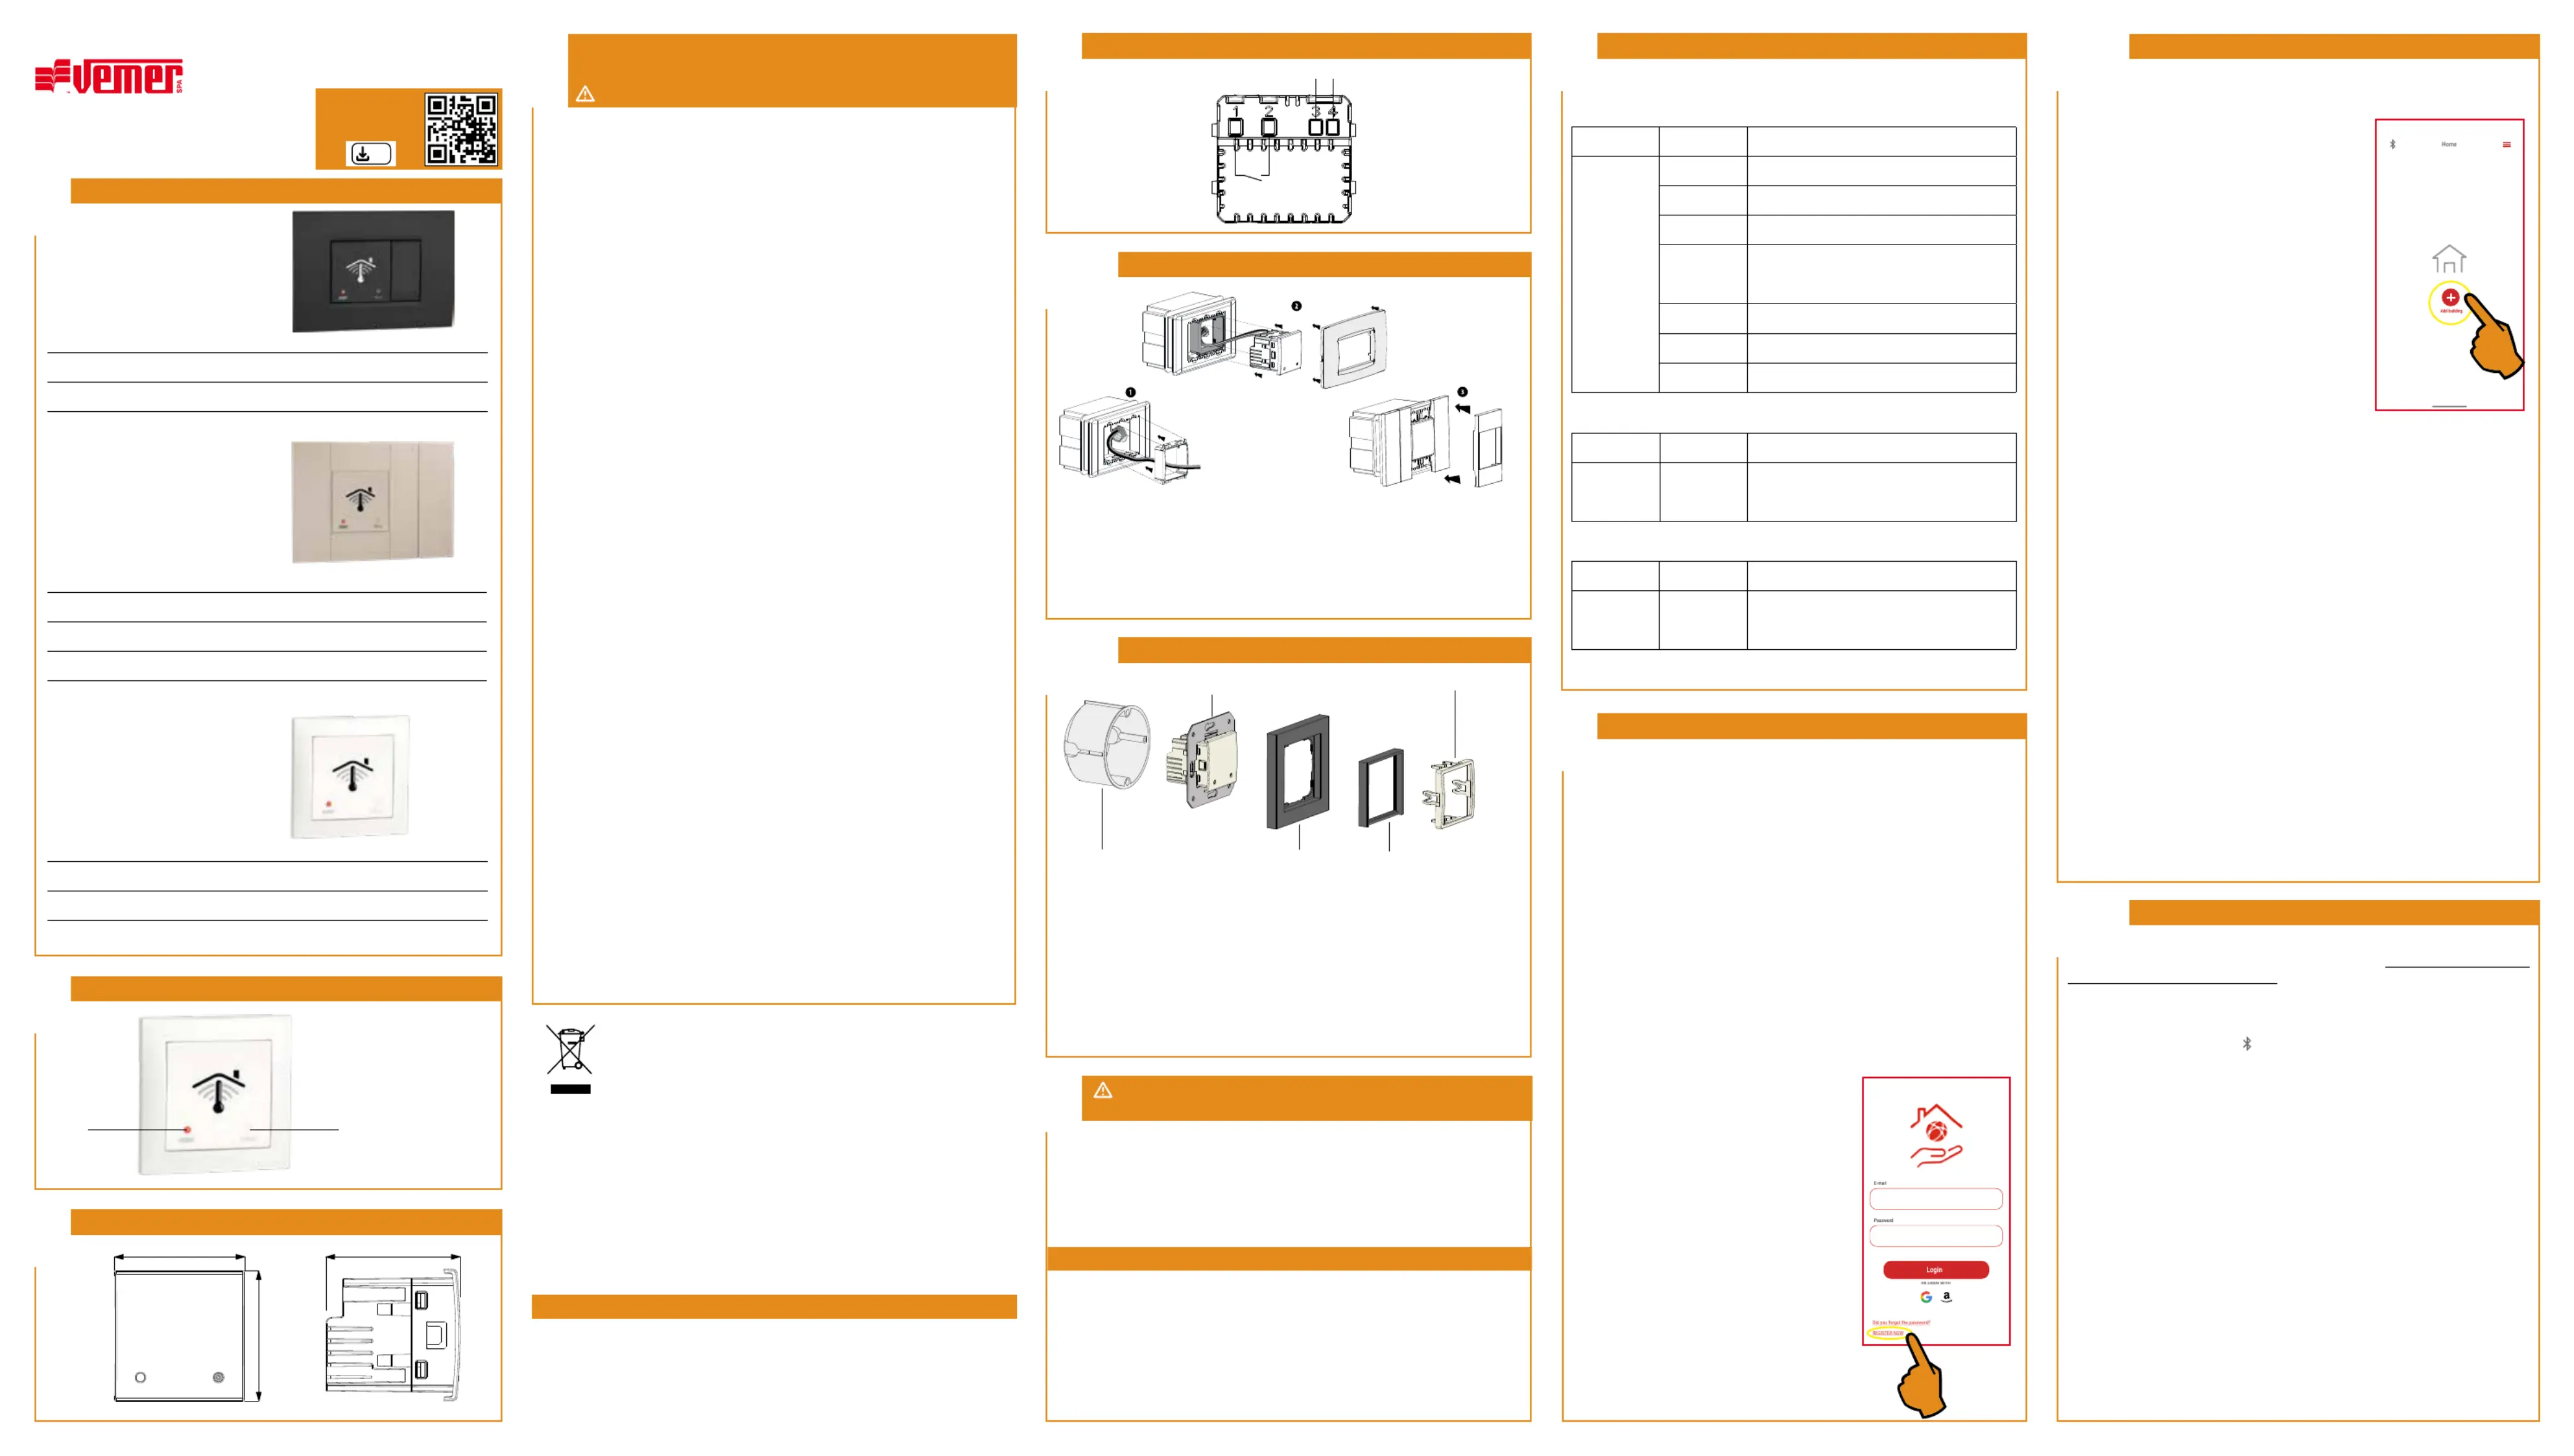
OIKOS WI-FI / OIKOS WI-FI.NOW MOUNTING
BERKER, BUSCH-JAEGER, TOUR,
BTICINO: Axolute, Axolute AIR
BTICINO: Light, Living International,
LivingLight, LivingLight AIR
VE VIMAR: Arké, Eikon, Eikon Evo
I - 32032 Feltre (BL) • Via Camp Lonc, 16
e-mail: info@vemer.it - website: www.vemer.it
Flush-mounting WI-FI chronothermostat 2 modules*
Flush-mounting WI-FI chronothermostat 2 modules*
* Including plastic support for adaptability to the plates of the main civil series of BERKER, BUSCH-JAEGER, GIRA,
FLUSH-MOUNTING WI-FI CHRONOTHERMOSTAT
Read all the instructions carefully
Compact built-in Wi-Fi chronothermostat suitable to control heating and air conditioning
systems with weekly programming and mains power supply. The device is managed exclusively
using the app, which is available free of charge for iOS and Android systems.
Programming, switching on the system, changing of the operating settings and the creation
of new programs are all operations that can be performed easily and from anywhere you are
thanks to the integrated Wi-Fi module that connects the device to the Internet through the home
router. It comes with adapters that allow it to be installed with the plates of the main civil
series. Oikos Wi-Fi is an electronic device that perform actions of 1B type and are intended to
operate in environments with III overvoltage category and pollution degree 2 in accordance with
During installation and operation of the device, it is necessary to comply with the
1) The device must be installed by a qualified person, strictly compliance with the
2) The device must be installed and activated in compliance with current electric
3) After installation, inaccessibility to the connection terminals without appropriate
tools must be guaranteed.
4) Do not use the product for anything other than the indicated purpose.
5) There must be a bipolar disconnection in the mains supply.
6) In the electrical system of the building where the chronothermostat must be installed,
a protection device from the overcurrents must be present.
7) Before accessing the connection terminals, make sure that the leads are not live.
8) Do not power on or connect the device if any part of it is damaged.
9) The device performs actions of 1B type and is suitable for environments with pollution
degree 2 and overvoltage category III (EN 60730-1).
• Power supply: 230 Vac (-15 ÷ 10%) 50/60 Hz
• Maximum consumption: 3 VA/230 Vac (in access point mode)
• Output: bistable relay with 5 A/250 Vac interruption power
• Operating mode: summer/winter/off (with antifreeze)
• Weekly programming via app with 3 temperature levels T1, T2, T3
• Programming resolution: 1 hour
• Interval between two measurements: 20 seconds
• Adjustment type: on/off or proportional
• Installation on rectangular recessed boxes with a height of 45 mm or round boxes
• Terminal block for cables with a maximum section of 1.5 mm
• Configuration/programming T key
• 3-colour operation status signal LED
• Measurement accuracy: ±0.5°C
• Measured temperature resolution: 0.1°C
• Temperature setting field: 2 ÷ 50°C
• Bluetooth communication interface: BLE 5.0
• Bluetooth operating frequency band: 2400-2483.5 MHz
• Maximum Bluetooth radiofrequency power transmitted: 4 dBm
• Wi-Fi operating frequency band: 2.4 GHz IEEE 802.11 b/g/n
• Maximum transmitted Wi-Fi radiofrequency power: 18.3 dBm
• Operating temperature: 0°C ÷ 50°C
• Storage temperature: -10 ÷ 65°C
• Operating humidity: 20% ÷ 90% non-condensing
• Protection degree: IP40
• Insulation: reinforced among accessible parts (front) and all the other clamps
EU Declaration of Conformity:
Vemer declares that the device complies with EU Directive 2014/53/EU (red) with reference to
• EN 60730-2-7 • EN 60730-2-9 • ETSI EN 300 328 • ETSI EN 301 489-1 • ETSI EN 301 489-17
The full text of the EU Declaration of Conformity is available at the Internet address
Oikos Wi-Fi Bianco Flush-mounting WI-FI chronothermostat 2 modules*
Oikos Wi-Fi Grigio Flush-mounting WI-FI chronothermostat 2 modules*
* Including plastic supports for adaptability to the plates of the main civil series of ABB, AVE, BTICINO, GEWISS
Flush-mounting WI-FI chronothermostat 2 modules*
Flush-mounting WI-FI chronothermostat 2 modules*
Flush-mounting WI-FI chronothermostat 2 modules*
*Includes plastic support for adaptability to the BTICINO Living Now plate.
① Apply the adapter corresponding to the civil series plate to be assembled
② Connect the load and power supply (see connection diagram),
insert the device into the adapter and secure the supplied civil series plate
③ With the BTicino Living Now series, also insert the closing frame
① Connect the load and power supply (see connection diagram)
② Attach the device with the metal frame to the built-in box
③ Apply the cover mask and any intermediate panel 50x50 mm
④ Finally insert the closing frame (white / grey colours)
The device can be adapted to the cover masks of Berker, Busch-Jaeger, Gira,
Jung and Merten. The complete list of compatible mask models is available on the
website www.vemer.it on the product page.
The use of the chronothermostat via the Clima APP must be carried out
in the presence of a Wi-Fi network connected to the Internet.
The smartphone used for setup must be connected to the same Wi-Fi network.
Make sure you have a Vemer account available.
• It is recommended to install the device at a height of 1.5 meters from the floor, in an
area that reflects as much as possible the average temperature conditions of the room.
• Avoid installation near doors or windows, in niches, behind doors and curtains or in
positions with excess or total lack of ventilation.
• Also make sure that the distance from the router is such that stable communication
WARNINGS FOR THE CORRECT POSITIONING AND CONNECTION
OF THE DEVICE TO A WI-FI NETWORK
The reset procedure deletes all the settings made as well as the configuration
of the connection with the home network and returns the device to the factory conditions.
To reset using a smartphone proceed as follows:
1. Launch the and press the “ ” key in the top left of the Home page. App
2. Follow the instructions in the wizard and press “Next”.
3. On the press the Oikos Wi-Fi T key. The green LED will start to flash quickly for a few
seconds, then it will flash slowly for approximately 5 minutes (configuration mode).
4. On the check in the settings that you have activated the Bluetooth connection.phone
a. follow the instructions in the wizard and press “Next”
b. find and select in the list the device “OW_...” to connect to the Oikos Wi-Fi
(the will become a steady light to indicate the connection between green LED
c. select the key and confirm. “Reset”
The reset procedure has ended. At this point:
the displays the reset message allowing you to return to the Home page App
Oikos Wi-Fi the will light up for a few seconds to signal orange LED
the restart phase and will then start flashing slowly.
Now it is possible to proceed with the configuration of the device described in BOX 10.
The device, depending on the model, comes with adapters that allow it to be
installed with the plates of the main civil series.
Device conguration/ program-
• All trademarks in the document are registered by their rightful owners.
information to users pursuant to art. 14 of the directive
2012/19 / EU of the european parliament and of the council
of 4 july 2012 on waste electrical and electronic equipment (WEEE)
If the crossed-out bin symbol appears on the equipment or packaging,
this means the product must not be included with other general waste
at the end of its working life.
The user must take the worn product to a sorted waste center,
or return it to the retailer when purchasing a new one.
Products for disposal can be consigned free of charge (without any new purchase obligation)
to retailers with a sales area of at least 400 m
, if they measure less than 25 cm.
An efficient sorted waste collection for the environmentally friendly disposal of the used device, or its
subsequent recycling, helps avoid the potential negative effects on the environment and people’s health,
and encourages the re-use and/or recycling of the construction materials.