28
3CONNECTION DIAGRAM
Vemer S.p.A.
I - 32032 Feltre (BL) • Via Camp Lonc, 16
e-mail: info@vemer.it - web site: www.vemer.it
V3IS01188-010 Mod. TUO 4G
Wall-mounted 4G-LTE smart thermostat suitable for controlling heating and air conditioning
systems with weekly programming and mains power supply. The device can be managed
using the App, which is available for free for iOS and Android systems. Programming,
switching on the system, changing the operating settings and creating new program are all
operations that can be carried out easily and from anywhere thanks to the integrated 4G-LTE
module that connects the smart thermostat to the Internet. The SIM card supplied and installed
in the device, which includes 2 years of data traffic, can be extended using the application or
replaced. TUO 4G is an electronic device that perform actions of 1B type and are intended to
operate in environments with III overvoltage category and pollution degree 2 in accordance with
EN 60730-1 standard.
Code Model Description
VE795800 Tuo 4G Bianco Weekly smart thermostat with SIM card included, white
VE795900 Tuo 4G Nero Weekly smart thermostat with SIM card included, black
SAFETY WARNINGS
During the installation and the operation of the instrument it’s necessary to observe the
following instructions:
1) The instrument must be installed by a qualified person by observing scrupulously the
connection diagrams.
2) The instrument must be installed and activated in compliance with current electric systems
standards.
3) After installation, inaccessibility to the connection terminals without appropriate tools
must be granted.
4) Do not use the instrument for other purposes different from the one specified.
5) In the power supply network a bipolar disconnection must be present.
6) A protection device against over-currents should be installed in the electrical system,
upstream of the device.
7) Before accessing the connection terminals, verify that the leads are not live.
8) Do not power on or connect the instrument if any part of it is damaged.
TECHNICAL CHARACTERISTICS
• Power supply: 230 Vac ±10% 50/60 Hz
• Backup battery: rechargeable AAA NiMH type, capacity 950 mAh
use only NiMH rechargeable batteries
• Output: bistable relay with changeover contact 5 A / 250 Vac
• Weekly programming with 3 settable temperatures: T1, T2, T3
• Daily Resolution: 1h
• Switch-on delay settable between 15, 30 or 45 minutes (independent for each hour)
• Measured temperature scale: 0°C ÷ 50°C
• Measured and displayed temperature resolution: 0.1°C
• Temperature regulation range: 2.0°C ÷ 50°C
• Measurement accuracy: ± 0.5°C
• Temperature regulation:
– on/off with adjustable differential between 0.1°C and 1°C
– proportional with settable band and regulation period
• Operating mode: heating (winter) or conditioning (summer)
• Configurable display backlight
• Display of relative humidity (regulation is not allowed)
• Automatic winter time/summer time
• Keypad lock with password for installation in public places
• Wall installation (or covering the box 503)
• Terminal block for cables with section of 1.5 mm
2
• Operating frequency band:
– GSM/GPRS/EDGE 900/1800 MHz – LTE-FDD B1/B3/B5/B7/B8/B20
• Maximum power of transmitted radiofrequency: 33 dBm
• Operating temperature: 0°C ÷ 50°C
• Operating humidity: 20% ÷ 90% non condensing
• Storage temperature: -20°C ÷ 65°C
• Degree of protection: IP40
• Insulation: reinforced between accessible parts (front) and all other terminals
Manuals
download
PDF
Clock
Day of the week
Off operation
Active load (conditioning mode)
Active load (heating mode)
Measured temperature
Running daily program divided into 24 histograms, one for each hour of the day. Each hour
is associated with one of the 3 temperatures:
Temperature T1 Temperature T2 Temperature T3
Active timed operation
Receiving a command
Vemer Cloud connection active
Measured relative humidity
Configuration menu
Local active operation. In this state the device is disconnected from the Cloud Vemer
and any change in operation must be made using the keys on the smart thermostat.
Local operation can be disabled by the app
Active keypad lock
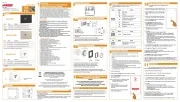
5INSTALLATION
4
5
click
1 2 3
Open the door of the terminal compartment
Connect the load and the power supply (see connection diagram) and fix the device to the wall
Close the door of the terminal compartment
Insert the back-up battery into the special housing, ensuring the correct polarity, and place the
front part on the wall-mounted part, ensuring the correct connection of the two parts
Close the device by rotating the front panel downwards
7REMOTE CONTROL CONFIGURATION
To configure the device using a smartphone proceed as follows:
2. Choose and fill in the "e-mail" and "password" fields"REGISTER NOW"
Note: for security reasons, it is advisable to choose a password different from the one used to
access your e-mail inbox
3. Check your e-mail address: confirm account activation by clicking on the link contained in the
e-mail sent by the system
4. Log in by entering the e-mails and passwords chosen during registration
• Start the device configuration procedure on the App by carefully following the step-by-step
instructions in the wizard
Important: The following figures display the App at the time of publication of these user
instructions. Newer versions of the App may deviate in terms of graphics and content.
6 WARNINGS AND PRELIMINARY OPERATIONS FOR THE CORRECT
POSITIONING AND CONNECTION OF THE DEVICE
WARNINGS
The use of the smart thermostat through the Clima APP
requires a stable 4G-LTE network to ensure a good Internet connection.
Make sure you have a Vemer account.
The SIM card supplied and installed in the device
can be replaced by another with the same characteristics.
Removing the SIM cared supplied and installed in the device causes its
immediate and automatic deactivation, rendering it unusable.
• Install and connect the device in accordance with the installation instructions in this manual.
• The device can be installed on the wall or to cover the 3-module flush-mounting box (type 503).
• It is advisable to install the device at a height of 1.5 metres from the floor, in an area that reflects the
average temperature conditions of the room as closely as possible.
• Avoid installation near doors or windows, in nooks, behind doors and curtains or where there is
excessive or no ventilation.
• Ensure that the 4G-LTE signal is such as to ensure stable communication.
In the event that the device cannot reach the Vemer Cloud due to connectivity problems,
the LOCAL OPERATION allows complete management, programming and configuration of the
smart thermostat through its keypad. In this way, the device does not check for new settings
on the Cloud and adjusts the temperature according to the settings entered from the keypad
(the programming and configuration in the Cloud are not changed).
8BACKUP BATTERY
The device is equipped with a back-up battery, which makes it possible to send a message in the event
of a power failure (e.g. in the event of a blackout) and to maintain the time until the battery is completely
discharged. The battery is recharged by the unit and takes approximately 48 hours to be fully charged
when plugged in. The backup battery is accessible by removing the front of the device from the wall
socket and can be replaced without disconnecting the power supply.
Use NiMh batteries (type AAA) with a capacity of 950 mAh or higher.
Use only rechargeable batteries
RECHAR GEABL E
It is necessary to remove the batteries before the instrument is scrapped.
In case of replacement, dispose of the batteries in the appropriate
places separate waste collection containers.
9BATTERY DISPOSAL
To reset if the key lock is active and you do not know the unlock password, you must:
1. remove the front of the device from the part fixed to the wall
2. remove the backup battery for at least 10 seconds (see BOX 8)
3. reposition the backup battery and when the display shows all the segments, press and hold
the key until " " appears.DEF
Operating mode heating
(winter)
Regulation type on/o
Dierential (on/o) 0.3°C
Band (proportional) 0.5°C
Period (proportional) 10 minutes
Antifreeze temperature OFF 6°C
Adj. ADJ temperature 0°C
Min. settable temperature 2°C
Max. settable temperature 50°C
Hour meter operation / 0 h
Automatic summer time change active
(according to EU rules)
Backlighting active
Key lock password deactivable
11 DEVICE RESET
Perform a reset to erase the entered settings and return the unit to the factory
settings.
To reset:
1. from the home screen, press and hold the key to access the configuration menu.
CLOCK indication starts flashing
2. keep the keys pressed at the same time and until " " appears on the display.RES
3. when the display shows all segments, press and hold the key until " " appears DEF
LOCAL OPERATION
(WHAT TO DO IF THERE IS NO CONNECTION)
SET
SET
+
Initial screen
Configuration
menu
3s 3s
3s
To switch from automatic to manual operation
To switch from manual to automatic operation
To switch from automatic operation (or manual) to the one switched off and vice versa
Manual
operation
Tm operation
Automatic
operation
Manual
operation
Automatic
operation
Tm operation
3s
Automatic
operation
Off
operation
3s
3s
Local operation is indicated by the icon on the App and device
display, and can be paused and/or disabled at any time from the
App (but not from the device).
If local operation is disabled (useful if you only want to control the
device from the App), the icon will appear on the display and
if you try to access the configuration menus from the device's
keypad, you will not be able to make any changes.
information to users pursuant to art. 14 of the directive
2012/19 / EU of the european parliament and of the council
of 4 july 2012 on waste electrical and electronic equipment (WEEE)
If the crossed-out bin symbol appears on the equipment or packaging,
this means the product must not be included with other general
waste at the end of its working life.
The user must take the worn product to a sorted waste center,
or return it to the retailer when purchasing a new one.
Products for disposal can be consigned free of charge (without any new purchase obligation)
to retailers with a sales area of at least 400 m
2, if they measure less than 25 cm.
An efficient sorted waste collection for the environmentally friendly disposal of the used device
or its subsequent recycling, helps avoid the potential negative effects on the environment
and people’s health, and encourages the re-use and/or
recycling of the construction materials.
• Create a Vemer account:
1. Install and launch the Clima Vemer App on your smartphone (or tablet)
Tuo 4G