Vimar 03989 Manual


Læs gratis den danske manual til Vimar 03989 (6 sider) i kategorien Termostat. Denne vejledning er vurderet som hjælpsom af 2 personer og har en gennemsnitlig bedømmelse på 3.7 stjerner ud af 1.5 anmeldelser. Har du et spørgsmål om Vimar 03989, eller vil du spørge andre brugere om produktet?

Side 1/6
Viale Vicenza 14
36063 Marostica VI - Italy
www.vimar.com
03989 01 2505
03989 - IoT connected thermostatic head
VIEW WIRELESS SMART HOME
The thermostatic head, fitted directly on the radiator, regulates the room temperature by con-
trolling the flow of hot water circulating in the radiators of a heating system. Thanks to Bluetooth
technology connectivity, it integrates into the View Wireless system and can be controlled manual-
assistants. The IoT connected heads replace existing thermostatic heads and are compatible
with most valves through the use of various adapters (see the VALVE COMPATIBILITY TABLE).
Download the View Wireless App from the stores onto the tablet/smartphone you
will be using for configuration.
When the device is powered for the rst conguration, we recommend you search for any
new rmware and perform the update.
You will also need:
Gateway art. 30807.x-20597-19597-14597
View App
for management via smartphone/tablet
Amazon Alexa, Google Assistant, Siri (Homekit) voice assistants for possible voice
operation
GENERAL SYSTEM CONFIGURATION
1. Create your Installer account on MyVIMAR (on-line).
2. Wire all the devices in the system (2-way switches, relays, thermostats, gateway, etc.).
3. Start the View Wireless App and log in with the credentials you just created.
4. Create the system and the environments.
5. Associate all the devices with the environments, except for the gateway (which should be
associated last).
6.
For every device, set the function, the parameters and any accessory devices (wired or radio
control and related function).
7. Transfer the configuration of the devices to the gateway and connect it to the Wi-Fi network.
8. Transfer the system to the Administrator user (who must have created his/her profile on
MyVIMAR).
For details, see the View Wireless App manual that can be downloaded from the www.
vimar.com website.
FIRST HEAD START-UP AND CONFIGURATION IN
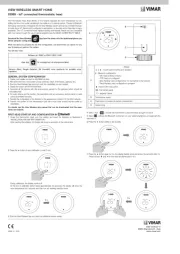
1. Screw the thermostatic head onto the radiator and insert the batteries as illustrated in
"INSTALLATION AND BATTERY INSERTION."
After inserting the batteries, the display will show an animation in the central area:
2. Press the button to start calibration or wait 5 min.
During calibration, the display remains off.
At the end of calibration (which takes approximately 30 seconds), the display will show the
room temperature for 2 seconds and then turn off, entering standby mode.
2 s
°C
3. Start the View Wireless App and view the additional devices screen.
A
Display
: Touch keys for setting and operation
: Bluetooth configuration.
- ON: head working correctly
- OFF; head not configured
- Slow flashing: head configured but not connected to the network
- Rapid flashing: head configuration in progress
: Head in ON mode active
: Flat battery signal
°C = degrees Celsius
BTemperature sensor
C
Push button to access the battery compartment
D
Hooking ring
A
°C
C
D
B
4. Select “Add” ( ), choose the environment to place the head and give it a name.
5. Select ; activate the Bluetooth connection on your tablet/smartphone and approach the
head with it.
6. Press the
button briefly to exit standby.
°C
7. Press the button again for 3 s; the display flashes twice and shows the set point after 3 s.
Press buttons and on the head simultaneously for 6 s.
°C
°C °C
3 s
°C
Viale Vicenza 14
36063 Marostica VI - Italy
www.vimar.com
03989 01 2505
03989 - IoT connected thermostatic head
VIEW WIRELESS SMART HOME
The icon starts flashing and the association is completed.
°C
HEAD OPERATION
The thermostatic head always operates in heating mode, either ON or OFF.
Standby
When the head is in standby, its display is off. To reactivate it, briefly press the
button.
°C
Operating mode
Briefly press the button.
°C
If the operating mode is ON, you'll see the temperature setpoint and can also modify it.
°C
If the operating mode is OFF, the display won't show any value.
Temperature set point setting
1. When the thermostatic head is in ON mode, press one of the buttons and they and
will both start flashing.
2. Again using
and set the desired set point (each press increases or decreases by
0.5 °C).
The display will revert to showing the room temperature and after a 5-second timeout without
interaction with the device, the thermostatic head will go into standby with the display off.
OFF ON switching
After activating the display, press the
button for 3 s.
°C
the display flashes twice and switches ON, showing the set point and the and buttons.
°C
°C
ON OFF switching
After activating the display, press the
button for 3 s.
°C
The display turns off and switches OFF.
°C
N.B. After a 5-second timeout without interaction with the device, the thermostatic head will go
into standby and the display will turn off.
RESET PROCEDURE.
The reset restores the factory settings.
With the head in ON mode, press the
and buttons until the display does not show any
value.


Produkt Specifikationer

Mærke: Vimar
Kategori: Termostat
Model: 03989

Har du brug for hjælp?

Hvis du har brug for hjælp til Vimar 03989 stil et spørgsmål nedenfor, og andre brugere vil svare dig


Termostat Vimar Manualer

Vimar

Vimar 03989 Manual

26 August 2025
Vimar

Vimar 32041.G Manual

20 August 2025
Vimar

Vimar 32041.C Manual

20 August 2025
Vimar

Vimar 02973 Manual

25 Juli 2025
Vimar

Vimar 19440.M Manual

24 Juli 2025
Vimar

Vimar 01910.14 Manual

24 Juli 2025
Vimar

Vimar 02952.BN Manual

24 Juli 2025
Vimar

Vimar 02970 Manual

24 Juli 2025
Vimar

Vimar 14440.SL Manual

24 Juli 2025

Termostat Manualer

Nyeste Termostat Manualer