Note
• This baby monitor is intended as an aid. It is not a substitute for proper adult supervision, and should
not be used as such.
Test your baby monitor
You may test the baby monitor before initial use, and at regular times thereafter.
Caution
• For hearing protection, make sure the parent unit is more
than 1 metre away from the baby unit(s). If you hear any
high-pitched noise, move the parent unit further until the
noise stops. You can also press on the parent unit to
reduce the noise.
1. Make sure your baby unit and parent unit are on.
2. The parent unit displays images from the baby unit.
• Speak towards the microphone of the baby unit.
You will hear the sound at the parent unit.
3. If you have two baby units, press VIEW on your parent
unit. The screen switches to the other baby unit. Then, repeat step 2.
Note
• When the parent unit displays and then No Link to CAM # (# represents the baby unit number),
and the LINK LED light flashes, move the parent unit closer to the baby unit (observe the minimum
distance of 1 metre).
Tip
• Increase the speaker volume of the parent unit if you cannot hear the sounds transmitted from the
baby units.
Positioning the baby monitor
Caution
• Keep the baby unit out of the reach of your baby. Never place or mount the baby unit inside the
baby’s crib or playpen.
Note
• To avoid interference from other electronic
devices, place your baby monitor at least 1
metre away from devices such as wireless routers,
microwaves, cell phones and computers.
1. Place the baby unit more than 1 metre away from your baby.
2. Place the parent unit more than 1 metre away from the baby unit(s) to avoid screeching
noise.
Caution
• The default volume of your parent unit is level 4, and the maximum volume is level 7. If you experience
high-pitched screeching noise from your baby monitor while positioning:
- Make sure your baby unit and parent unit are more than 1 metre apart, OR
- Lower the volume of your parent unit.
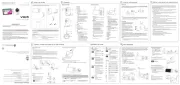
Power on or off the baby unit
• Slide the ON/OFF switch to ON to turn on the baby unit. The ON/OFF LED light turns on.
• Slide the ON/OFF switch to OFF to turn off the baby unit. The ON/OFF LED light turns off.
Power on or off the parent unit
• Press and hold POWER to turn on the parent unit. The screen turns on.
• Press and hold POWER to turn off the parent unit. The screen turns off.
Turn on or off the parent unit screen
You can turn on or off the parent unit screen without powering off the parent unit. You can still
hear sound from the baby unit.
• Press and hold LCD ON/OFF on the parent unit to turn off the screen.
• Press any key on the parent unit to turn on the screen again.
Adjust the speaker volume
For parent unit:
• Press / on the parent unit at any time when viewing images.
For baby unit:
Press VOL / VOL to adjust the listening volume. The baby unit speaker volume
determines the lullaby volume and talkback volume transmitted from parent unit. Level 1 is the
softest while Level 5 is the loudest.
1. Press MENU when the parent unit is idle.
2. Press or to choose Camera, then press SELECT.
3. Press or to choose Volume on Camera, then press SELECT.
4. Press or to choose the desired volume level, then press SELECT to confirm your
selection.
Adjust LCD brightness
You can change the brightness of the parent unit screen from Level 1 to Level 5. The LCD
brightness is preset to Level 3.
1. Press MENU when the parent unit is idle.
2. Press or to choose Brightness, then press SELECT.
3. Press or to choose the desired level of brightness, then press SELECT to confirm your
selection.
User’s manual
For product support please call:
1300 369 193
Congratulations
on purchasing your new VTech product. Before using this product, please read Important safety
instructions.
This manual has all the feature operations and troubleshooting necessary to install and operate
your new VTech product. Please review this manual thoroughly to ensure proper installation and
operation of this innovative and feature-rich VTech product.
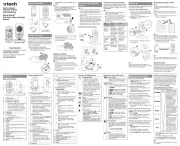
Connect and charge the battery
What’s in the box
Before use
Using the baby monitor
3
Using the baby monitor (Con’t)
Operating range
The operating range of the baby monitor is up to 300 metres outdoors or 50 metres indoors.
The actual operating range may vary depending on the environmental conditions and other
interferences such as walls, doors and other obstructions.
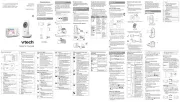
Zoom
You can zoom in while viewing images from the baby unit .
• Press to zoom in.
• Press again to zoom out.
Talk
You can use the TALK function of the parent unit to comfort your baby in Single CAM and Patrol
mode.
1. Press and hold TALK on the parent unit. The TALK light turns on.
2. Speak towards the microphone on the parent unit. Your voice is broadcast to the baby unit.
3. Release TALK to stop the broadcast. The TALK light goes off. The speaker is then turned on for
around 20 seconds, so you can hear your baby.
Note
• The parent unit speaker is muted during voice broadcast. Sound transmission from the baby unit resumes
after TALK is released.
Lullaby
The baby monitor has five lullabies and four soothing sounds for you to comfort your baby.You can
play the lullabies or soothing sounds on the baby unit using the parent unit.
To play lullaby using the parent unit:
1. Press MENU when the parent unit is idle.
2. Press or to choose Lullaby, then press SELECT.
3. Press or to choose Play Melodies, then press SELECT.
4. Press or to choose a lullaby, then press SELECT.
To play soothing sound using the parent unit:
1. Press MENU when the parent unit is idle.
2. Press or to choose Lullaby,then press SELECT.
3. Press or to choose Play Soothing Sounds, then press SELECT.
4. Press or to choose a soothing sound, then press SELECT.
Notes
• The lullaby playback on the baby unit will be paused when receiving talkback from the parent unit.
To stop playing lullaby or soothing sound:
1. Press MENU when the parent unit is idle.
2. Press or to choose Lullaby,then press SELECT.
3. Press or to choose Stop, then press SELECT.
To set auto timer for lullaby:
While the baby unit is playing lullaby or soothing sound, the auto timer feature helps you
automatically stop the lullaby or soothing sound after playing for 15/30/45/60 minutes. You can set
auto timer for lullaby with the parent unit.
1. Press MENU when the parent unit is idle.
2. Press or to choose Lullaby,then press SELECT.
3. Press or to choose Auto Timer, then press SELECT.
4. Press or to choose the desired lullabies duration, then press SELECT.
After 15/30/45/60 minutes, the lullaby or soothing sound will stop automatically.
Set sleep timer (Sound activation)
You can set the auto screen-off timer so that the LCD will turn off automatically when the parent unit
does not detect sound for the period of time you set (1, 2 or 3 minutes).
1. Press MENU when the parent unit is idle.
2. Press or to choose Sleep timer, then press SELECT.
3. Press or to choose the desired idle time for the LCD to turn off automatically, or choose
Off, then press SELECT.
After 1/2/3 minutes, the parent unit screen will turn off automatically. If you have chosen
Off, there will no sleep timer set. The parent unit screen will turn on when sound is detected
coming from the baby unit. The level of noise to enable the screen to be sound activated depends
on the sound sensitivity level set (see below).
Adjust the sound sensitivity of the baby unit
You can choose to hear sounds from the baby unit all the time, or to hear sounds that exceed a
certain level. You can use the parent unit to adjust the microphone sensitivity of your baby unit from
Lowest to Highest. The higher the sensitivity level, the more sensitive the baby unit is in detecting
sounds for transmitting to the parent unit. The VOX sound sensitivity level is preset to Highest.
Sensitivity
Level
Description
Highest
Low sensitivity
High sensitivity
Highest VOX sensitivity level
The parent unit speaker is constantly on, and you will hear all sounds (including
background noises) from your baby’s room.
High
High VOX sensitivity level
The parent unit speaker turns on for soft babbling and louder sounds from your baby.
It remains quiet when your baby sleeps soundly.
Medium
Medium VOX sensitivity level
The parent unit speaker turns on for loud babbling and louder sounds from your
baby. It remains quiet when your baby makes soft sounds.
Low
Low VOX sensitivity level
The parent unit speaker turns on for crying and louder sounds from your baby. It
remains quiet when your baby makes soft sounds.
Lowest
Lowest VOX sensitivity level
The parent unit speaker turns on for loud crying or screeching sounds from your baby.
It remains quiet when your baby makes soft sounds.
1. Press MENU when the parent unit is idle.
2. Press or to choose Sensitivity (VOX setting), then press SELECT.
3. Press or to choose the desired sensitivity level, then press SELECT to confirm your selection.
Tip
• You can adjust the baby unit placement to improve the sound detection.
Set alert tone
No link alert
You can set the parent unit to beep when the link between the parent unit and the baby unit is lost.
1. Press MENU when the parent unit is idle.
2. Press or to choose Alert Tone, then press SELECT.
3. Press or to choose No Link Alert, then press SELECT.
4. Press or to choose On or Off, then press SELECT to confirm your selection.
Low battery tone
You can set the parent unit to beep when the parent unit operates in low battery condition.
1. Press MENU when the parent unit is idle.
2. Press or to choose Alert Tone, then press SELECT to select.
3. Press SELECT again to choose
Low Battery Tone.
4. Press or to choose On or Off, then press SELECT to confirm your selection.
Monitor the temperature
Your baby unit monitors the temperature of your baby’s room with its built-in temperature sensor. If
the detected temperature is outside of the preset temperature range, the parent unit will display alert
message.
Set temperature range
You can set the desired room temperature alert range. The minimum temperature can be set
between 11
o
C (52
o
F) and 20
o
C (69
o
F).
The maximum temperature can be set between 21
o
C (70
o
F) and 30
o
C (86
o
F).
1. Press MENU when the parent unit is idle.
2. Press or to choose Temperature, then press SELECT.
3. Press or to choose Minimum or Maximum, then press SELECT.
4. Press or to choose the desired minimum or maximum temperature, then press SELECT to
confirm your selection.
Temperature alert tone
You can turn on the temperature alert tone so that the parent unit will emit an alert tone if the
detected temperature is out of range.
1. Press MENU when the parent unit is idle.
2. Press or to choose Temperature, then press SELECT.
3. Press or to choose Set alert, then press SELECT.
4. Press or to choose On or Off, then press SELECT to confirm your selection.
Temperature format
You can choose to display the temperature in Fahrenheit (
o
F) or Celsius (
o
C).
1. Press MENU when the parent unit is idle.
2. Press or to choose Temperature, then press SELECT.
3. Press or to choose Format, then press SELECT.
4. Press or to choose
o
F or
o
C, then press SELECT to confirm your selection.
Turn on or off the vibration
You can turn on the vibration feature so that the parent unit vibrates when it receives any of No link
alert or Temperature alert tone after turning on the respective alert tones.
1. Press MENU when the parent unit is idle.
2. Press or to choose Vibration, then press SELECT .
3. Press or to choose On or Off.
4. Press SELECT to confirm your selection.
Note
• If the vibration feature is turned on, the parent unit may vibrate as it receives sound broadcast from the baby unit.
The vibration alert for sound detection will only vibrate approximately every 20-30 seconds.
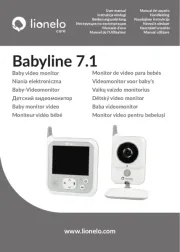
Monitoring mode
*
for pairing with BM5110-BEAR only
Every time the parent unit is turned on, it displays a baby unit in Single CAM mode. If there are two
baby units in your system, you can also monitor your baby in Patrol or Split mode.
Single CAM The screen displays image of a single baby unit in full screen.
Patrol A single cam view that transitions to a different baby unit every 10 seconds.
Split The screen displays all baby units.
You can choose the desired monitoring mode.
1. Press MENU when the parent unit is idle.
2. Press or to choose Monitoring Mode, then press SELECT.
3. Press or to choose Single CAM, Patrol or Split, then press SELECT.
In Single CAM or Patrol mode:
• Press VIEW to view the next baby unit.
In Split mode:
• Press , , or to select a baby unit.
• Press or VIEW to view the selected baby
unit temporarily in Single CAM mode. It
returns to Split mode after 10 seconds.
Note
• The parent unit is muted while in Split mode.
Install the parent unit battery
The parent unit runs on rechargeable battery or AC power. To continuously monitor your
baby, keep the parent unit connected to AC power. With the battery alone, the parent unit can
cordlessly run for approximately 2.5 hours.
• Use only the battery supplied with this product.
• If the parent unit will not be used for a long time, disconnect and remove the battery to prevent possible leakage.
Replace the battery
To replace the battery, press down on the battery compartment cover and pull it out, then
follow the steps above to install the battery.
Connect the baby monitor
• Use only the power adapters supplied with this product.
• Make sure the baby monitor is not connected to a switch controlled electric outlet.
• Connect the power adapters in a vertical or floor mount position only. The adapters’ prongs are not
designed to hold the weight of baby monitor, so do not connect them to any ceiling, under-the-table,
or cabinet outlets. Otherwise, the adapters may not properly connect to the outlets.
• Make sure the parent unit, the baby unit and the power adapter cords are out of reach of children.
Charge the parent unit battery
When you have connected the parent unit and installed its battery for the first time or after
power outage, the parent unit powers on automatically. The battery icon indicates the
battery status (see the following table).
Notes
• The parent unit battery is fully charged after 3 hours of continuous charging.
• It takes longer to charge the battery when the parent unit is turned on. To shorten the charging time,
turn the parent unit off while charging.
• The standby time varies depending on the sensitivity level you set, your actual use and the age of the battery.
Battery indicators Battery status Action
The battery icon is off and
displays.
No battery is installed but
operates using AC power,
or the battery has been
installed incorrectly.
Install the parent unit battery.
Charge without interruption (at
least 30 minutes).
The screen displays Battery
low at Parent Unit and .
The light flashes.
The battery has very little
charge and may be used
for only a short time.
Charge
without interruption
(about
30 minutes).
The battery icon becomes
solid .
The battery is fully charged. To keep the battery charged, connect
it to AC power when not in use.
THIS SIDE UP
Press down
on the battery
compartment
cover to pull
it out.
Make sure the
label THIS SIDE
UP is facing up
while inserting
the battery.
Strangulation
Hazard
Keep this cord out of reach of children.
The cord needs to be at least three feet
away from the child at all times. Do not
use with an extension cord. Do not
remove this tag.
Éloignez ce cordon des enfants. Le
cordon doit se trouver à au moins trois
pieds d’un enfant et ce, en tout temps.
N’utilisez pas de rallonge. Ne retirez pas
cette étiquette.
Mantenga este cable fuera de la alcance
de los niños. Este cable debe estar por
lo menos tres pies fuera de la alcance
del niño en todo momento. No lo use
con una extensión inalámbrica. No quite
esta etiqueta.
Risque
d’étranglement
Riesgo de
estrangulación
BM5100-BEAR
Video Monitor
﹏﹏﹏
﹏﹏﹏
﹏﹏﹏﹏
﹏﹏﹏﹏
﹏﹏﹏﹏
﹏﹏﹏﹏﹏
﹏﹏﹏﹏﹏
﹏﹏﹏﹏﹏
﹏﹏﹏
﹏﹏﹏
﹏﹏﹏﹏
﹏﹏﹏﹏
﹏﹏﹏﹏
﹏﹏﹏﹏﹏
﹏﹏﹏﹏﹏
﹏﹏﹏﹏﹏
≥
1 metre
63ē
When using your equipment, basic safety precautions should always be followed to reduce the risk of fire, electric shock and
injury, including the following:
1. Follow all warnings and instructions marked on the product.
2. Adult setup is required.
3. This product is intended as an aid. It is not a substitute for responsible and proper adult supervision and should not be used as such.
4. This product is not intended for use as a medical monitor.
5. Do not use this product near water. For example, do not use it next to a bath tub, wash bowl, kitchen sink, laundry tub or
swimming pool, or in a wet basement or shower.
6. CAUTION: Use only the batteries indicated in this manual. There may be a risk of explosion if a wrong type of battery is used for the
parent unit. Use only the supplied rechargeable battery or the parent unit. Do not dispose of batteries in a fire. They may explode.
7. Use only the adaptors included with this product. Incorrect adaptor polarity or voltage can seriously damage the
product.
Baby unit power adaptor: Output: 5V DC 1000mA; Parent unit power adaptor: Output: 5V DC 1000mA.
8. The power adaptors are intended to be correctly oriented in a vertical or floor mount position. The prongs are not
designed to hold the plug in place if it is plugged into a ceiling, under-the-table or cabinet outlet.
9. For pluggable equipment, the socket-outlet shall be installed near the equipment and shall be easily accessible.
10. Unplug this product from the wall outlet before cleaning. Do not use liquid or aerosol cleaners. Use a damp cloth for cleaning.
11. Unplug the power cords before replacing batteries.
12. Do not cut off the power adaptors to replace them with other plugs, as this causes a hazardous situation.
13. Do not allow anything to rest on the power cords. Do not install this product where the cords may be walked on or crimped.
14. This product should be operated only from the type of power source indicated on the marking label. If you are not sure
of the type of power supply in your home, consult your dealer or local power company.
15. Do not overload wall outlets or use an extension cord.
16. Do not place this product on an unstable table, shelf, stand or other unstable surfaces.
17. This product should not be placed in any area where proper ventilation is not provided. Slots and openings in the back
or bottom of this product are provided for ventilation. To protect them from overheating, these openings must not be
blocked by placing the product on a soft surface such as a bed, sofa or rug. This product should never be placed near or
over a radiator or heat register.
18. Never push objects of any kind into this product through the slots because they may touch dangerous voltage points or
create a short circuit. Never spill liquid of any kind on the product.
19. To reduce the risk of electric shock, do not disassemble this product, but take it to an authorized service facility.
Opening or removing parts of the product other than specified access doors may expose you to dangerous voltages
or other risks. Incorrect reassembling can cause electric shock when the product is subsequently used.
20. You should test the sound reception every time you turn on the units or move one of the components.
21. Periodically examine all components for damage.
22. Be aware of possible loss of privacy while using public airwaves. Conversations may be picked up by other nursery
monitors, cordless phones, scanners, etc.
23. Children should be supervised to ensure that they do not play with the product.
24. The product is not intended for use by persons (including children) with reduced physical, sensory or mental capabilities, or
lack of experience and knowledge, unless they have been given supervision or instruction concerning use of the appliance
by a person responsible for their safety.
SAVE THESE INSTRUCTIONS
Cautions
1. Use and store the product at a temperature between 0
o
C and 40
o
C.
2. Do not expose the product to extreme cold, heat or direct sunlight. Do not put the product close to a heating source.
3. Batteries should not be exposed to excessive heat such as bright sunshine or fire.
4. Make sure the baby unit(s) and the adaptor cord(s) are always out of reach of the baby, at least 1 metre away from
the baby or cot, to avoid a possible strangulation hazard.
5. Never place the baby unit(s) inside the baby’s cot or playpen. Never cover the baby unit(s) or parent unit with anything
such as a towel or a blanket.
6. Other electronic products may cause interference with your baby monitor. Try installing your baby monitor as
far away from these electronic devices as possible: wireless routers, radios, cellular telephones, intercoms, room
monitors, televisions, personal computers, kitchen appliances and cordless telephones.
Important safety instructions
Specifications are subject to change without notice.
© 2019 VTech Telecommunications Ltd.
All rights reserved. 08/19. BM5100-BEAR_AU_CIB_V1
Strangulation
Hazard
Keep this cord out of reach of children.
The cord needs to be at least three feet
away from the child at all times. Do not
use with an extension cord. Do not
remove this tag.
Éloignez ce cordon des enfants. Le
cordon doit se trouver à au moins trois
pieds d’un enfant et ce, en tout temps.
N’utilisez pas de rallonge. Ne retirez pas
cette étiquette.
Mantenga este cable fuera de la alcance
de los niños. Este cable debe estar por
lo menos tres pies fuera de la alcance
del niño en todo momento. No lo use
con una extensión inalámbrica. No quite
esta etiqueta.
Risque
d’étranglement
Riesgo de
estrangulación
63
℉
> 1metre
> 1metre
< 1metre
> 1metre
63ē
63ē
Press VIEW