INSTRUCTIONS: Wimberley MonoGimbal Head (MH-100)
Page 1
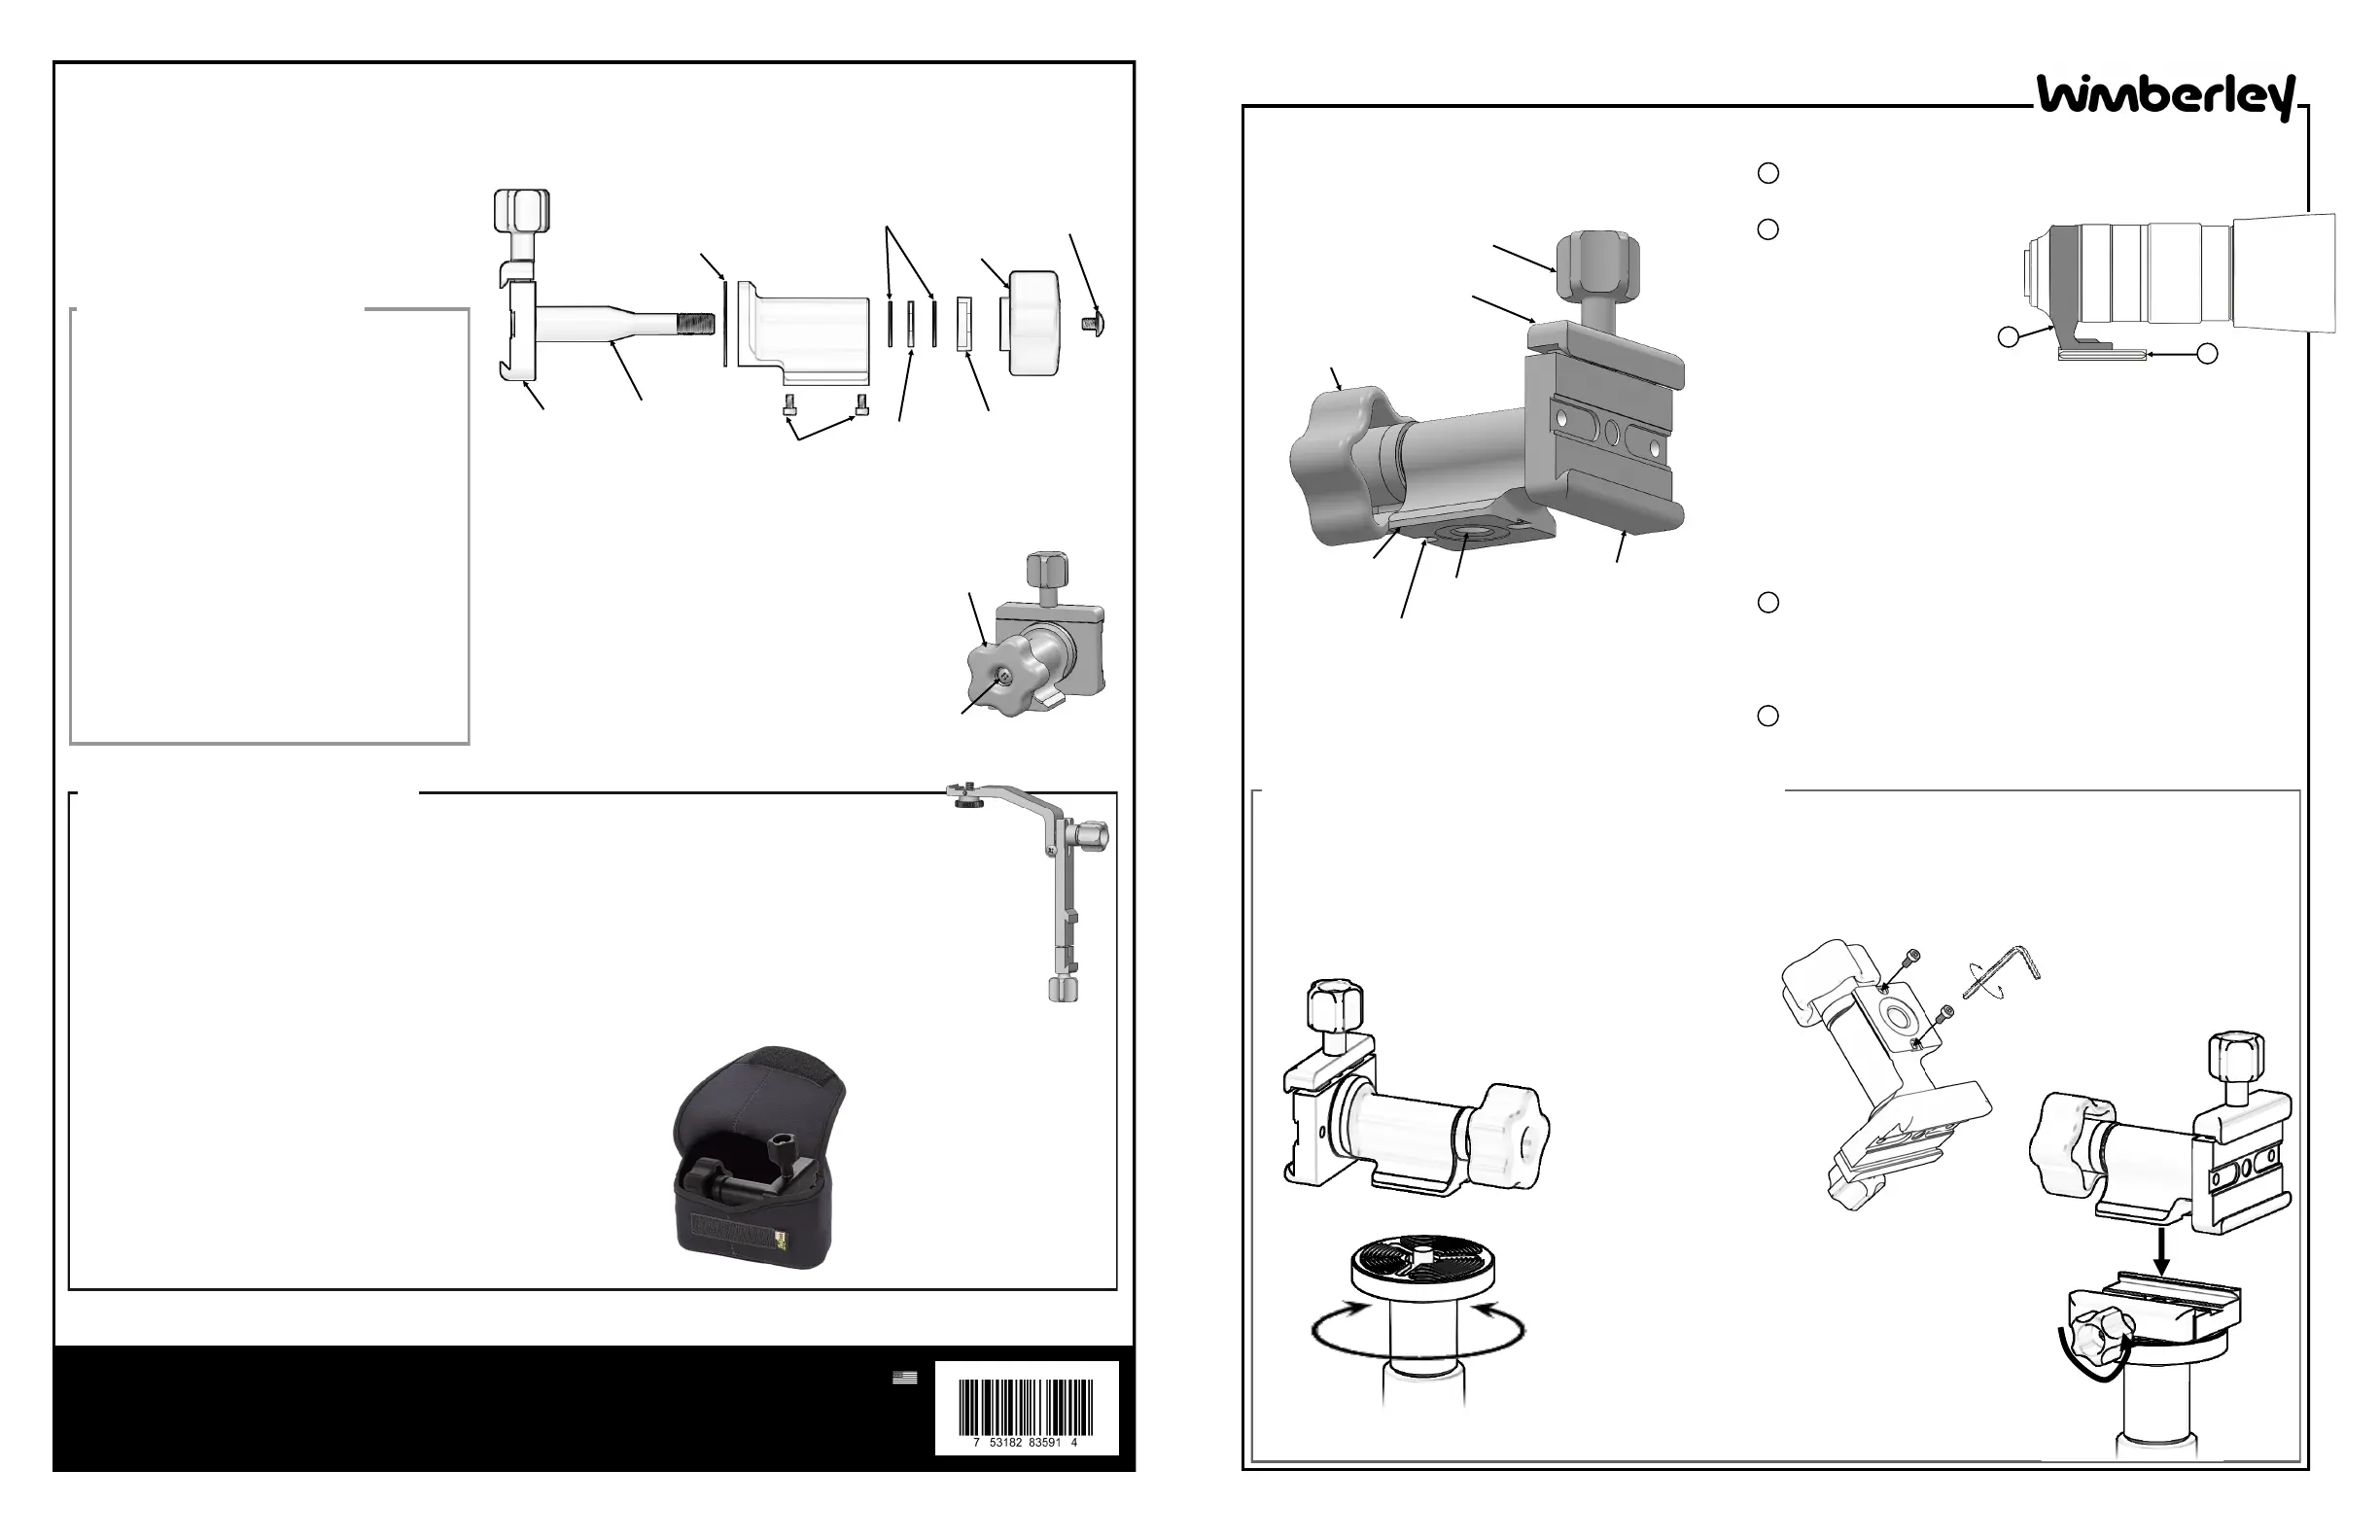
Wimberley MonoGimbal Pouch - PO-130:
The Wimberley MonoGimbal Pouch fits this head. Custom manufactured
by LensCoat, the soft neoprene protects the head from scratches during
traveling and in the field. A pull cord closure allows for quick and easy
access. The Pouch flattens for easy storage.
Wimberley, Inc. Phone: 1-434-529-8385
1750 Broadway St Toll Free: 1-888-665-2746 (USA & Canada)
Charlottesville, VA
22902 USA www.tripodhead.com info@tripodhead.com
Wimberley, Inc. ©2019, All Rights Reserved Revised 190930
Made in USA
MAINTENANCE & TROUBLESHOOTING:
It is important to read these instructions.
Setting up the MonoGimbal Head is not difficult, but reading these
instructions will allow you to get the most out of the product.
Thank You! Your observations and suggestions are welcome. We will continue to refine the MonoGimbal and instructions in response to customer feedback.
The MonoGimbal has been designed and constructed to handle many maintenance free years in the field.
There should be no need for any routine maintenance.
IF YOU HAVE A PROBLEM WITH
YOUR MONOGIMBAL HEAD:
Few things are likely to go wrong with the Wimberley
MonoGimbal Head However, if the head is in need of
repair, we ask that you return the head to us for inspec-
tion and service. (International customers should con-
tact the dealer who sold you the MonoGimbal Head).
If you need a head for a trip or shoot while yours is be-
ing repaired, let us know and we can send you one on
loan. If the head is faulty, we will fix it free of cost. If the
problem arises from extreme use, abuse or accident,
we will repair the head for a reasonable fee.
EMERGENCY REPAIRS:
We discourage you from disassembling this unit without
direct instruction from us. Any damage to the head
resulting from disassembly will not be covered by war-
ranty. In special cases it may not be feasible to send the
unit in for repair and you may wish to attempt to fix a
problem yourself. If you choose this route however you
do so at your own risk. Field repairs should be followed
up with a proper repair from us as soon as possible.
Nylon Washer
Thrust Washer
Radial Roller
Thrust Bearing
Stainless Steel
Captivating Screw
Cover for
Bearing Assembly
Knob
Stainless Steel
Tilt Shaft
Safety Stop
Screw
Quick-Release
Clamp
SETTING UP THE MONOGIMBAL HEAD
Page 4
Weight: .77 lbs (347 grams)
Dimensions: 3.4”h x 2.5”w x 4.4”d
Quick-Release
Knob
Quick-Release
Clamp
Tilt Knob
Arca-
Swiss
If your head has been exposed to a large
amount of salt water, sand or grit it can be
easily disassembled and rinsed. If you need to
disassemble the tilt mechanism refer to the
drawing to the right
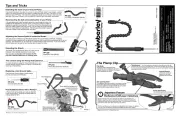
Flash Bracket - F-6:
We offer a convenient telephoto flash bracket that attaches directly to the lens plate and makes telephoto flash a breeze.
The bracket uses a quick-release attachment, so it is very fast and easy to install. It also breaks-down and folds for easy
storage. Refer to our product catalog or website for details
USEFUL ACCESSORIES:
F-6 Flash Bracket
MonoGimbal
Pouch
Lens Prerequisites
1 Your lens must have a rotation collar if you wish to quickly
switch between landscape and portrait modes
2 Your lens must have an Arca-
Swiss style quick-release plate
or a Lens Replacement Foot
with an integrated Arca-Swiss
style dovetail.
1
2
Captivating Screw
Tilt Mechanism:
To disassemble the tilt mechanism, remove
the captivating screw and unscrew the Tilt Knob.
If you need to remove the grease in the mechanism,
it is okay to use the tilt mechanism without grease
until you have the opportunity to send it in for us to
refurbish.
Tilt Knob
2
3
1
MOUNTING THE HEAD ON A MONOPOD
On a 3/8-16 Threaded Stud:
Step 1: Attach the head to the monopod See Fig. 1.
Rotate the monopod counter-clockwise to attach the head
on the 3/8 threaded stud on the monopod. Do not install
the safety stop screws if you intend to use the head with-
out a QR clamp.
Monopod Prerequisites
1 Your monopod should be heavy duty. We recommend using
a monopod with a 3/8 stud that is rated at 3 times the weight of
your setup. A reducer bushing can be used in the head for a
1/4” monopod stud, however it is doubtful such a tripod will be
sufficient to guarantee your gears stiffness and stability
2 An Arca-Swiss Quick Release clamp if you plan on mounting using
the arca-swiss dovetails on the MonoGimbal head.
MOUNTING THE HEAD ON A MONOPOD
WITH A QR CLAMP:
Step 1: Install the safety stop screw See Fig. 2. (Also see clamp
compatibility warnings in included safety stop screw kit)
Step 2: Open the QR clamp. The head has
optional safety stop screws. These prevent
accidental sliding out of the quick release.
If you use these stops you must be using
a QR clamp that can be opened wide
enough to load your head from the top
(instead of sliding it in). See Fig 3
Step 3: Attaching the MonoGimbal
Position the flat side of the head’s mounting
base against the clamp face. Clamp it securely.
Fig. 2 – Safety Stop
Screw Installation
Fig. 3 - Attaching
the MonoGimbal
to a QR Clamp
Fig. 1 – Attaching the MonoGimbal to
a 3/8-16 Threaded Stud
The monopod mounting
platform can typically be
removed if it interferes
with the full rotation of
the clamp or knobs or if a
lighter setup is desired.
Moving
Jaw
3/8-16 Mounting Hole
Safety Stop Screw
Mounting Holes