本製品は、取り付け用の穴にねじ切りのあるカートリッジ用のヘッドシェル
です。取り付け用の穴にねじ切りのないカートリッジを取り付ける場合、別
途適切な長さとサイズのねじやナットをお買い求めください。
This product is a headshell for cartridges with a threaded installation
hole. If you install a cartridge without a threaded hole for installation,
purchase separate screws and nuts of the appropriate length and
Ce produit est un porte-cellule pour cellules avec un trou de fixation
fileté. Si vous installez une cellule sans trou de fixation fileté,
achetez séparément des vis et des écrous de longueur et de taille
Dieses Produkt ist eine Headshell für Tonabnehmer mit
Gewindeeinsätzen. Wenn Sie einen Tonabnehmer ohne
Gewindeeinsätze befestigen, kaufen Sie separate Schrauben und
Muttern der entsprechenden Länge und Größe.
Questo prodotto è una testina sagomata per capsule con foro di
installazione filettato. Se si installa una capsula senza un apposito
foro filettato, acquistare viti e dadi separati della lunghezza e delle
Este producto es un portacápsulas para cápsulas con orificio
roscado de instalación. Si instala una cápsula sin orificio roscado
para su instalación, adquiera tornillos y tuercas por separado de la
longitud y el tamaño adecuados.
Este produto é uma headshell para cápsulas com um orifício de
instalação com rosca. Se for instalar uma cápsula sem um orifício
com rosca para instalação, adquira separadamente parafusos e
porcas do comprimento e tamanho adequados.
Это изделие представляет собой держатель головок звукоснимателей с
резьбовым крепежным отверстием. При установке головки
звукоснимателя без резьбового крепежного отверстия приобретите
отдельно винты и гайки соответствующей длины и размера.
本产品是带有螺纹安装孔的唱头壳。如果您安装不带螺纹安装孔的唱
本產品是有螺紋安裝孔的唱頭適用的唱頭蓋。 如果安裝沒有螺紋安裝孔
본 제품은 설치용 나사 구멍이 있는 카트리지용 헤드셸입니다. 설치용 나사
구멍이 없는 카트리지를 설치하는 경우, 적절한 길이 및 크기의 나사와
本製品をご家庭用として、取扱説明や接続・注意書きに沿ったご使用に
おいて万が一、製造上の原因による品質不良が発生した場合は新品と
お取り換えいたします。それ以外の責はご了承ください。
お取り換えの際は、お買い上げの確認のため領収書またはレシートなど
お問い合わせ先(電話受付/平日9:00〜17:30)
製品の仕様・使いかたや修理・部品のご相談は、お買い上げのお店また
は当社窓口およびホームページのサポートまでお願いします。
(携帯電話・PHS などのご利用は 03-6746-0211)
Eメール:support@audio-technica.co.jp
(携帯電話・PHS などのご利用は 03-6746-0212)
Eメール:servicecenter@audio-technica.co.jp
www.audio-technica.co.jp/atj/support/
162307670-01-04 ver.4 2020.04.01
生产标准:GB8898-2011, GB/T13837-2012
地址:香港九龍紅磡民裕街51號凱旋工商中心第二期9樓K室
地址: 32050 桃園市中壢區過嶺里福達路二段322巷6號
Audio‑Technica Corporation
2-46-1 Nishi-naruse, Machida, Tokyo 194-8666, Japan
©2020 Audio-Technica Corporation
Global Support Contact: www.at-globalsupport.com
〒194-8666 東京都町田市西成瀬2-46-1
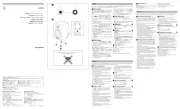
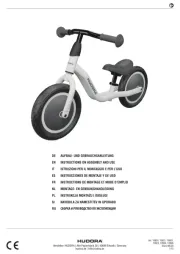
17 18.6 18.5
17 18.6 18.5
Make this distance as exact as possible.
Cartridge that came with the turntable
Green (right channel / )Blue (left channel / ) −−
White (left channel / ) +
イラストはAT-LH13Hです。 / The figure is AT-LH13H.
*1 / At time of purchasing購入時
*2 / Movable range : 31.5 40.5 mm可動範囲 〜
*1 / At time of purchasing購入時
*2 / Movable range : 35.0 44.0 mm可動範囲 〜
お買い上げありがとうございます。ご使用の前にこの取扱説明書を必ず
お読みのうえ、正しくご使用ください。また、いつでもすぐ読める場所に
本製品は安全性に充分な配慮をして設計をしていますが、使いかたを誤
事故を未然に防ぐために下記の内容を必ずお守りください。
この表示は「取り扱いを誤った場合、使用者が死亡または重
幼児の手の届く所に置かないでください。取り付けビスやプラスチッ
この表示は「取り扱いを誤った場合、使用者が傷害を負う、また
は物的損害が発生する可能性があります」を意味しています。
カートリッジを取り付ける用途以外には使用しないでください。破
直射日光の当たる場所、暖房器具の近く、高温多湿やほこりの多い
場所に置かないでください。故障や不具合の原因になります。
分解や改造はしないでください。故障の原因になります。
強い衝撃を与えないでください。故障の原因になります。
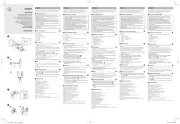
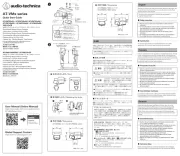
ご使用になる前に、本製品の各部を確認してください。
1.本製品とカートリッジ(別売)を、付属のビス、プラスチックワッシャー
図のように、ビスは上から下に通し、カートリッジを固定してください。
ご使用のカートリッジの取扱説明書も併せてご確認ください。
2.リード線の先端にあるリードチップをカートリッジに差し込み接続し
ヘッドシェルとカートリッジの取り付けには、市販のピンセット、スモー
ルペンチや非磁性マイナスドライバーなどを使用して取り付けるこ
リードチップが緩い場合は、少しつぶして接続してください。
3.2カ所の六角ボルトを付属の六角レンチで緩めて、オーバーハング、
傾きの調整をします。調整終了後は六角ボルトを本締めしてください。
不明な場合は、図のようにお手持ちのターンテーブルに最初から付
いているカートリッジの針先位置に合わせてください。
4.ターンテーブルのトーンアームに本製品を接続します。
5.ターンテーブルの取扱説明書を参照し、水平バランス、針圧、アンチ
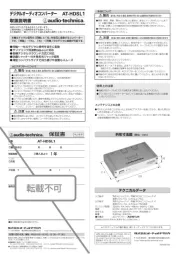
AT-LH11H AT-LH13H AT-LH15H AT-LH18H
付属品 六角レンチ、取り付けビス(M2.6)(8mm×2、10mm×2)、
Thank you for purchasing this Audio-Technica product. Before
using the product, read through this user manual to ensure that
you will use the product correctly. Please keep this manual for
• Keep the product out of the reach of small children to avoid
accidental ingestion of screws and washers, or damage to
• Do not use the product for any purpose other than to mount a
• Do not put the product in a location where it is exposed to
direct sunlight, near heating devices, or in places with high
temperatures, high humidity, or high concentrations of dust.
• Do not attempt to disassemble or modify the product.
• Do not subject the product to strong impact.
Become familiar with each part before using the product.
1. Mount a cartridge onto the headshell using the correct size
of provided installation screws with the plastic washers.
• Normally the screws should enter from the top of the
headshell when fitting the cartridge.
• Read the user manual of the cartridge.
2. Slide the lead tips over the cartridge connections.
• Use tweezers, small pliers, and non-magnetic screwdriver(s)
to mount the headshell/cartridge.
• If a lead tip is loose, flatten it out slightly to attach it.
3. Loosen hexagon bolts with a hexagonal wrench and adjust
for overhang and tilt. Tighten the hexagon bolts firmly when
If you are unsure about the overhang adjustment, align the
stylus tip with the stylus on the cartridge that originally came
4. Attach the headshell to the tonearm.
5. Refer to the turntable’s user manual and adjust the tonearm
balance, tracking force and anti‑skate.
AT‑LH11H AT‑LH13H AT‑LH15H AT‑LH18H
18.5 (0.73”) × 17 (0.67”) × 41.7 (1.64”)
18.5 (0.73”) × 17 (0.67”) × 45.2 (1.78”)
Accessories Hexagonal wrench, Cartridge installation screw (M2.6) (8.0 mm × 2, 10.0 mm ×
For product improvement, the product is subject to modification
Nous vous remercions d’avoir fait l’acquisition de ce produit
Audio-Technica. Avant de l’utiliser, lisez entièrement ce manuel de
l’utilisateur afin de vous assurer que vous utiliserez correctement
le produit. Veuillez conserver ce manuel pour toute consultation
• Gardez le produit hors de portée des jeunes enfants afin
d’éviter toute ingestion accidentelle de vis et rondelles, ou
tout endommagement du produit.
• N’utilisez pas le produit dans un but autre que celui de
monter une cellule de tourne-disque.
• Ne placez pas le produit dans un endroit exposé à un
ensoleillement direct, à proximité d’appareils générant de la
chaleur, dans des lieux à températures ou une humidité
élevées ou à forte concentration de poussières.
• Ne tentez pas de démonter ou modifier le produit.
• Ne soumettez pas le produit à de forts impacts.
Familiarisez-vous avec chaque élément avant d’utiliser le produit.
1. Rondelle en caoutchouc
■Procédure d’installation
1. Montez une cellule sur le porte‑cellule. Utilisez la dimension
adéquate de vis d’installation et de rondelles en plastique
fournies avec le produit.
• Les vis doivent normalement entrer par le haut du porte-
cellule lors de l’installation de la cellule.
• Lisez le manuel de l’utilisateur de la cellule.
2. Glissez les extrémités de fil sur les connexions de la cellule.
• N’appliquez pas de chaleur.
• Utilisez des pinces plates et un tournevis non magnétique
pour monter le ou la porte-cellule/cellule.
• Si l’extrémité d’un fil est desserrée, aplatissez-la légèrement
3. Desserrez les vis à tête hexagonale à l’aide d’une clé pour vis
à tête hexagonale et procédez au réglage de l’overhang et de
l’inclinaison. Serrez fermement les vis à tête hexagonale
lorsque la position est fixée.
Si vous n’êtes pas sûr(e) du réglage de l’overhang, alignez la
pointe de lecture avec la pointe sur la cellule qui est fournie
d’origine avec le tourne‑disque.
4. Fixez le porte‑cellule sur le bras de lecture.
5. Reportez‑vous au manuel de l’utilisateur du tourne‑disque et
réglez l’équilibre du bras de lecture, la force d’appui et
■Caractéristiques techniques
AT‑LH11H AT‑LH13H AT‑LH15H AT‑LH18H
Corps du porte-cellule : Aluminium
Accessoires Clé pour vis à tête hexagonale, vis d’installation de cellule (M2.6) (8,0 mm × 2,
10,0 mm × 2), Rondelle en plastique × 2
À des fins d’amélioration, le produit peut être modifié sans
Vielen Dank für den Kauf dieses Audio-Technica-Produktes.
Lesen Sie vor dem Gebrauch dieses Produktes diese
Bedienungsanleitung für eine ordnungsgemäße Nutzung.
Bewahren Sie diese Anleitung zur zukünftigen Bezugnahme
• Bewahren Sie das Produkt außerhalb der Reichweite von
kleinen Kindern auf, um ein unbeabsichtigtes Verschlucken
von Schrauben und Unterlegscheiben oder eine
Beschädigung des Produktes zu vermeiden.
• Verwenden Sie das Produkt ausschließlich zum Zweck der
Befestigung eines Tonabnehmers.
• Platzieren Sie das Produkt nicht an einem Ort, an dem es
direktem Sonnenlicht ausgesetzt ist, in der Nähe von
Heizvorrichtungen oder an Orten, an denen eine hohe
Temperatur oder hohe Luftfeuchtigkeit herrscht oder viel
• Versuchen Sie nicht, das Produkt auseinanderzubauen oder
• Schützen Sie das Produkt vor starken Erschütterungen.
Machen Sie sich vor der Verwendung des Produktes mit der
Bezeichnung der Teile vertraut.
1. Befestigen Sie einen Tonabnehmer mit den mitgelieferten
Befestigungsschrauben und Kunststoff‑Abstandshaltern in
der richtigen Größe auf die Headshell.
• Normalerweise sollten die Schrauben beim Einsetzen des
Tonabnehmers von oben in die Headshell eingeführt
• Lesen Sie die Bedienungsanleitung des Tonabnehmers.
2. Schieben Sie die Drahtenden über die
• Keiner Hitze aussetzen.
• Verwenden Sie zur Befestigung der Headshell/des
Tonabnehmers eine Zange, eine kleine Pinzette und einen
nichtmagnetischen Schraubendreher.
• Wenn ein Drahtende lose ist, ziehen Sie es gerade, um es
3. Lösen Sie die Sechskantschrauben mit einem
Sechskantschlüssel und passen Sie Überhang und
Neigung an. Ziehen Sie die Sechskantschrauben fest an,
wenn die Position fixiert ist.
Sollten Sie hinsichtlich der Überhangeinstellung unsicher
sein, richten Sie die Spitze der Abtastnadel an der Nadel
des Tonabnehmers aus, die ursprünglich mit dem
Schallplattenspieler mitgeliefert wurde.
4. Befestigen Sie die Headshell am Tonarm.
5. Entnehmen Sie Informationen zum Anpassen von
Tonarmbalance, Auflagekraft und Anti‑Skating der
Bedienungsanleitung des Plattenspielers.
AT‑LH11H AT‑LH13H AT‑LH15H AT‑LH18H
Headshell-Gehäuse: Aluminium
Zubehör Sechskantschlüssel, Befestigungsschraube für Tonabnehmer (M2.6) (8,0
mm × 2, 10,0 mm × 2), Kunststoff-Abstandshalter × 2
* Zum Zeitpunkt des Kaufs
Produktänderungen zu Zwecken der Produktverbesserung ohne