AT8705
English
Thank you for purchasing this Audio-Technica product.
Before using the product, read through this user manual to
ensure that you will use the product correctly.
Please keep this manual for future reference.
■ Safety precautions
• Do not subject the product to strong impact to avoid
malfunction.
• Do not disassemble, modify or attempt to repair the
product.
• Keep out of reach of children.
• The product could be damaged or cause injury if it falls
over or is dropped. Place it in a stable location.
• Do not catch your fingers in the gaps of the moving
parts.
■ Notes on use
• Be sure to read the connected device’s user manual
before use.
• Do not subject the product to strong impact to avoid
malfunction.
• Do not store the product in direct sunlight, near heating
devices, or in hot, humid, or dusty places. Additionally,
do not allow the product to get wet.
• When the product is used for a long time, the product
may become discolored due to ultraviolet light (especially
direct sunlight) and wear.
• Do not expose the product to excessive stress or
pressure. Doing so may result in deformation.
• Do not install any other device besides a microphone
onto the product.
• Depending on the installation site material, some
installation marks may remain.
■ Installation precautions
• Check the strength of the installation location before
installing. If the location is unable to handle the load of
the product, damage to the installation site or injury may
occur.
• Audio-Technica will not be liable in any way for any
accidents—including falling objects—due to insufficient
installation site strength or improper installation.
• Make sure the microphone does not exceed the
product’s load-bearing capacity before installation.
• Secure the table clamp and arm by firmly tightening
the fixing knob before using the product. If any of the
components become loose or rattle after installation,
retighten the fixing knob. If the installation is too loose
or rattles, the arm or microphone may fall over or fall off,
resulting in an accident or injury.
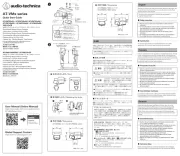
• Install the table clamp so that it sits perfectly flat on the
top and bottom table surfaces.
• Do not install the product on a table with rounded edges
or if the table clamp cannot be attached securely. Doing
so may cause the product to fall over or fall off, resulting
in injury or a malfunction.
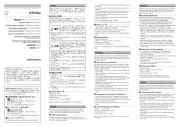
Table with rounded edges
Table with non-flat surface
■ Cleaning
Get into the habit of regularly cleaning the product to
ensure that it will last for a long time. Do not use alcohol,
paint thinners, or other solvents for cleaning purposes.
• Use a dry cloth to clean the arm.
• If the product will not be used for an extended period
of time, store it in a well-ventilated place free from high
temperatures and humidity.
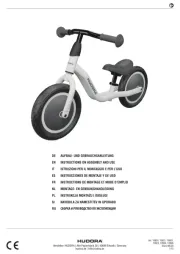
■ Specifications
• Load-bearing capacity: 2.2 kg (4.9 lbs)
• Movable distance: 740 mm (29”)
• Max. opening of table clamp: 15 mm (0.59”) to 50 mm
(2.0”)
• Mounting screw dimensions: 5/8-inch screw
• Rotation angle: Arm mounting section: 360° horizontal
Microphone mounting section: 240°
vertical
Upper arm section: 360° horizontally, 85°
vertically
• Dimensions: Main unit: 390 mm (15”) x 350 mm (14”)
Extension part: 145 mm (5.7”)
• Weight: Main unit: 1,040 g (37 oz)
Table clamp: 345 g (12 oz)
Extension part: 110 g (3.9 oz)
• Included accessories: Table Clamp, Extension Part
For product improvement, the product is subject to
modification without notice.
简体中文
感谢您购买本“铁三角”产品。
使用产品之前,请完整阅读本用户手册,确保正确使用本产品。
请妥善保管本手册以供将来参考。
■ 安全预防措施
•
切勿让本产品遭受强烈冲击,以避免发生故障。
•
切勿拆开、改装或尝试维修本产品。
•
请将本品放在儿童无法触及之处。
•
如跌落或掉落,本产品可能损坏或者导致人员受伤。将其放
在稳定位置。
•
切勿将手指伸进活动部件的缝隙中。
■ 使用注意事项
•
请在使用前阅读所连接设备的用户手册。
•
切勿让本产品遭受强烈冲击,以避免发生故障。
•
切勿将本产品存放在阳光直射的地方、加热装置附近或者炎
热、潮湿或多尘的地方。此外,本产品应避免受潮。
•
当本产品使用较长一段时间后,可能会因为紫外线(尤其是
阳光直射)和磨损而褪色。
•
请勿对产品施加过大的应力或压力。否则,可能会导致变形。
•
切勿在产品上安装除话筒以外的其他任何设备。
•
安装位置可能会留下些许安装痕迹,具体视所用材料而定。
■ 安装注意事项
•
安装之前,请检查安装位置是否稳固。如果该位置无法承受
产品的重量,安装位置可能受损,甚至可能导致人员受伤。
•
对于因安装位置强度不足或安装不当所引发的任何事故(包
括高空坠物),铁三角概不负责。
•
安装之前,请确保话筒未超出产品的承载能力。
•
使用产品之前,请拧紧固定旋钮,以固定台钳和臂杆。如果安
装后有任何部件出现松动或者嘎吱作响,请重新拧紧固定旋
钮。如果安装太松或者嘎吱作响,臂杆或话筒可能会翻倒或
掉落,从而导致事故发生或人员受伤。
•
安装台钳,使其与桌子的上下表面完全贴合。
•
切勿将产品安装在圆边桌上或者无法牢牢固定台钳的桌子
上。否则,产品可能会翻倒或掉落,从而导致事故发生或人员
受伤。
圆边桌
表面不平整的桌子
■ 清洁
养成定期清洁本产品的习惯,以确保产品可长时期使用。请勿
使用酒精、油漆稀释剂或其他溶剂来清洁耳机。
•
使用干布来清洁臂杆。
•
如果本产品长期不用,将其存放在通风良好、远离高温潮湿
的地方。
■ 规格
•
承载能力:2.2kg
•
可移动距离:740毫米
•
台钳的最大开口:15毫米~50毫米
•
安装螺钉尺寸:5/8英寸螺钉
•
旋转角度:臂杆安装区域:水平360°
话筒安装区域:垂直240°
上臂杆区域:水平360°,垂直85°
•
尺寸:主机:390毫米×350毫米
扩展部分:145毫米
•
重量:主机:1,040g
台钳:345g
扩展部分:110g
•
附带配件:台钳、扩展部分
因产品改进,本产品会随时改装,恕不另行通知。
繁體中文
感謝您購買本「鐵三角」產品。
使用前,請務必詳閱本使用說明書,確保以正確的方式使用本
產 品。
請妥善保管本說明書以備隨時參閱。
■ 安全上的注意事項
•
請勿讓本產品受到強烈碰撞,以免故障。
•
請勿拆解、改造或嘗試修理本產品。
•
請放在孩童無法拿取的地方。
•
如果產品倒下或掉落,可能會造成產品的損壞或導致受傷。
請將其放置於穩定的地方。
•
請勿讓手指夾在活動零件之間的間隙中。
■ 使用上的注意事項
•
使用前,請務必閱讀所連接裝置的使用說明書。
•
請勿讓本產品受到強烈碰撞,以免故障。
•
請勿將本產品放置於日照直射處、暖氣設備附近,高溫多濕
或多塵的場所。此外,請勿讓本產品受潮。
•
本產品使用一段時間後,有可能因為紫外線(尤其是陽光直
射)和磨損而發生褪色情況。
•
請勿對本產品施加過大的應力或壓力,否則可能導致變形。
•
請勿在產品上安裝除麥克風以外的其他任何裝置。
•
視實際安裝處的材質而異,可能會殘留些許安裝痕跡。
■ 安裝注意事項
•
安裝前請先行確認安裝處的強度。如果安裝處強度不足以負
荷產品的重量,有可能導致安裝處的損傷或人身傷害。
•
對於安裝現場強度不足或安裝不當導致的任何意外(包含物
體掉落),鐵三角概不負責。
•
安裝前請確認所使用的麥克風重量在本產品承重範圍之內。
•
使用產品前,請鎖緊固定旋鈕來固定桌面鎖定夾和支臂。如
果安裝後任何零件出現鬆動跡象或發出碰撞聲,請重新鎖緊
固定旋鈕。如果安裝不夠確實或發出碰撞聲,支臂或麥克風
可能會翻倒或掉落,因而導致意外或傷害。
•
安裝桌面鎖定夾時,請確認固定處完全平貼於桌面的頂部和
底 部。
•
請勿將產品安裝於無法牢固安裝桌面鎖定夾或有圓角的桌
面處。否則可能會造成產品翻倒或掉落,進而導致受傷或故障。
有圓角的桌面
不平整的桌面
■ 清潔保養方法
為了能夠長久使用,請養成定期清潔本產品的習慣。清潔保養
時,請勿使用酒精、油漆稀釋劑或其他有機溶劑。
•
請用乾布擦拭支臂。
•
如果長期不使用本產品,請避開高溫、潮濕處,並存放於通風
良好的地方。
■ 規格
•
承重能力:2.2kg
•
移動距離:740mm
•
桌面鎖定夾的最大開口:15mm~50mm
•
安裝螺絲尺寸:5/8英吋螺絲
•
旋轉角度:支臂安裝部:360°水平
麥克風安裝部:240°垂直
上支臂部:360°水平,85°垂直
•
尺寸:支架本體:390mm×350mm
延伸部位:145mm
•
重量:支架本體:1,040g
桌面鎖定夾:345g
延伸部位:110g
•
附屬品:桌面鎖定夾,延伸用零件
規格若有改良,恕不另行通知。
한국어
Audio-Technica 제품을 구매해 주셔서 감사합니다.
본 제품을 올바르게 사용할 수 있도록 제품을 사용하기 전에 이
사용설명서를 빠짐없이 읽으십시오.
나중에 참조할 수 있도록 이 설명서를 보관하십시오.
■ 안전주의사항
•
오작동 방지를 위해 본 제품에 강한 충격을 가하지 마십시오.
•
제품을 분해, 개조하거나 수리하지 마십시오.
•
어린이의 손이 닿지 않는 곳에 보관하십시오.
•
제품이 넘어지거나 떨어지면 손상되거나 부상을 초래할 수
있습니다. 제품을 안정적인 장소에 두십시오.
•
움직이는 부품의 틈새에 손가락이 끼지 않도록
주의하십시오.
■ 사용시참고사항
•
사용하기 전에 연결된 장치의 사용설명서를 읽으십시오.
•
오작동 방지를 위해 본 제품에 강한 충격을 가하지 마십시오.
•
제품을 직사광선이 닿는 장소, 난방기 근처, 고온다습한 환경
또는 먼지가 많은 장소에 보관하지 마십시오. 또한 제품이
물에 젖지 않도록 주의하십시오.
•
제품을 장시간 동안 사용하면 자외선(특히 직사광선) 및
마모로 인해 제품이 변색될 수 있습니다.
•
제품을 과도한 힘 또는 압력에 노출시키지 마십시오. 변형이
발생할 수 있습니다.
•
제품에 마이크 외의 다른 장치를 설치하지 마십시오.
•
설치 장소의 재질에 따라 설치 흔적이 남을 수 있습니다.
■ 설치주의사항
•
설치하기 전에 설치 장소의 강도를 확인하십시오. 해당
장소가 제품의 하중을 감당할 수 없는 경우, 설치 장소가
파손되거나 부상이 발생할 수 있습니다.
•
Audio-Technica는 설치 장소의 강도 부족 또는 부적절한
설치로 인해 발생하는 모든 사고(낙하물 포함)에 대해 어떠한
책임도 지지 않습니다.
•
설치하기 전에 마이크가 제품의 하중 지지 용량을 초과하지
않는지 확인하십시오.
•
제품을 사용하기 전에 고정 노브를 단단히 조여 테이블
클램프를 고정하십시오. 설치 후 구성품이 느슨해지거나
덜컹거리는 경우 고정 노브를 다시 조이십시오. 설치가 너무
느슨하거나 덜컹거리면 암이나 마이크가 넘어지거나 떨어져
사고나 부상이 발생할 수 있습니다.
•
테이블 클램프가 상단 및 하단 테이블 표면에 완전히
평평하게 놓이도록 설치하십시오.
•
모서리가 둥글거나 테이블 클램프를 단단히 부착할 수
없는 경우에는 테이블에 제품을 설치하지 마십시오. 제품이
넘어지거나 떨어져 부상이나 오작동이 발생할 수 있습니다.
모서리가 둥근 테이블
표면이 평평하지 않은 테이블
■ 청소
제품의 수명이 오래 지속되도록 정기적으로 제품을 청소하는
습관을 들이십시오. 손질 시에는 알코올, 페인트 신나 등
용제류는 사용하지 마십시오.
•
마른 천을 사용하여 암을 청소하십시오.
•
제품을 장기간 사용하지 않을 경우에는 온도와 습도가 높지
않고 환기가 잘 되는 장소에서 보관하십시오.
■ 사양
•
하중 지지 용량: 2.2kg
•
이동 가능 거리: 740mm
•
테이블 클램프의 최대 개구부: 15mm ~ 50mm
•
마운트 나사 규격: 5/8인치 나사
•
회전 각도: 암 장착부: 360° 수평
마이크 장착부: 240° 수직
상단 암 부분: 수평으로 360°, 수직으로 85°
•
규격: 메인 장치: 390mm × 350mm
연장 부품: 145mm
•
중량: 메인 장치: 1,040g
테이블 클램프: 345g
연장 부품: 110g
•
기본 제공 구성품: 테이블 클램프, 연장 부품
제품 개선을 위해 공지 없이 제품이 변경될 수 있습니다.
日本語
お買い 上げありがとうございます。
ご使用の前にこの取扱説明書を必ずお読みのうえ、正しくご使
用ください 。
また、いつでもすぐ読める場所に保管しておいてください。
■ 安全上の注意
本製品は安全性に充分な配慮をして設計をしていますが、
使い かたを誤ると事 故が 起こることが あります。
事故を未然に防ぐために下記の内容を必ずお守りください。
警告
この表示は「取り扱いを誤った場合、使用者
が死亡または重傷を負う可能性がありま
す 」を 意 味 し て い ま す 。
•
強い衝撃を与えないでください。
•
分解、改造、修理を行わないでください。
•
幼児の手の届く場所に置かないでください。事故の原因に
なる場 合があります。
注意
この表示は「取り扱いを誤った場合、使用者
が傷害を負う、または物的損害が発生する
可能性があります」を意味しています。
•
転倒や落下により、けがや故障の恐れがあります。安定し
た場所に設置してください。
•
可動部の隙間に指を挟まないようにご注意ください。
■ 使用上の注意
•
ご使用の際は、接続する機器の取扱説明書も必ずお読みくだ
さい。
•
強い衝撃を与えないでください。
•
直射日光の当たる場所、暖房器具の近く、高温多湿やほこり
の多い場所に置かないでください。また水がかからないように
してください 。
•
本製品は長い間使用すると、紫外線(特に直射日光)や摩擦
により変 色 することが あります。
•
本製品に無理な力を加えた状態で放置しないでください。変
形する恐れがあります。
•
マイクロ ホン 以 外 を 取 り付 け な い でください 。
•
設置場所の素材などによっては、取り付け跡が残る場合があ
ります。
■ 設置上の注意
•
設置場所の強度を確認して設置してください。本製品の荷重
に耐えられない場合、設置場所の破損やけがの原因となります。
•
設置場所の強度不足、設置不備による落下などの事故に対
する責任は、当社は一切負いません。
•
マイクロホンが本製品の耐荷重範囲内であることを確認して
から 取 り付 けてください 。
•
テーブルクランプやアームは固定ノブでしっかりと締めて使用
してください。また、設置後に緩みやがたつきが生じた場合は、
固定ノブを締め直してください。緩んだり、がたついたままで
使用すると、アームやマイクロホンの転 倒や落下によるけがや
事故の原因となります。
•
テ ーブル クランプ が テ ーブ ル の 上 下 面 にぴ ったりと平 たん に な
るよう に 取 り 付 けてくだ さい 。
•
テ ーブル の 縁 が 丸 くなっていたり、テ ーブル クランプ が 奥 までしっ
かりと差し込 むことが で きないテ ーブルに 取 り付 けな いでくだ
さい。転倒や落下によるけがや故障の原因となります。
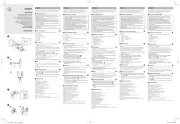
テ ーブル の 縁 が 丸 い
テ ーブル が 平 た んで ない
■ お手入れのしかた
長くご使用いただくために各部のお手 入れをお願いいたします。
お手入れの際は、アルコール、シンナーなど溶剤類は使用しない
でください 。
•
本体は乾いた布で汚れを拭いてください。
•
長い間ご使用にならない場合は、高温多湿を避け、風通しの
良い場所に保管してください。
■ テクニカルデータ
•
耐荷重:2.2kg
•
可動距離:740mm
•
テーブルクランプ最大開口:15~50mm
•
取り付けねじ寸法:5/8インチねじ
•
回転角度: アーム取付部:水平方向360°
マイクロホン取付部:垂直方向240°
上部アーム部:水平方向360°、垂直方向85°
•
外形寸法: 本体:390mm×350mm
延長パーツ:145mm
•
質量: 本体:1,040g
テーブルクランプ:345g
延長パーツ:110g
•
付属品:テーブルクランプ、延長パーツ
改良のため 予 告なく変 更することがあります。
Français
Nous vous remercions d’avoir choisi ce produit
Audio-Technica.
Avant utilisation, merci de lire attentivement ce manuel de
l’utilisateur pour vous assurer du bon usage du produit.
Veuillez conserver ce manuel pour consultation ultérieure.
■ Consignes de sécurité
• Ne soumettez pas le produit à des chocs violents afin
d’éviter tout dysfonctionnement.
• Ne démontez pas, ne modifiez pas ou ne tentez pas de
réparer le produit.
• Tenez hors de portée des enfants.
• Le produit peut être endommagé ou provoquer des
blessures s’il tombe. Placez-le dans un endroit stable.
• Ne vous coincez pas les doigts dans les interstices des
pièces mobiles.
■ Remarques concernant l’utilisation
• Soyez sûr de lire le manuel de l’utilisateur de l’appareil
connecté avant de l’utiliser.
• Ne soumettez pas le produit à des chocs violents afin
d’éviter tout dysfonctionnement.
• Rangez le produit à l’abri des rayons du soleil, des
appareils générant de la chaleur et des environnements
chauds, humides ou poussiéreux. De plus, ne faites pas
rentrer de l’eau en contact avec le produit.
• Lorsque le produit est utilisé pendant une longue
période, il peut se décolorer à cause de la lumière
ultraviolette (surtout l’ensoleillement direct) et de l’usure.
• N’exposez pas le produit à une contrainte ou une
pression excessive. Cela pourrait entraîner une
déformation.
• Ne placez aucun autre appareil que le microphone sur le
produit.
• Selon le matériau du lieu d’installation, certaines
marques d’installation peuvent subsister.
■ Consignes d’installation
• Vérifiez la solidité de l’emplacement avant l’installation.
Si l’emplacement ne peut pas supporter la charge du
produit, le lieu d’installation risque d’être endommagé
ou des blessures peuvent être provoquées.
• Audio-Technica ne pourra en aucun cas être tenu
responsable des accidents, y compris des chutes
d’objet, en raison d’une résistance insuffisante du lieu
d’installation ou d’une mauvaise installation.
• Veillez à ce que le microphone ne dépasse pas la
capacité de charge du produit avant l’installation.
• Fixez la pince de table et le bras en serrant fermement le
bouton de fixation avant d’utiliser le produit. Si l’un des
composants se détache ou tremble après l’installation,
resserrez le bouton de fixation. Si l’installation est
trop lâche ou vibre, le bras ou le microphone peuvent
tomber ou se détacher, provoquant un accident ou des
blessures.
• Placez la pince de table de manière à ce qu’elle repose
parfaitement à plat sur les surfaces supérieure et
inférieure de la table.
• Ne placez pas le produit sur une table à bords arrondis
ou si la pince de table ne pas être fixée de manière
sûre. Le produit risque de tomber ou de se détacher,
provoquant un accident ou des blessures.
Table à bords arrondis
Table à surface non plane
■ Nettoyage
Prenez l’habitude de nettoyer régulièrement le produit pour
qu’il dure longtemps. N’utilisez pas d’alcool, de diluant à
peinture ou d’autres solvants pour le nettoyage.
• Utilisez un chiffon sec pour nettoyer le bras.
• Si vous envisagez de ne pas utiliser le produit pendant
une période prolongée, rangez-le dans un endroit bien
ventilé à l’abri des températures élevées et de l’humidité.
■ Caractéristiques techniques
• Capacité de charge: 2,2kg
• Distance de déplacement: 740mm
• Ouverture max. de la pince de table: 15 mm à 50 mm
• Dimensions de la vis de montage: Vis de 5/8”
• Angle de rotation: Section de montage du bras: 360°
horizontal
Section de montage du microphone:
240° vertical
Section supérieure du bras: 360°
horizontal, 85° vertical
• Dimensions: Unité principale: 390 mm x 350 mm
Extension: 145mm
• Poids: Unité principale: 1040 g
Pince de table: 345 g
Extension: 110g
• Accessoires fournis: Pince de table, extension
Le produit est susceptible d’être modifié sans préavis à des
fins d’amélioration.
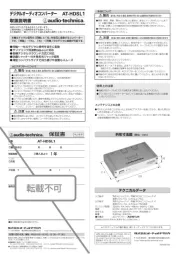
取扱説明書 / マイクロホンブームアーム
User Manual / Microphone Boom Arm
Manuel de l’utilisateur / Bras de microphone
用户手册/悬臂式话筒支架
使用說明書/懸吊式麥克風支架
사용설명서 / 마이크 붐 암
アフターサービスについて
本製品をご家庭用として、取扱説明や接続・注意書きに従ったご使用において故障した場合、保証書記載の期間・規定により無
料修理をさせていただきます。修理ができない製品の場合は、交換させていただきます。お買い上げの際の領収書またはレシート
などは、保証開始日の確認のために保証書と共に大切に保管し、修理などの際は提示をお願いします。
お問い合わせ先(電話受付/平日9:00~17:30)
製品の仕様・使いかたや修理・部品のご相談は、お買い上げのお店または当社窓口およびホームページのサポートまでお願いし
ます。
●お客様相談窓口(製品の仕様・使いかた)
0120-773-417
(携帯電話・PHSなどのご利用は 03-6746-0211)
FAX:042-739-9120
Eメール:support@audio-technica.co.jp
●サービスセンター(修理・部品)
0120-887-416
(携帯電話・PHSなどのご利用は 03-6746-0212)
Eメール:servicecenter@audio-technica.co.jp
FAX:042-739-9120
● ホ ー ム ペ ー ジ( サ ポ ー ト )
https://www.audio-technica.co.jp/support/
株式会社オーディオテクニカ
〒194-8666
東京都町田市西成瀬2-46-1
www.audio-technica.co.jp
Audio-Technica Corporation
2-46-1 Nishi-naruse, Machida, Tokyo 194-8666, Japan
www.audio-technica.com
©2025 Audio-Technica Corporation
Global Support Contact / Contact de support global:
www.at-globalsupport.com
中国大陆客户联系资料
制造商:铁三角有限公司
代理商:北京铁三角技术开发有限公司华南分公司
地址:广州市番禺区南村镇万博二路180号粤海广场2505房
电话:+86(0)20-37619291
生产标准:GB/T9254.1-2021
原产地:中国东莞市
印刷版本一:2025年3月
香港及澳門客戶聯絡資料
總代理:鐵三角(大中華)有限公司
地址:香港九龍紅磡民裕街51號凱旋工商中心第二期9樓K室
電話:+852-23569268
142700320-01-01 ver.1 2025.03.01