AXABH-LX3
INSTALLATION INSTRUCTIONS
AxxessInterfaces.com © COPYRIGHT 2025 METRA ELECTRONICS CORPORATION REV. 6/25/25 INSTAXABH-LX3
TOOLS REQUIRED
• Crimping tool and connectors, or solder gun,
solder, and heat shrink
• Tape • Wire cutter • Zip ties
TABLE OF CONTENTS
Amplifier Location & Connections
Convertible with Mark Levinson .........................2
Convertible without Mark Levinson ................... 3
Sedan with Mark Levinson .................................. 4
Sedan without Mark Levinson ............................5
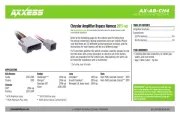
Amplifier Bypass Harness
Fits Select Lexus/Subaru
2010-2015
Factory amp must stay plugged into vehicle in order for your factory
HVAC to work. When using the bypass harness only unplug connectors
that correspond with the amp bypass being used. All other remaining
plugs must stay plugged in with amp and remain in vehicle.
Refer to the following pages for the vehicle specific instructions for
wiring connections. Wiring connections vary per amplifier design.
If uncertain whether the vehicle contains a specific speaker or not,
test the wires with a tone generator, or check to see if the factory
wires are populated on the vehicle side. Alternatively, the wires can
be tested for impedance with a multimeter.
Visit AxxessInterfaces.com for more detailed information about the product and up-to-date
vehicle specific applications
APPLICATIONS
Lexus
IS-Series (without NAV) ............................................2010-2013
Subaru
Forester..........................................................................2012-2015
Legacy ...........................................................................2012-2014
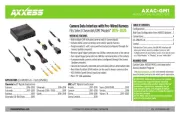
• Vehicle-specific harness to bypass the factory amplifier
• Saves the installer unnecessary labor and wire
• 20 gauge wires
• Wire Length: 12”
FEATURES
ATTENTION: With the key out of the ignition, disconnect
the negative battery terminal before installing this
product. Ensure that all installation connections,
especially the air bag indicator lights, are plugged in
before reconnecting the battery or cycling the ignition
to test this product.
NOTE: Refer also to the instructions included with the
aftermarket accessory before installing this device.