AXRSEH-CH1
REV. 9/24/20© COPYRIGHT 2020 METRA ELECTRONICS CORPORATION
Integrate • AxxessInterfaces.com
AXRSEH-CH1
INSTALLATION INSTRUCTIONS
REV. 9/24/20© COPYRIGHT 2020 METRA ELECTRONICS CORPORATION
Integrate • AxxessInterfaces.com
INSTRUCCIONES DE INSTALACIÓN
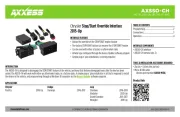
INTRODUCTION
The AXRSEH-CH1 is designed to provide an audio/video input to the factory
overhead video screen from the aftermarket radio.
• The AXRSEH-CH1 is designed to work with the overhead video monitors that
do
not
have the DVD player built in.
• This harness
must
be used along with an Axxess interface.
Note: For models with a 3rd row RSE, only the 2nd row RSE will function.
INTRODUCCIÓN
El AXRSEH-CH1 está diseñado para proporcionar una entrada de audio/video a la
pantalla de video superior de fábrica desde la radio de mercado secundario.
• El AXRSEH-CH1 está diseñado para funcionar con los monitores de video
superiores
que
no
tienen el reproductor de DVD incorporado.
• Este arnés
debe
usarse junto con una interfaz Axxess.
Nota: Para los modelos con un RSE de la tercera fila, solo funcionará el RSE de la
segunda fila.
Chrysler
Aspen 2008-2009
Town & Country 2008-2017
Dodge
Durango 2008-2013
Grand Caravan 2008-Up
Journey 2009-2010
Ram 1500 2009-2011
Ram 2500/3500 2010-2011
Jeep
Grand Cherokee 2008-2013
RAM
1500/2500/3500 2012
VOLKSWAGEN
Routan 2009-2013
Chrysler
Aspen 2008-2009
Town & Country 2008-2017
Dodge
Durango 2008-2013
Grand Caravan 2008 y mas
Journey 2009-2010
Ram 1500 2009-2011
Ram 2500/3500 2010-2011
Jeep
Grand Cherokee 2008-2013
RAM
1500/2500/3500 2012
VOLKSWAGEN
Routan 2009-2013
APPLICATIONS
APLICACIONES
Chrysler RSE Retention Harness 2008-Up
Chrysler RSE Arnés de retención RSE 2008-Up
Visit AxxessInterfaces.com for more detailed information about the product and up-to-date vehicle specific applications
Visite
AxxessInterfaces.com
para obtener información más detallada sobre el producto y
aplicaciones actualizadas específicas para vehículos.
AXRSEH-CH1
INSTALLATION INSTRUCTIONS
REV. 9/24/20© COPYRIGHT 2020 METRA ELECTRONICS CORPORATION
Integrate • AxxessInterfaces.com
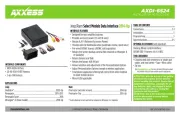
INTERFACE COMPONENTS
• AXRSEH-CH1 harness
CONNECTIONS
• Connect the “A/V 1” RCA jacks to the aftermarket radios audio/video output.
Connect Yellow to video-out, Red to right audio-out, and White to left audio-out
.
• Disregard the "A/V 2" RCA jacks, they will not be used in this application.
•
Connect the Yellow RCA jack labeled "BACKUP" to the aftermarket radios backup
camera input
.
• Connect the (3) loose Black wires to chassis ground.
Note: When programming the Axxess interface, ensure that the rear seat
entertainment screen is fully closed.
TOOLS REQUIRED
• Crimping tool and connectors, or solder gun,
solder, and heat shrink • Tape • Wire cutter
• Zip ties • Small flat-blade screwdriver
AXRSEH-CH1
REV. 9/24/20© COPYRIGHT 2020 METRA ELECTRONICS CORPORATION
Integrate • AxxessInterfaces.com
INSTRUCCIONES DE INSTALACIÓN
COMPONENTES DE LA INTERFASE
• Arnés AXRSEH-CH1
CONEXIONES
• Conecte las tomas RCA “A/V 1” a la salida de audio/video de las radios de posventa.
Conecte amarillo a la salida de video, rojo a la salida de audio derecha y blanco a la
salida de audio izquierda.
• No tenga en cuenta los conectores RCA "A/V 2", no se utilizarán en esta aplicación.
• Conecte la toma RCA amarilla con la etiqueta "BACKUP" a la entrada de la cámara de
respaldo de las radios del mercado de accesorios.
• Conecte los (3) cables negros sueltos a la tierra del chasis.
Nota: cuando programe la interfaz Axxess, asegúrese de que la pantalla de entre-
tenimiento del asiento trasero esté completamente cerrada.
HERRAMIENTAS REQUERIDAS
• Herramienta de ponchadora y conectores, o pistola de soldadura,
soldadura y termocontracción
• Cinta • Cortacables • Zip lazos • Pequeño destornillador de cabeza plana