Manufacturer reserves the right to discontinue, or change at any time, specifications or designs without notice and without incurring obligations.
Catalog No. 04-53620040-01 Printed in U.S.A. Form No. 62X-10SI Pg 1 5-25 Replaces: 62X-9SI
Installation Instructions
CONTENTS
Page
SAFETY CONSIDERATIONS . . . . . . . . . . . . . . . . . . . 2
A2L REFRIGERATION INFORMATION . . . . . . . . . . . 5
Transportation . . . . . . . . . . . . . . . . . . . . . . . . . . . . . . . 5
Minimum Conditioned Space Area . . . . . . . . . . . . . . 5
GENERAL . . . . . . . . . . . . . . . . . . . . . . . . . . . . . . . . . . . 6
PRE-INSTALLATION . . . . . . . . . . . . . . . . . . . . . . . . . . 6
Inspection . . . . . . . . . . . . . . . . . . . . . . . . . . . . . . . . . . 6
Unit Storage . . . . . . . . . . . . . . . . . . . . . . . . . . . . . . . . . 6
Storage Guidelines . . . . . . . . . . . . . . . . . . . . . . . . . . . 6
• DRY LOCATION
• DRAINAGE
• CONDENSATION PREVENTION
•PROTECTION
Temporary Operation for a Completed Building . . . 6
Temporary Operation for an Under-Construction . . 6
INSTALLATION . . . . . . . . . . . . . . . . . . . . . . . . . . . . . . 7
Step 1 — Check Jobsite . . . . . . . . . . . . . . . . . . . . . . . 7
• INSTALLATION GUIDELINES (ALL UNITS)
Step 2 — Check Unit . . . . . . . . . . . . . . . . . . . . . . . . . . 8
•INSPECT UNIT
Step 3 — Provide Unit Support . . . . . . . . . . . . . . . . . 8
• ROOF CURB
Step 4 — Rig and Place Unit . . . . . . . . . . . . . . . . . . . 8
• LIFTING A PACKAGED DOAS
• MOVING/LIFTING A PACKAGED AIR
CONDITIONING UNIT
• POSITIONING
• ROOF MOUNT
• SLAB MOUNT
• INSTALLATION ONTO CURB
Step 5 — Field Fabricate Ductwork . . . . . . . . . . . . . 36
• DUCTWORK CONSIDERATIONS:
• RETURN AIR DUCTWORK
• DISCHARGE DUCTWORK
Step 6 — Make Unit Duct Connections . . . . . . . . . . 36
• VERTICAL SUPPLY/RETURN CONNECTIONS
• HORIZONTAL SUPPLY CONNECTIONS
Step 7 — Install External Trap for Evaporator
Condensate Drain . . . . . . . . . . . . . . . . . . . . . . . . . 36
Step 8 — Install Gas Piping (Gas Heat Units Only) . 37
• A, B, C, CL, AND D CABINETS
• CXL, DXL CABINETS
• GAS HEAT SAFETY CONTROLS
Step 9 — Install Gas Heat Condensate Drain . . . . .38
Step 10 — Install Hot Water (Hot Water Units Only) . .38
• HOT WATER COIL PIPE ROUTING
• HOT WATER HEATING CONTROL
Step 11 — Make Electrical Connections . . . . . . . . .39
• OPTIONAL UNIT-POWERED TYPE CONVENIENCE
OUTLET
• OPTIONAL NON-UNIT-POWERED TYPE (FIELD
WIRED) CONVENIENCE OUTLET
• FIELD POWER SUPPLY
• SENSOR WIRING
Step 12 — Open Exhaust Damper (Units with Optional
Exhaust or Energy Conservation Wheel Only) . .40
Step 13 — Install all Accessories . . . . . . . . . . . . . . .41
Step 14 — Configure Controls . . . . . . . . . . . . . . . . .41
• SEQUENCE OF OPERATION
• OCCUPIED MODE
• STAGED HEAT (ELECTRIC HEAT) 2-STAGE HEAT
• STAGED HEAT (ELECTRIC HEAT) 4-STAGE HEAT
• STAGED HEAT (GAS HEATER) 2-STAGE
• STAGED HEAT (GAS HEATER) 4-STAGE
• MODULATED HEAT
• UNOCCUPIED MODE
• SAFETY SHUTDOWN
• REFRIGERANT CHARGING
Step 15 — Unit Start-Up . . . . . . . . . . . . . . . . . . . . . .44
Step 16 — Test Mode and Fan Balancing . . . . . . . .44
Typical Wiring Diagrams . . . . . . . . . . . . . . . . . . . . . .44
MAINTENANCE . . . . . . . . . . . . . . . . . . . . . . . . . . . . .54
Installation Code and Quarterly Inspections . . . . .54
General . . . . . . . . . . . . . . . . . . . . . . . . . . . . . . . . . . . .54
• QUARTERLY
Unit Exterior . . . . . . . . . . . . . . . . . . . . . . . . . . . . . . . .54
• CABINET EXTERIOR
• UNIT LOCATION
Direct Drive Supply and Exhaust Fans . . . . . . . . . .54
• BLOWER WHEEL
• MOTORS
Condensing Fans . . . . . . . . . . . . . . . . . . . . . . . . . . . .54
Refrigeration Circuit Components . . . . . . . . . . . . . .54
• EVAPORATOR COIL
• CONDENSER COIL
•COMPRESSORS
Condensate Drain Pan and Drain . . . . . . . . . . . . . . .54
Dampers . . . . . . . . . . . . . . . . . . . . . . . . . . . . . . . . . . .54
•DAMPERS
• DAMPER MOTOR/LINKAGES
Energy Conservation Wheel . . . . . . . . . . . . . . . . . . .54
• BEARINGS
•DRIVE MOTOR
• DRIVE BELTS
• SEALS
•WHEEL
Gas Heater . . . . . . . . . . . . . . . . . . . . . . . . . . . . . . . . .55
IMPORTANT: This installation instruction contains basic unit
installation information including installation of field control
devices. For information on unit start-up, service, and
operation, refer to the unit Controls, Start-Up, Operation,
Service, and Troubleshooting Instructions also enclosed in the
unit literature packet.
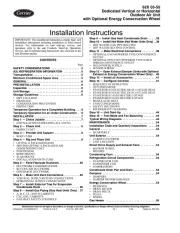
62X 03-55
Dedicated Vertical or Horizontal
Outdoor Air Unit
with Optional Energy Conservation Wheel