Cotech 36-6286 Manual


Læs gratis den danske manual til Cotech 36-6286 (5 sider) i kategorien Ikke kategoriseret. Denne vejledning er vurderet som hjælpsom af 10 personer og har en gennemsnitlig bedømmelse på 5.0 stjerner ud af 5.5 anmeldelser. Har du et spørgsmål om Cotech 36-6286, eller vil du spørge andre brugere om produktet?

Side 1/5
GREAT BRITAIN CUSTOMER SERVICE tel. 020 8247 9300 e-mail customerservice@clasohlson.co.uk internet www.clasohlson.co.uk postal 10 13 Market Place, Kingston Upon Thames, Surrey, KT1 1JZ
D
Ver. 20170119
Please read theentire instruction manual before using theproduct and then
save it for future reference. Wereserve theright for any errors in text or images
and any necessary changes made to technicaldata. In theevent of technical
problems or other queries, please contact our Customer Services.
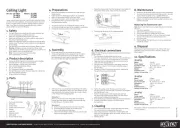
Safety
This lighttting is only suitable for permanent installation and should be
installed by aqualified electrician.
Only to be installed outside arms reach.
Ensure proper footing and balance at all times during installation.
Make sure that there are no hidden cables or water pipes in theceiling
before drilling/screwing.
Read all theinstructions before you install and use thefitting.
Always turn off thepower before assembling, connecting or repairing.
Whenever installing any electrical fittings, basic safety Caution!
precautions should always be observed to avoid therisk of fire,
electric shock and personal injury.
The light source of this luminaire is not replaceable; when the light source
reaches its end of life the whole luminaire shall be replaced.
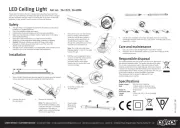
Installation
8. Use thesame installation procedures described above for connecting
several light fittings in series (36-1321: max 10 pcs, 36-6286: max 21 pcs).
CableØ5,5–10 mm.
Care and maintenance
Use adry cloth to wipe thelightxture/s clean when needed.
Thelamps are non-replaceable. Nevertry to open thehousing or modify
thefitting in anyway.
Responsible disposal
2. Unscrew thenut on
thecablegland.
4. Remove thecover over theterminal
block by twisting it anticlockwise
ahalf turn until thearrow points to
theunlock symbol and lifting it off
thelight fitting. Thread thecable
through thecable gland and connect
thewires to theterminalblock.
Note: The cable entry might need
enlarging slightly in order for the cable
to pass through.
3. Remove thesealplug.
Note: Theseal plug must be
removed before inserting acable.
Leave theseal plug in to maintain
thetightness of theseal if no
cable is to be connected through
theend of thelight fitting.
5. Refit thecover by aligning thearrow
on thecover with theunlock symbol
and then turning it half aturn
clockwise until thearrow points
towards thelock symbol and locks
thecover inplace.
1. Screw thelight fitting brackets securely against theceiling using thesupplied
screws and plugs or use another appropriate fastening method.
6. Screw thenut back onto
thecablegland.
7. Press thelight
fitting up into
themounting
brackets.
LED Ceiling Light Art.no 36-1321, 36-6286
This symbol indicates that this product should not be disposed of
with general household waste. This applies throughout the entire
EU. In order to prevent any harm to the environment or health
hazards caused by incorrect waste disposal, the product must be
handed in for recycling so that the material can be disposed of in
a responsible manner. When recycling your product, take it to your
local collection facility or contact the place of purchase.
They will ensure that the product is disposed of in an
environmentally sound manner.
Specifications
Rated voltage 220–240 V AC, 50/60 Hz
Bulb 4150lm, 3000 K, 46 W (36-1321)
1750 lm, 3000 K, 19.5 W (36-6286)
Ratedlife 50000hours
Protectionclass IP66
Length 130cm (36-1321), 70 cm (36-6286)
Width 55mm
SVERIGE • KUNDTJÄNST tel 0247/445 00 fax 0247/445 09 e-post kundservice@clasohlson.se internet www.clasohlson.se brev Clas Ohlson AB, 793 85 INSJÖN
D
Ver. 20170119
Takarmatur LED
Art.nr 36-1321, 36-6286
s igenom hela bruksanvisningen före användning och spara den sedan
för framtidabruk. Vireserverar oss förev. text- och bildfel samt ändringar av
tekniskadata. Vidtekniska problem eller andra frågor, kontaktar kundtjänst.
Säkerhet
Armaturen är avsedd r fast installation och ska installeras av behörig elektriker.
Ska monteras utom räckhåll.
Se till att hela tiden stå säkert och ha god balans under installationsarbetet.
Kontrollera att det inte finns några kablar eller vattenrör itaket innan du
borrar/skruvar.
s alla instruktioner innan du installerar och tänder armaturen.
Stäng alltid av strömmen före montering, anslutning och underhåll.
Varning! Vidmontering av elektriska apparater måste alltid grundläggande
försiktighettgärder följas för att undvika risk för brand, elektrisk chock
och personskada.
Armaturens ljuskälla är inte utbytbar. När ljuskällan slutat fungera ska
armaturen kasseras.
Installation
8. Du kan genom att följa installationsanvisningen ovan koppla samman
flera armaturer efter varandra (36-1321: max 10 st, 36-6286: max 21 st).
KabelØ 5,5–10 mm.
Skötsel och underhåll
Torka av armaturen med entorr trasa vidbehov.
Ljuskällan kan inte bytas, försök aldrig öppna höljet eller modifiera
armaturen på någotsätt.
Avfallshantering
2. Lossa muttern på
kabelgenomföringen.
4. Öppna locket över armaturens
kopplingsplint genom att vrida
det motsols etthalvt varv tills
pilen på locket pekar mot
upplåst-symbolen på armaturen.
Lyftbort locket. Tkabeln genom
kabelgenomföringen och anslut den
till kopplingsplinten.
Obs! Kabelgenomföringen kan behöva
vidgas något för att kabeln ska kunna
träs igenom.
3. Dra ut tningen.
Obs!tning dras ur när en kabel
ska anslutas. Låttningen sitta
kvar för att garantera produktens
thet om ingen kabel ska anslutas
för vidarekoppling.
5. Skruva tillbaka locket genom att först
lägga det så att pilen på locket pekar
mot upplåst-symbolen och sedan
genom att vrida locket etthalvt varv
medsols tills pilen pekar mots-
symbolen på armaturen.
1. Skruva upp armaturens fästen itaket, använd medföljande skruv och plugg
eller annan lämplig fästmetod.
6. Skruva tillbaka muttern över
kabelgenomföringen.
7. Tryck fast
armaturen
ifästena.
Denna symbol innebär att produkten inte får kastas tillsammans
med annat hushållsavfall. Dettaller inom hela EU. För att
förebygga eventuell skada på miljö ochlsa, orsakad av
felaktig avfallshantering, ska produkten lämnas till återvinning
att materialet kan tas omhand på ett ansvarsfullt sätt.
r du lämnar produkten till återvinning, använd dig av de
returhanteringssystem som finns där du befinner dig eller
kontakta inköpsstället. De kan se till att produkten tas om hand
ett för miljön tillfredställande sätt.
Specifikationer
Nätanslutning 220–240 V AC, 50/60 Hz
Ljuskälla 4150lm, 3000 K, 46 W (36-1321)
1750 lm, 3000 K, 19,5 W (36-6286)
Livslängd Upp till 50000tim
Skyddsklass IP66
Längd 130cm (36-1321), 70 cm (36-6286)
Bredd 55 mm


Produkt Specifikationer

Mærke: Cotech
Kategori: Ikke kategoriseret
Model: 36-6286

Har du brug for hjælp?

Hvis du har brug for hjælp til Cotech 36-6286 stil et spørgsmål nedenfor, og andre brugere vil svare dig


Ikke kategoriseret Cotech Manualer

Cotech

Cotech HT7715 Manual

18 September 2024
Cotech

Cotech K-CPL-LS4W-IR-S3 Manual

16 September 2024
Cotech

Cotech J1x-JF2-210/20 Manual

14 September 2024
Cotech

Cotech TD9511-3 Manual

12 September 2024
Cotech

Cotech S1J-AJ8-10 Manual

31 August 2024
Cotech

Cotech J5218D Manual

27 August 2024
Cotech

Cotech 50053 Manual

27 August 2024
Cotech

Cotech 51097X23 Manual

27 August 2024
Cotech

Cotech 36-6286 Manual

27 August 2024

Ikke kategoriseret Manualer

Nyeste Ikke kategoriseret Manualer