Dual Alarm Clock Radio
With White Mirror Display,
LED Nightlight, Phone Rest
and Bluetooth Speaker
OWNER’S MANUAL
ER100206
360x280mm, 4折,书写纸,双面单黑印刷R1说明书
Visit our website at
www.emersonradio.com
CAUTION: Danger of explosion if battery is incorrectly replaced.
Replace only with the same or equivalent type.
IC Warning:
RF warning statement:
FCC Note:
FCC Part 15.19 Warning Statement
FCC Part 15.21 Warning Statement
FCC Part 15.105 Warning Statement
PRODUCT CARE:
RF warning statement
Unpacking and Set Up
Emerson Radio Corp. warrants this product to be free from manufacturing
defects in original material, including original parts, and workmanship
under normal home use and conditions (“manufacturing defect”) for a
period of ninety (90) days from date of original purchase in, and if used in
the United States. Should service be necessary under this warranty,
Emerson will provide the following at our Return Repair Facility provided
the manufacturing defect is verified along with the date of purchase:
* Repair service for ninety (90) days from date of original purchase
at no charge for labor and parts.
To Receive Authorization to Return a Defective Item, please contact
Emerson Customer Service at 1-800-898-9020 or at
http://www.emersonradio.com/service/return-policy. Have your Model
number, Serial Number and dated Proof of Purchase with you when you
call.
In the event the product must be returned to Emerson:
* Pack the unit in a well-padded heavy corrugated box. Please insure the
item is well padded to avoid damage while in transit back to our facility.
If the item incurs damage, it will NOT be replaced and the consumer
will be responsible for return freight costs to receive their same
unit back.
* Enclose your check or money order payable to Emerson Radio in the
amount of $10 to cover return shipping and handling costs.
* Enclose a note with your name, address, phone number, Return
Authorization number and brief reason for returning the unit.
* Enclose a copy of your proof of purchase (warranty service will not be
provided without dated proof of purchase).
* Ship the unit prepaid via UPS or parcel post (SHIP INSURED and obtain
a tracking number).
The serial number can be found
on the bottom cabinet. We
suggest that you record the
serial number of
space below for future reference.
Model Number: ER100206
Serial Number:
Emerson Part No.
ER100206-20190927-00
Printed in China
NOTE: This warranty does not cover:
(a) Damage to equipment not properly connected to the product.
(b) Cost incurred in the shipping of the product to and from Emerson’s
Return Facility.
(c) Damage or improper operation of unit caused by customer abuse,
misuse, negligence or failure to follow operating instructions (including
cleaning instructions) provided with the product.
(d) Ordinary adjustments to the product which can be performed by
customer as outlined in the owner’s manual.
(e) Signal reception problems caused by external antenna or cable
systems.
(f ) Products not purchased in the United States.
(g) Damage to product if used outside the United States.
THIS WARRANTY IS NON-TRANSFERABLE AND APPLIES ONLY TO THE
ORIGINAL PURCHASER AND DOES NOT EXTEND TO SUBSEQUENT
OWNERS OF THE PRODUCT. ANY APPLICABLE IMPLIED WARRANTIES,
INCLUDING THE WARRANTY OF MERCHANTABILITY, ARE LIMITED IN
DURATION TO A PERIOD OF THE EXPRESSED WARRANTY AS PROVIDED
HEREIN BEGINNING WITH THE DATE OF ORIGINAL PURCHASE AT RETAIL
AND NO WARRANTIES, WHETHER EXPRESSED OR IMPLIED, SHALL
APPLY TO THE PRODUCT THEREAFTER. EMERSON MAKES NO
WARRANTY AS TO THE FITNESS OF THE PRODUCT FOR ANY
PARTICULAR PURPOSE OR USE.THE EXTENT OF EMERSON RADIO
CORP’S LIABILITY UNDER THIS LIMITED WARRANTY IS THE REPAIR OR
REPLACEMENT PROVIDED ABOVE AND, IN NO EVENT, SHALL EMERSON
RADIO CORP’S LIABILITY EXCEED THE PURCHASE PRICE PAID BY THE
PURCHASER OF THE PRODUCT. UNDER NO CIRCUMSTANCES SHALL
EMERSON RADIO CORP. BE LIABLE FOR ANY LOSS, DIRECT, INDIRECT,
INCIDENTAL, SPECIAL, OR CONSEQUENTIAL DAMAGE ARISING OUT OF
OR IN CONNECTION WITH THE USE OF THIS PRODUCT. THIS WARRANTY
IS VALID ONLY IN THE UNITED STATES OF AMERICA. THIS WARRANTY
GIVES YOU SPECIFIC LEGAL RIGHTS. HOWEVER, YOU MAY HAVE OTHER
RIGHTS WHICH MAY VARY FROM STATE TO STATE. SOME STATES DO
NOT ALLOW LIMITATIONS ON IMPLIED WARRANTIES OR EXCLUSION OF
CONSEQUENTIAL DAMAGE, THEREFORE THESE RESTRICTIONS MAY
NOT APPLY TO YOU.
10-90-1402A
Protect Your Furniture
Power Source
IMPORTANT SAFETY INSTRUCTIONS
1) Read these instructions. Keep these instructions. Follow all
instructions. Heed all warnings.
2) Do not use this apparatus near water.
3) Never remove the casing of this product.
4) Never lubricate any part of this product.
5) Clean only with dry cloth.
6) Do not block any ventilation openings. Install in accordance with
the manufacturer's instructions.
7) Do not install near any heat sources such as radiators, heaters,
stoves, or other apparatus (including amplifiers) that produce
heat.
8) Do not defeat the safety purpose of the polarized or grounding-
type plug. A polarized plug has two blades with one wider than
the other. A grounding type plug has two blades and a third
grounding prong.The wide blade or the third prong is provided for
your safety. If the provided plug does not fit into your outlet, ask
an electrician to replace the obsolete outlet.
9) Only use attachments / accessories specified by the manufacturer.
10) Unplug this apparatus during lightning storms or when unused for
long periods of time.
11) Refer all servicing to qualified service personnel. Servicing is
required when the apparatus has been damaged in any way,
such as power-supply cord or plug is damaged, liquid has been
spilled or objects have fallen into the apparatus, the apparatus
has been exposed to rain or moisture, does not operate normally,
or has been dropped.
12) Use only with the cart, stand, tripod, bracket, or
table specified by the manufacturer, or sold with
the apparatus. When a cart is used, use caution
when moving the cart / apparatus combination to
avoid injury from tip-over.
13) The AC adapter must not be exposed to dripping or splashing
and no objects filled with liquids, such as vases, shall be placed
on apparatus.
14) The AC adapter is used as a disconnect device and it must
remain readily accessible during intended use. In order to
disconnect the apparatus from the AC power completely, the
AC adapter must be removed from the AC outlet completely.
15) The battery must not be exposed to excessive heat such as
sunshine, fire, etc.
16) This package contains small parts that may be hazardous to
children and should be kept out of reach of children at all time.
The product is not a toy – never allow children to play with the
product. The bags themselves or the many small parts they contain
may cause choking if ingested.
17) Never try to dismantle the product yourself, or push objects of any
kind into the product, as this may cause short circuits which could
result in a fire of electric shock.
18) None of the components can be replaced or repaired by users.
Only authorized dealers or service centers may open the product.
If any parts of your product required replacement for any reason,
including normal wear and tear or breakage, contact your dealer.
19) Avoid exposing your product to rain, moisture or other liquids to
protect against damage to the product or injury to you.
20) If the product overheats, if the product has been dropped or
damaged, or if the product had been dropped in a liquid,
discontinue use.
21) Never mount or store the product over any airbag deployment area,
as serious injury may result when an airbag deploys.
22) Do not use in areas where there are explosive hazards.
23) Observe all signs and instructions that require an electrical device
or RF radio product to be switched off in designated areas such as
hospitals or aircrafts.
24) Dispose of the product according to local standard and regulations.
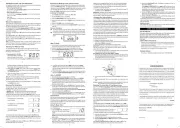
Press the - / + button while in Standby
Mode to select any of the four
display brightness levels.
Phone Rest is designed as a retractable
platform to enable holding the smartphone
upright for a better viewing angle.
Retractable phone rest
"+" polarity facing down
1
2
When the power to the radio is interrupted, the backup lithium battery
(not included) takes over to maintain the time and alarm settings.
To install a backup lithium battery:
• Leave the USB adapter power system connected to your AC outlet to
retain memory while backup lithium battery is being installed.
• Push the tab lock of the battery holder to the left and Hold it in that
position. Slide the battery holder open.
• Insert a new CR2032 battery or equivalent type into the holder with
the positive (+) polarity facing down, observing the positive (+) polarity
before sliding the holder back into the slot.
• If backup battery is installed properly, the time and alarm settings will
remain unchanged after the USB adapter power system is unplugged
and plugged back in again, otherwise, check above procedure and
adjust the time and alarm settings when necessary.
Note: The lithium backup battery needs replacement when the time and
alarm settings are lost after a power outage. To maximize the life of the
lithium battery, keep the radio connected to a 'live' AC outlet at all times.
Care of Cabinets
If the cabinet becomes dusty, wipe it with a soft cloth. If the cabinet
becomes smudged or dirty, clean it with a soft, slightly dampened cloth.
Never allow water or any liquid to get inside the cabinet. Never use any
abrasive cleaners or cleaning pads as these will damage the finish of
your radio.
Lithium Battery Precautions
• Dispose of the old battery properly. Do not leave it lying around where
a young child or pet could play with or swallow it. If the battery is
swallowed, contact a physician immediately.
• The battery may explode if mistreated. Do not attempt to recharge it or
disassemble it. Do not dispose of the old battery in a fire.
IMPORTANT: Temperature can only be read in Standby mode.
1. Press briefly the POWER button to sense and display the ambient
temperature in degree Fahrenheit (the “TMP” indicator ‘On’)
2. The temperature can be converted between Fahrenheit and Celsius
scale by pressing the – (Celsius) or + (Fahrenheit) button while in
TEMPERATURE mode.
Fahrenheit Celsius
Press and Hold the NIGHTLIGHT LED
button for 2 seconds to turn the White
LED ‘On’ to illuminate or decorate your
bedroom or desk. To turn it Off, Press
and Hold the button for 2 seconds.
This NIGHTLIGHT LED can be
activated while the unit is turned
On or Off (Standby).
WARNING1
2
4
5
3
ER100206 x 1 pc
USB AC/DC Adapter x 1 pc
(Output DC5V 1A)
USB Cable x 1 pc
Owner’s Manual x 1 pc
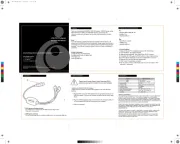
FRONT PANEL
1
WARNING
Do not ingest the battery, Chemical Burn Hazard.
This product contains a coin/button cell battery.
If the coin/button is swallowed, it can cause severe internal burns in just 2 hours and can lead to death.
Keep new and used batteries away from children.
If the battery compartment does not close securely, stop using the product and
keep it away from children.
If you think batteries might have been swallowed or placed inside any part of the body,
seek immediate medical attention.
This device complies with Industry Canada Licence-exempt RSS
standard(s). Operation is subject to the following two conditions:
(1) this device may not cause interference, and (2) this device must
accept any interference, including interference that may cause
undesired operation of the device. le présent appareil est conforme
aux CNR d'Industrie Canada applicables aux appareils radio exempts
de licence. L'exploitation est autorisée aux deux conditions suivantes:
(1) l'appareil ne doit pas produire de brouillage, et (2) l'utilisateur de
l'appareil doit accepter tout brouillage radioélectrique subi, même si le
brouillage est susceptible d'en compromettre le fon ctionnement.
Thank you for purchasing this Emerson ER100206 clock radio with
Bluetooth speaker. If you encounter any problems with the set up or
operation of this item, please call the Emerson Consumer Products
Corp., Customer Service Hotline, toll free, at 1-800-898-9020.
To prevent any damage to your furniture we strongly recommend that
you purchase small self-adhesive felt pads, available at hardware
stores and home improvement centers everywhere, and apply these
pads to the bottom of the radio before you place the product on fine
wooden furniture.
This product is designed to be powered by the DC5V/1A USB Adapter
on normal 120V 60Hz AC power only via the USB cable connecting
the USB output port of the adapter to the micro USB input port of the
radio. Do not attempt to operate the radio on any other power source.
You could cause damage to the radio that is not covered by your
warranty. The USB Adapter should be connected to an AC outlet that
is always 'live'. Do not connect it to an outlet that is controlled by a
wall switch.
• Remove the radio from the carton and remove all packing material
from the radio. Save the packing material, if possible, in case
the radio ever needs to be serviced or transported. The original
carton and packing material is the only safe way to pack your
radio to protect it from damage in transit.
• Remove any descriptive labels or stickers on the front or top of the
cabinet. Do not remove any labels or stickers from the back or
bottom of the cabinet.
• Note the serial number on the bottom of your radio and write this
number in the space provided on the Warranty page of this manual.
• Place your radio on a level surface such as a table, desk or shelf,
convenient to an AC outlet, out of direct
sunlight, and away from sources of excess heat, dirt, dust, moisture,
humidity, or vibration.
• Unwind the cable connecting the USB adapter and extend it to its
full length. The FM antenna is built in to this cable, which must be
fully extended to provide the best FM reception.
The device has been evaluated to meet general RF exposure
requirement. To maintain compliance with RSS-102 Radio
Frequency (RF) Exposure guidelines, this equipment should be
installed and operated with a minimum distance of 20cm between the
radiator and your body. le dispositif de a été évalués à répondre
génér al rf exposition exigence. pour maintenir la conformité avec les
directives d'exposition du RSS-102- Radio Fréquence (RF), ce
matériel doit être installé et exploité à une distance minimale de 20 cm
entre le radiateur et votre corps.
THIS DEVICE COMPLIES WITH PART 15 OF THE FCC RULES.
OPERATION IS SUBJECT TO THE FOLLOWING TWO
CONDITIONS:
(1) THIS DEVICE MAY NOT CAUSE HARMFUL INTERFERENCE,
AND
(2) THIS DEVICE MUST ACCEPT ANY INTERFERENCE RECEIVED,
INCLUDING INTERFERENCE THAT MAY CAUSE UNDESIRED
OPERATION.
NOTE: THE GRANTEE IS NOT RESPONSIBLE FOR ANY
CHANGES OR MODIFICATIONS NOT EXPRESSLY APPROVED
BY THE PARTY RESPONSIBLE FOR COMPLIANCE. SUCH
MODIFICATIONS COULD VOID THE USER AUTHORITY TO
OPERATE THE EQUIPMENT.
Note: This equipment has been tested and found to comply with the
limits for a class B digital device, pursuant to part 15 of the FCC Rules.
These limits are designed to provide reasonable protection against
harmful interference in a residential installation. This equipment
generates, uses and can radiate radio frequency energy and, if not
installed and used in accordance with the instructions, may cause
harmful interference to radio communications. However, there is no
guarantee that interference will not occur in a particular installation.
If this equipment does cause harmful interference to radio
communications. However, there is no guarantee that interference to
radio communication. If this equipment does cause harmful
interference to radio or television reception, which can be determined
by turning the equipment off and on. The user is encouraged to try to
correct the interference by one or more of the following measures:
• Reorient or relocate the receiving antenna
• Increase the separation between the equipment and receiver
• Connect the equipment into an outlet on a circuit different from that
to which the receiver is connected.
• Consult the dealer or an experienced radio/TV technician for help.
• Changes or modifications to this unit not expressly approved by
the party responsible for compliance could void the user's authority
to operate the equipment.
• Leaving the product in hot or cold places, such as in a closed car in
the summer and winter conditions, will reduce the capacity lifespan
of the battery.
The device has been evaluated to meet general RF exposure
requirement.
To maintain compliance with FCC's RF exposure guidelines, this
equipment should be installed and operated with a minimum distance
of 20cm between the radiator and your body.
AVERTISSEMENT
Ne pas ingérer la pile, Danger de brülure chimique
Ce produit contient une pile bouton. Si la pile bouton est avalée, elle peut provoquer de graves
brülures internes en 2 heures seulement et peut entrainer la mort.
Conserver les piles neuves et usées hors de portée des enfants.
Si le compartiment pile ne se ferme pas correctement,
cesser d'utiliser le produit et tenir hors de portée des enfants.
En cas de doute concernant le fait que les piles pourraient avoir été avalées
ou introduites dans une partie quelconque du corps, consulter immédiatement un médecin.
TOP PANEL
DO NOT INGEST BATTERY, CHEMICAL BURN HAZARD
USB ADAPTER CARE:
• Do not attempt to power your unit with anything other than the USB
Adapter provided. The use of any other types may damage or
destroy the product and could be dangerous. Use of other AC
Adapters may void any warranty.
• When you disconnect the adapter from AC mains, grasp and pull
the plug, not the cord.
• Never use an adapter that is damaged.
• Do not attempt to disassemble the adapter as it may expose you to
dangerous electric shock.
• Incorrect reassembly can cause electric shock or fire when the
product is subsequently used.
Preparation for Use
Package Contents
11 12 13 14
15
16 17 18 19
2 3 6
10 9
7
8
21
22
2324
20
54
****** S E R V I C E ******
FOR ADDITIONAL SET-UP OR OPERATING ASSISTANCE
PLEASE CALL:
1-800-898-9020
FOR CUSTOMER SERVICE, PLEASE E-MAIL TO:
internet@emersonradio.com
OR WRITE TO:
Emerson Radio Corp.
Consumer Affairs Dept.
35 Waterview Blvd
Parsippany, NJ 07054
Sensing Room
Nightlight LED
Temperature
4-Level Dimmer Control
Backup Battery for Time and Alarm Settings
Phone Rest (Retractable)
Care and Maintenance
Important Notes
Location of Controls and Indicators
Dual Alarm Clock Radio
With Whi te Mirror Display,
LED Nightlight, Phone Res t
and Bluetooth Speak er
OWNER’S MANUAL
ER100206
Visit our website at
www.emersonradio.com
IMPORTANT: Time can only be set in Standby mode, in which the
Radio, Bluetooth and AUX functions are disabled (i.e. “MHz”, “BT”
and “AUX” indicators are ‘Off’).
When the unit is powered up at the first time without backup battery
installed, the clock time will `flash' and reset to 12:00AM, prompting you
to set the correct time.
1. Press the – / + button repeatedly to adjust the Minutes and Hours, or
2. Press and Hold the – / + button to scroll through the Minutes and
Hours rapidly until the correct time is reached
3. When “AM” indicator ‘glows’, the time displayed is AM,
otherwise the time is PM.
4. Press the M button to finish the time setting process, or
5. Leaving the unit idle for 5 seconds to restore the clock time on the
display.
6.To adjust the clock time, Press and Hold the M button until the Time
display `flashes', then release the M button, and repeat above
procedure.
Note: If backup battery is installed, the clock time will not `flash' after a
power outage, and the time and alarm settings will be maintained.
IMPORTANT: Alarm can only be set in Standby mode, in which the Radio,
Bluetooth and AUX functions are disabled (i.e. “MHz”, “BT” and “AUX”
indicators are ‘Off’).
This clock radio has two separate alarms, ALARM1 (AL1) and ALARM2
(AL2), which can be set and used independently. You may use the alarms
to wake two people up at different times in Wake-to-Radio or Wake-to-
Buzzer mode.
6
7
1. POWER (On / Standby) / TEMPERATURE
(°F/°C) / SNOOZE (Off) Button
2. VOLUME - / REVERSE / DIMMER - Button
3. VOLUME + / ADVANCE / DIMMER + Button
4. Microphone for Hands-free
5. ALARM SET Button
6. MODE (FM / Bluetooth / AUX) / AMS Button
7. NIGHTLIGHT / ZZ SNOOZE / SLEEP
Button
8. AUX IN Jack
9. Speaker (behind)
10. Temperature Sensor (behind)
11. LED Nightlight (Left)
12. ALARM1 / “AL1” Mode Indicator
13. ALARM2 / “AL2” Mode Indicator
14. BLUETOOTH / “BT” Mode Indicator
15. Phone Rest (retractable)
16. “AUX” Mode Indicator
17. TEMPERATURE / “TMP” Indicator
18. “MHz” (FM Radio) Indicator
19. LED Nightlight (Right)
20. Micro USB Port (Power Input)
21. Battery Holder
22. “AM” (‘On’=AM, ‘Off’=PM) Indicator
23. MINUTES Digits
24. HOURS Digits (12-hour format)
Setting the Time
Setting the Alarm
Adjusting the Wake-up Time for AL1 and AL2:
1. Press and Hold the A button until Alarm Time
and the “AL1” indicator ‘flash’.
2. Press the – / + button to adjust the Minutes and Hours, or
3. Press and Hold the – / + button to scroll through rapidly the
Minutes and Hours until your desired Alarm Time for AL1 reaches.
4. Press the A button to finish the Alarm setting for AL1, then the “AL2”
indicator ‘flashes’ for adjustment.
5. Press the – / + button to adjust the Minutes and Hours, or
6. Press and Hold the – / + button to scroll through rapidly the Minutes and
Hours until your desired Alarm Time for AL2 reaches.
7. Press the A button to finish the Alarm setting for AL2. It will restore clock
time on display.
8. To quit the setup at any time, simply leave the unit idle for 5 seconds.
Activating and Deactivating the Alarm Mode:
1. Press the A button repeatedly to activate your desired Alarm mode: AL1,
AL2, or AL1+AL2.
2. When the “AL1/2” indicator glows, the alarm will go off gradually at wake-
up time.
3. To completely turn Off the Alarm, press the A button repeatedly until the
“AL1” and “AL2” indicators ‘Off’.
Wake-to-Buzzer Alarm Mode and Alarm Volume Setting:
1. Wake-to-Buzzer Alarm mode can be activated only if the last function
mode before the unit is shut down is Bluetooth / AUX mode.
2. Default alarm volume is V08 if the last Bluetooth / AUX volume before
the unit is turned Off is set between V00-V08.
3. For a louder alarm, set up the Bluetooth / AUX volume above V08 before
turning Off the unit.
If you want to disconnect this unit from your Bluetooth enabled device
after pairing successful, press and hold the A button for 2 seconds.
To reconnect this unit, just Press and Hold the A button for 2 seconds, or
select 'ER100206’ again from the Available/Paired device list.
Listening to Bluetooth Speaker:
• Press and Hold the POWER button for 2 seconds
to turn the unit ON.
• Press the M button repeatedly to select Bluetooth
(bt) mode (“BT” indicator ‘flashes’ for pairing).
• Enable your Bluetooth device and select ER100206 from its
Available/Paired device list. If pairing is successful, the unit will
prompt and “BT” indicator will become solid.
• Automatic connection with your Bluetooth devices is possible if they
have been paired successfully with this unit before.
• Once paired, you can play your music through this Bluetooth Speaker.
• To pause or resume playback, press briefly the POWER button.
• To select a specific track, Press and Hold the – / + button for 2 secs
then release
• When you finish listening to Bluetooth music, press the M button
repeatedly to select other function mode, or Press and Hold the POWER
button for 2 seconds to turn the unit Off.
Note: If pairing is unsuccessful, all previously paired Bluetooth devices
around should be disconnected first, or turn Off their Bluetooth connection
in order to avoid making any auto reconnection between them. Then, set
this unit to Bluetooth mode, and tap the Bluetooth switch on your
smartphone/device Off and back On again to refresh/search of any nearby
ER100206 units for pairing.
Press and Hold the POWER button for 2 seconds to turn the unit On. Press
the M button to switch it to Radio mode. Radio frequency will display with
its “MHz” indicator ‘On’. When you play the Radio for the first time, use the
AMS function mentioned below to set up the Program Number Memory
(P01-P50) for a quick access to your favorite stations.
1. Make sure the USB cable is connected to the unit
as it functions as an antenna for FM signal
reception (USB adapter is also required to
power the unit).
2. Auto Memory Saving (AMS) - Auto Searching / Scanning / Saving FM
Stations, Press and Hold the M button for 2 seconds and then release
for automatic searching and saving of the captured radio stations into
Memory (Program Number from P01 to P50).
Note: Searching will only stop at a station with acceptable reception before
saving onto memory.
3. Recalling Favorite Stations from Program Number Memory (P01-P50)
• Press and Hold the - / + button for 2 seconds to display the Program
Number, select the one to recall from Memory for listening. Radio
frequency (MHz) will be showing after Program Number displayed.
• Press briefly the - / + button to adjust volume.
• When done listening, press the M button to switch to either Bluetooth or
AUX function, or Press and Hold the POWER button for 2 seconds to turn
the unit Off.
Note: Keep the unit away from other electronic devices to avoid any radio
interference.
Receive your desired station with manual Tuning Control:
1. Press and Hold the A button for 2 secs then release, Auto Station
Seeking will be engaged, the receiving frequency will increase
automatically until a station with appropriate reception is captured.
2. Manual tuning is possible by pressing the A button briefly, the receiving
frequency will advance in a 0.1MHz step.
Snooze Alarm:
When the alarm comes On, press the SNOOZE button to pause it for 9
minutes. Alarm indicator will ‘flash’. If not turned Off, the Snooze Alarm will
only be active for one hour. To shut Off the Snooze Alarm completely,
press the POWER or A button once to silence the alarm for 24 hours with
the alarm indicator remaining ‘On’. The alarm will then come On again at
the same time the next day. To cancel the Alarm mode, press the A button
repeatedly to turn the “AL1” and “AL2” indicators ‘Off’.
Hands-free Phone Conversation:
• Hands-free functions only if the Bluetooth connection is set up
successfully between your smartphone and the unit.
• To answer an incoming call, press briefly the POWER button.
• To decline an incoming call without answering it, Press and Hold the
POWER button for 2 seconds.
• To finish hands-free conversation, press briefly the POWER button.
Wake-to-Radio Alarm Mode and Alarm Volume Setting:
1. Press and Hold the POWER button for 2 seconds to turn the unit On.
2. Press the M button to select FM Radio mode (the “MHz” indicator ‘On’).
3. Tune in or recall from Memory the station that you wish to hear when the
Alarm goes off.
4. Press the – / + button to set the maximum radio volume at which the
Alarm will gradually reach at wake-up time.
5. Default alarm volume is V08 if the last radio volume is set between
V00-V08 before the unit is turned Off.
6. For a louder alarm, set up radio volume above V08 before shutting down
the unit.
Note: Wake-to-Radio Alarm mode can be activated only if the last input
source before the unit is shut down is FM Radio mode, otherwise,
Wake-to-Buzzer Alarm mode will then be activated automatically.
This clock radio is equipped with an AUX IN jack for you to connect the
output from your external audio source such as your portable player,
phone, etc. with a jack to jack cable to this audio reproduction unit.
• Press and Hold the POWER button for 2
seconds to turn the unit ON.
• Press the M button repeatedly to select AUX
mode (“AUX” indicator ‘glows’).
• Connect your external audio source via its earphone jack to the
AUX IN jack of this unit via an audio AUX cable (not included) with
both ends in 3.5mm stereo plug.
• Start to play your external audio source and adjust the output volume
to its maximum when necessary.
• Adjust the volume of this clock radio to meet your desired level as well.
• When you finish listening to AUX IN music, press the M button
repeatedly to select other function mode, or Press and Hold the
POWER button for 2 seconds to turn the unit Off.
Note: When alarm time comes, music playing through the AUX IN jack
will be muted, and Wake-To-Music or Wake-To-Buzzer can only be
heard according to your alarm setting.
Press and Hold the POWER button for 2 seconds to turn the unit On.
Press the M button to select either FM Radio, Bluetooth or AUX mode
to play music or radio.
• Press the SLEEP button. The display will show the sleep timer (default
10 minutes)
• Press the SLEEP button repeatedly to choose your desired sleep time
(10-90 minutes or OFF).
• To display the sleep timer during the countdown process, Press the
SLEEP button.
• To cancel the sleep timer during the countdown process, Press and
Hold the POWER button for 2 seconds to shut Off the unit.
istening to FM Radio
Listening to Bluetooth Speaker and Hands-free
Enjoying Audio Source via AUX IN Jack
Sleeping to Music Timer