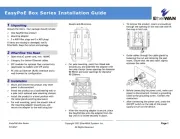
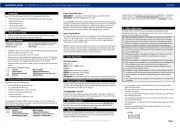
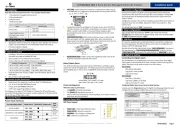
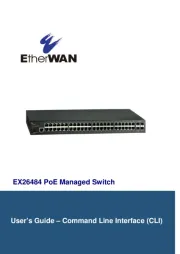
EtherWAN EX77900 Manual

EtherWAN bryter EX77900

Læs gratis den danske manual til EtherWAN EX77900 (2 sider) i kategorien bryter. Denne vejledning er vurderet som hjælpsom af 7 personer og har en gennemsnitlig bedømmelse på 4.6 stjerner ud af 4 anmeldelser. Har du et spørgsmål om EtherWAN EX77900, eller vil du spørge andre brugere om produktet?

Side 1/2
W70G-EX77900Q5 Page 1
Copyright 2022 EtherWAN Systems, Inc. All Rights Reserved 12/01/2022
Installation Guide
EX77900 Series | Hardened Managed Ethernet Switch
Unpacking
Open the carton and unpack the items. Your package should include:
EX77900 hardened managed Ethernet switch
2 Mounting brackets
12 Mounting screws
1 Console cable
2 Power cables (if no terminal block)
If any items are missing or damaged, notify your EtherWAN representative. If
possible, save the carton and packing material in case you need to ship or store the
switch in the future.
What Else You Need
Category 5e or better cable for RJ-45 ports
Appropriate fiber cables for fiber ports
Appropriate SFP cable and modules for SFP ports
Personal computer with a DB-9 male interface (if switch is to be managed
through console port)
Select a Location
Installation: Rack-mount. Use the enclosed screws and brackets to mount
the switch in an open or enclosed 19” rack.
Identify a power source within 6 feet (1.8 meters).
Choose a dry area with ambient temperature between -40 and 75ºC (-
40 and 167ºF).
Keep away from heat sources, sunlight, warm air exhausts, hot-air vents,
and heaters.
Be sure there is adequate airflow.
Connect to the Data Ports
The EX77900 has the following ports:
24 10/100/1000 Mbps copper ports
8 SFP slots shared with ports 17 24 supporting 100Mbps or 1Gbps
4 SFP+ slots, supporting 10Gbps or 1Gbps
10/100/1000BASE-TX Ports
Ports 1 to 16 are gigabit copper ports and can be connected to routers, other
switches, or end devices. Use category 5e or higher UTP/STP cable.
1 Gbps Combo/SFP Ports
Ports 17 24 are combo ports, and have two physical interfaces for each port.
These ports can be used as either 10/100/1000BASE-TX on the left section or
1000BASE-FX on the right section. These ports operate in “either/or” fashion, i.e.,
connecting to fiber port 17 will render copper port 17 inoperable.
SFP+ Slots
SFP transceivers can be installed directly into right-side ports 17 24 and SFP
ports 1 4. Ensure that the same type of transceiver is used at both ends of the
link and that the correct type of fiber cable is used.
Connect Power
Terminal Block
If your EX77900 comes with power cables, connect the cables into the power
modules at the back of the switch. If your switch comes with a terminal block (no
cable), then connect the switch to a suitable power supply using 12 to 24 AWG
wire.
Redundant power supply is supported. However, only one power input is
required to operate the switch.
Relay Output Alarm
The switch provides relay output contacts for signaling of a user-defined power or
port failure. The relay output can be connected to an alarm signaling device.
Normal state: 3 & 2 open, 2 & 1 closed
Alarm state: 3 & 2 closed, 2 & 1 open
Power-Up Sequence
When the switch is powered up:
All Link/ACT LEDs blink momentarily.
The Power 1, 2 LEDs light up and stay lit.
LEDs for every port connected to a device will flash, as the switch conducts a
brief Power On Self-Test (POST).
Front Panel LEDs
LED Panel Layout
Green LED ON = network connection established
FLASHING = Port sending or receiving data
Console Configuration
Connect to the switch console by connecting the DB-9 cable to the console port of
the switch and to the serial port of the computer running a terminal emulation
application (such as HyperTerminal or Putty).
Configuration settings of the terminal-emulation program: Baud rate:
115,200bps, Data bits: 8, Parity: none, Stop bit: 1, Flow control: none.
The default login name is root,” no password.
Web Configuration
Log in to the switch by launching a web browser and entering 192.168.1.10 in the
address bar. Enter the default login ID: root (no password) and click “Login.”
Copy Configuration to USB
The switch is equipped with one USB port (Type A connector) for configuration
file and syslog backup. The USB port can be used to save the configuration and
Syslog to a (FAT32) USB storage device.
Plug the device into the USB port, and use the “Save Configuration” command in
the web interface, or copy running-config startupconfig” in the CLI.


Produkt Specifikationer

Mærke: EtherWAN
Kategori: bryter
Model: EX77900

Har du brug for hjælp?

Hvis du har brug for hjælp til EtherWAN EX77900 stil et spørgsmål nedenfor, og andre brugere vil svare dig


bryter EtherWAN Manualer

EtherWAN

EtherWAN EX17008 Manual

4 November 2025
EtherWAN

EtherWAN EX78900X Manual

4 November 2025
EtherWAN

EtherWAN EX75000 Manual

3 November 2025
EtherWAN

EtherWAN EasyPoE Box Manual

2 November 2025
EtherWAN

EtherWAN EG97023 Manual

2 November 2025
EtherWAN

EtherWAN ED3601 Manual

2 November 2025
EtherWAN

EtherWAN EX26484 V2 Manual

2 November 2025
EtherWAN

EtherWAN EX78162 Manual

1 November 2025
EtherWAN

EtherWAN EX17082A Manual

1 November 2025

bryter Manualer

Nyeste bryter Manualer