EtherWAN SPL90BT Manual


Læs gratis den danske manual til EtherWAN SPL90BT (1 sider) i kategorien Ikke kategoriseret. Denne vejledning er vurderet som hjælpsom af 3 personer og har en gennemsnitlig bedømmelse på 3.9 stjerner ud af 2 anmeldelser. Har du et spørgsmål om EtherWAN SPL90BT, eller vil du spørge andre brugere om produktet?

Side 1/1
Copyright 2020 EtherWAN Systems, Inc. Page 1
All Rights Reserved
SPL90BT
1/6/2020
SPL90BT Hardened PoE Splitter
Installation Guide
1 Unpacking
include:
One SPL90BT PoE Splitter
Power output terminal block
Wall and DIN-Rail mounting hardware
brackets
If items are missing or damaged, notify your
EtherWAN representative. Keep the carton
and packing material.
More information available at:
https://www.etherwan.com/us
For warranty information, visit:
https://www.etherwan.com/us/support/war
ranty-policy
2 Equipment Needed
Category 5e or better cable for RJ-45
ports
Power cable to connect to end device
3 Select a Location
DIN-rail installations: Attach the bracket
on the unit using the included screws and
then mount on a DIN-rail.
Wall installations: Attach the brackets on
the unit using the included screws and
then mount on a wall.
Choose a dry area with ambient
temperature between -40 and 75ºC (-40
and 167ºF).
Keep away from heat sources, sunlight,
warm air exhausts, hot-air vents, and
heaters.
Make sure there is adequate airflow.
4 Connect to the Ports
The SPL90BT has the following ports:
2 10/100/1000 Mbps copper ports
10/100/1000BASE-T Ports
Port labeled “PoE IN” can be connected to a
PoE power source (PSE) such as a PoE switch
or a PoE injector. Port labeled “Data” can be
connected to the RJ-45 port of the end
device.
5 Supply Power to the Device
Redundant power output is supported.
However, only one power connection is
required to provide power to the end device.
1. Connect power wires to the
appropriate V1+/- or V2+/- pins on
the terminal block.
2. Connect power at the end device.
3. Plug the terminal block into the
socket.
4. Connect the unit to a PSE via the
“PoE IN” port.
6 Power Output Voltage
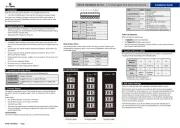
DIP Switch Settings
The SPL90BT is capable of delivering multiple
output voltage levels at 12/16/24/48VDC,
which can be adjusted by DIP switches, as
shown below.
7 Front Panel LEDs
LED Panel Layout
LED Color Status
Power Green ON = power detected
OFF = power not detected
BT Green ON = 802.3bt detected
Off = 802.3bt not detected
DIP1 DIP2
Output
voltage
/ Output
current
UP UP
48VDC /
1.5A
(default)
DOWN
UP
24VDC /
1.5
A
UP DOWN
16VDC /
1.5
A
DOWN
DOWN
12VDC /
1.5
A


Produkt Specifikationer

Mærke: EtherWAN
Kategori: Ikke kategoriseret
Model: SPL90BT

Har du brug for hjælp?

Hvis du har brug for hjælp til EtherWAN SPL90BT stil et spørgsmål nedenfor, og andre brugere vil svare dig


Ikke kategoriseret EtherWAN Manualer

EtherWAN

EtherWAN EN301 Manual

7 November 2025
EtherWAN

EtherWAN SPL90BT Manual

7 November 2025
EtherWAN

EtherWAN EDGE 2 Manual

5 November 2025
EtherWAN

EtherWAN OttoE 10H Manual

5 November 2025
EtherWAN

EtherWAN EX42905 Manual

4 November 2025
EtherWAN

EtherWAN ED3575 Manual

4 November 2025
EtherWAN

EtherWAN AiR PACE CL Manual

4 November 2025
EtherWAN

EtherWAN EX41922 Manual

3 November 2025
EtherWAN

EtherWAN SmartE Manual

3 November 2025
EtherWAN

EtherWAN PD1041 Manual

1 November 2025

Ikke kategoriseret Manualer

Nyeste Ikke kategoriseret Manualer