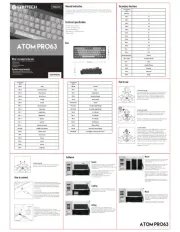
What’s included in the box
1. FANTECH MAXFIT81 FROST WIRELESS Mechanical Keyboard
4. Detachable Type-C Cable
1. Operating systems: Windows XP/7/8/10/11;
MAC OS (Software only works with windows)
Thank you for purchasing FANTECH MAXFIT81 MK910 Mechanical Keyboard.
MAXFIT81 features hotswappable sockets which are compatible with Cherry, Gateron,
Kailh and other switches, as well as featuring a premium macro knob for easy control
of your PC. The exploded layout design allows for easy typing, MAXFIT81 also features
interactive OLED , as well as BT5.0 + 2.4Ghz + USB connection modes.
Get your game on with MAXFIT81!
• Switch type: Mechanical
• Anti-Ghosting: All keys
• Connection: Wired, 2.4GHz, BT5.0 (Up to 5 devices)
• Battery Capacity: 4000mAh
• Battery Life: 165 hours with RGB OFF
• Wireless Distance: Up to 10m
• Size: 303.2(L)x104.3(W)x45(H)mm
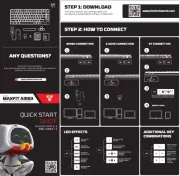
Download our Manual / Software from
On this screen, you can customize up to 22
lighting modes, and even set the speed and
Plug in the USB receiver to the computer USB port. Press
FN+4 to activate 2.4Ghz mode, after it connects, the
OLED will notify the keyboard is connected. If it doesn't
connect, please hold FN+4 for 5 seconds to enter 2.4Ghz
Maxfit81 Frost Wireless can connect up to 3 BT
devices simultaneously via combination key, connect the
BT by hold FN+1 / FN+2/ FN+3 for 5 seconds. Then, navigate
to your devices BT settings, and begin the pairing process.
In pairing process the OLED will notify your keyboard still in
pairing, After connected the OLED will notify the keyboard
* On the main screen, you can customize the
keyboard's keys and set macros, by clicking
on the keys. You also can customize
You can customize another layer of macro
by turning on Fn Layer features.
1. Set or record the combination keys
2. To activate the keys by pressing
To set up a new macro, click the "add" icon on
the Macro bar, to start the macro customization.
Next, click the "Start" button, which will begin
the macro input process. When finished, click
To save your new macro, click the "save" button
after stopping the macro input.
After recording the macro, you can easily edit
it by clicking the input step of the macro. To do
this, you can click on "add" to add more steps,
or "Modify" to modify the key.
After setting up the macro, return to the Main
screen and click on a key to apply a macro to it.
You can set the macro looping number
Auto looping start once keys was pressed and
end when the keys was pressed again.
Auto looping start upon holding and pressing
the keys, it will end once you let go the key press
In this section, you can customize the sleep
and light ON time of your keyboard when
you are away from your computer.
In this section, you can customize the OLED
display by opening the sketchpad mode.
1. Set your display in the sketchpad frame
2. If you have any pictures that you already
download from the web, you can import
them by pressing “select picture”
3. After finishing setting your display, you
can edit the frame, after finishing editing
you can upload the design in the upload
*Note: - Picture format needs to be JPEG, PNG, GIF
- If you found out the date and time on the
OLED is not correct, please press “Adjust
screen time” button to fix the date and time.
Gunakan penarik switch untuk mendorong dua tab yang
terletak di sisi atas dan bawah switch. Setelah mereka
didorong masuk, tarik ke atas untuk melepaskan switch dari
Peringatan: Sangat mudah untuk melecetkan casing
keyboard anda dengan alat ini, jadi berhati-hatilah saat
Saat memasukan switch baru, sejajarkan switch dengan
lubang pada keyboard, dan masukkan lurus ke bawah.
Harus ada hambatan minimal dan switch harus masuk
ke bingkai keyboard. Saat ini di sarankan untuk menyiapkan
notepad di PC anda, buka dan pastikan switch berfungsi
saat anda menekannya. Jika switch tidak menyala, atau tombol
tidak muncul di PC anda saat anda menekannya, berarti
sakelar tidak dimasukkan dengan benar. Lepaskan switch
dan pastikan pin lurus lalu masukkan kembali.
* Catatan: Aman untuk menukar swicth saat keyboard anda
Gunakan alat penarik keycap untuk menjepit keycap dan tarik
ke atas untuk melepaskan keycap dari sakelar. Terkadang
sakelar juga bisa keluar jika keycap di amankan erat pada
sakelar dan kejadian ini normal. Untuk kunci yang lebih
panjang seperti spasi, selalu jepit dan hapus dari
Cara mengganti switches dan keycaps
Setelah anda menginfoirmasi bahwa switch tekah
dimasukkan dengan benar, pasang kembali keycap
Colokkan kabel Tipe-C ke keyboard, lalu sambungkan
keyboard ke komputer dengan memasukkan jack USB
ke port USB komputer. Tahan FN+5 selama 3 detik untuk
mengaktifkan mode kabel, setelah terhubung tampilan
OLED akan menunjukan kalau keyboard sudah
Apa yang disertakan di dalam kotak
1. Keyboard Mekanik FANTECH MAXFIT81 FROST WIRELESS
4. Kabel tipe-C yang dapat di lepas
1. Sistem operasi: Windows XP/7/8/10/11;
MAC OS (Perangkat lunak hanya bekerja dengan windows)
Terima kasih telah membeli Keyboard Mekanik FANTECH MAXFIT81 MK910.
MAXFIT81 memiliki soket hotswappable yang kompatibel dengan Cherry, Gateron,
Kailh dan sakelar lainnya, serta menampilkan kenop makro premium untuk kontrol
yang mudah dari PC Anda. Desain tata letak arrow keys yang terpisah memungkinkan
pengetikan yang mudah, MAXFIT81 juga memiliki fitur OLED interaktif, serta
mode koneksi BT5.0 + 2.4Ghz + USB. Mainkan game Anda dengan MAXFIT81!
• Jenis sakelar: Mechanical
• Anti-Ghosting: All keys
• Koneksi: Wired, 2.4GHz, BT5.0 (Up to 5 devices)
• Kapasitas batere: 4000mAh
• Daya tahan Batere: 165 jam dengan RGB OFF
• Jarak nirkabel: Sampai dengan 10m
• Ukuran: 303.2(L)x104.3(W)x45(H)mm
Unduh Manual / Perangkat Lunak kami dari
Di layar ini, Anda dapat menyesuaikan
hingga 22 mode pencahayaan, dan
bahkan mengatur kecepatan dan
kecerahan pada beberapa mode
Masukan Colokkan penerima USB ke port USB komputer.
TekanFN+4 untuk mengaktifkan mode 2.4Ghz, setelah
terhubung, OLED akan memberi tahu keyboard terhubung.
Jika tidak terhubung, tahan FN+4 selama 5 detik untuk
masuk dalam pairing mode.
Maxfit81 Frost Wireless dapat terhubung hingga 3 BT
perangkat secara bersamaan melalui tombol kombinasi,
sambungkan BT dengan menahan FN+1 / FN+2/ FN+3
selama 5 detik. Kemudian, navigasikan ke pengaturan BT
perangkat Anda, dan mulai proses pemasangan. Dalam
proses pemasangan, OLED akan memberi tahu keyboard
Anda masih di mode pairing, Setelah terhubung OLED
akan memberi tahu keyboard terhubung.
* Pada layar utama, Anda dapat
menyesuaikan tombol keyboard dan
mengatur makro, dengan mengklik pada
kunci. Anda juga dapat menyesuaikan
Anda dapat menyesuaikan lapisan makro lain
dengan mengaktifkan fitur Fn Layer.
1. Atur atau rekam tombol kombinasi
untuk kunci yang dipilih.
2. Untuk mengaktifkan tombol dengan
menekan Fn + tombol yang dipilih.
Untuk menyiapkan makro baru, klik ikon
"tambah" pada bilah Makro, untuk memulai
Selanjutnya, klik tombol "Start", yang akan
dimulai proses input makro. Setelah selesai,
Untuk menyimpan makro baru Anda, klik
tombol "simpan" setelah menghentikan
Setelah merekam makro, Anda dapat dengan
mudah mengedit itu dengan mengklik
langkah input makro. Untuk melakukan ini,
Anda dapat mengklik "tambah" untuk
menambahkan lebih banyak langkah,
atau "Modifikasi" untuk memodifikasi kunci.
Setelah menyiapkan makro, kembali ke Main
layar dan klik pada tombol untuk menerapkan
Anda dapat mengatur nomor
Perulangan otomatis dimulai setelah tombol
ditekan dan Akhiri saat tombol ditekan lagi.
Perulangan otomatis dimulai saat menahan
dan menekan tombol, itu akan berakhir setelah
Anda melepaskan penekanan tombol
Di bagian ini, Anda dapat menyesuaikan tidur
dan nyalakan waktu keyboard Anda saat
Anda jauh dari komputer Anda.
Di bagian ini, Anda dapat menyesuaikan
tampilan OLED dengan membuka mode
1. Atur tampilan Anda di bagian bingkai
2. Jika Anda memiliki gambar yang sudah
Anda unduh dari web, Anda dapat
mengimpornya dengan menekan
3. Setelah selesai mengatur tampilan Anda,
Anda dapat mengedit bingkai, setelah
selesai mengedit Anda dapat
mengunggah desain di bagian unggah file.
* Catatan: - Format gambar harus JPEG, PNG, GIF
- Jika Anda mengetahui tanggal dan waktu pada
OLED tidak benar, silakan tekan "Sesuaikan
Tombol Screen Time" untuk memperbaiki
Use the switch puller to push in the two tabs located on the top
and bottom side of the switch. Once they are pushed in, pull
upwards to remove switch from keyboard case.
Warning: It is very easy to scratch your keyboard case with this
tool, so take caution when removing switches!
When inserting a new switch, align switch to holes on the
keyboard, and insert straight down. There should be minimal
resistance and the switch should pop into the frame of the
keyboard. It is recommended at this time to have a Notepad
ready on your PC, open it and make sure the switch works
when you press it. If the switch does not light up, or the key
doesn't show up on your PC when you press it, then the switch
was not inserted properly. Remove switch, and make sure pins
are straight then insert again.
* Note: It is safe to swap switches while your keyboard is
Use the keycap puller tool to clamp on a keycap and pull
upwards to detach keycap from switch. Sometimes the switch
may come out as well if the keycap is secured tightly on switch,
which is normal. For longer keys such as the space bar, always
clamp and remove from the MIDDLE of the keycap.
Change switches and keycaps
Once you have confirmed the switch was properly inserted,
snap back in the appropriate keycap.
Plug in the Type-C cable to the keyboard, then connect
the keyboard to computer by inserting USB jack to your
computer USB port. Press FN+5 3s to activate wired mode,
after it connects the OLED will notify the keyboard is
Notes: Cycle OLED allows for functions such as CPU status, Disk Status,
Memory Status and more to be shown. For this, the keyboard must be
connected to the software.
Catatan: Siklus OLED memungkinkan untuk fungsi-fungsi seperti status CPU,
Status Disk, Status Memori dan lainnya untuk ditampilkan. Untuk ini,
keyboard harus terhubung ke perangkat lunak.