1. Posion the reel where it is to be
installed and mark the rst hole
posion.
2. Drill the hole with the 10mm drill
bit, 50mm deep. ( Depth is Tip:
important, use scky tape around
the drill bit to mark 50mm depth)
3. Hammer plug into the rst hole.
4. Posion the reel again to mark the
2nd hole posion, then drill hole
as above and hammer in plug.
5. Repeat process 1-3 to drill the remaining 2 holes.
6. Set unit in place and secure with lag screws provided into
each anchor. Reference Figure 3.
For more informaon visit www.hoselink.com.au 1300 900 617 or call
Kit contents
1 1x Leader Hose
2 1x Hardware Pack
3 1x Crank Handle
4 1x Intel Tube with Seals
4x Anchors
Before you begin
Assembly instructions
Tools Required:
Phillips Screwdriver
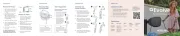
Step 1: Attaching the Crank Handle
Locate and place the handle
over axle. Reference Figure 1.
Secure in place using
screw provided.
This product has been packaged to assure it arrives in the
best possible condion. Please be careful when unpacking.
Read instrucons prior to assembly. This kit contains parts
that can be damaged if incorrectly assembled. Please follow
instrucons carefully.
Note: Do not completely ghten bolts unl assembly is
completed. For easier assembly, we recommend that two
people assemble this product.
Please consider carefully the appropriate method
to be used in mounng this hose reel. Hardware
is included for your convenience but may not
be suitable for all mounng condions. Some
surfaces like vinyl siding or render may require
special consideraons or addional hardware.
Improper mounng can cause personal injury or
property damage. If you are unsure, contact a
home improvement professional.
CAUTION
Installation
Mounting to Concrete or Brick Masonry Construction
Tools Required:
Phillips Screwdriver
Hammer Drill or rotary drill with 10mm masonry drill bit
Small hammer or mallet
Please follow these steps carefully for installaon.
Tools Required:
13mm socket or spanner
Hammer Drill or rotary drill with 10mm masonry drill bit
Small Hammer or Mallet
Powdered Hand Drill with 1/4” (6mm) Standard Drill Bit
Phillips Screwdriver
Step 2: Attaching the Leader Hose
Remove 2 meter leader hose
from the packaging.
Leader hose can be connected to the
water inlet. Reference Figure 2.
Figure 1
Figure 2
Figure 3
Installaon guide
Decorative Wall Mount Hose Reel Manual
Items: 3552 & 3553