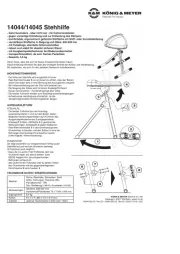
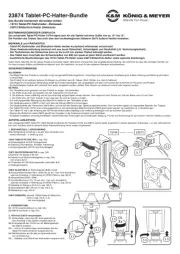
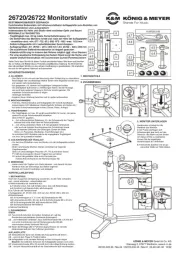
3. ASSEMBLY
24120 Speaker Wall Mount
- for loudspeakers to max. 50 kg
- equally suited for home, object and public venues
- patented expanding mandrel for a shudder-free, secure fit
- suitable for flange bushing with an internal diameter of 35-37mm
- speaker direction and tilt adjustable
1. SAFETY NOTES
- Please check the support arms prior to and after use. Please do not use damaged support arms
- Do not exceed max. central load capacity of 50 kg
- Do not use in external or damp rooms
- Please observe relevant local regulations regarding installation (could differ from the examples in section 5. A,B,C)
- Use 6 screws for mounting on a wall
- Installation must be carried out by a trained installation technician
- Only mount on a suitable wall with correct mounting materials (not included in the delivery).
- Walls which are too weak or behind which run electricity pipes, water pipes or similar are unsuitable. In case of doubt, consult a
- qualified technician.
- Regularly check the bracket to make sure it is attached tightly and that the components and screws are in god condition.
- Take care when positioning the speaker, as there is a danger of pinching
- "When using the bracket at staging and production facilities" the German Accident Prevention Regulations BGV C1 apply.
a. Connect the support section 11 to the U bracket 12:
a. - using bolt components 1-2-3-3-10-1
b. Connect the adjusting shaft 5 to the wall plate 6:
b. - using bolt components 7-8-9
c. Connect support section 11 with U bracket 12 (open at top) to the
c. adjusting shaft 5:
c. - using bolt components 1-2-3-3-10-1
c. NOTE: If using the top hole of the adjusting shaft, the cantilever arm
c. will be horizontal.
d. Connect the cantilever arm 4 with U bracket (open below) to the
d. adjusting shaft 5:
d. - using bolt components 1-2-3-3-10-1
e. Connect the support section 11 with the cantilever arm 4:
e. - using bolt components 1-2-3-3-10-1
2. COMPONENTS - OVERVIEW
Check that all components are
present and function correctly.
4 cantilever arm
5 adjusting shaft
6 wall plate
11 support section
in the bag:
1 12 x caps, small
2 3 x bolts M6 x 60 mm
3 6 x washers, small
7 2 x washers, large
8 2 x bolts M12 x 25 mm
9 2 x caps, large
10 3 x safety nuts M6
Thank you for choosing this product. These instructions contain information about the assembly and mounting of the product and its
use. We suggest you keep the instructions in a safe place for later use.