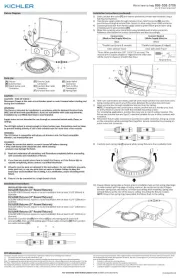
Kichler Florence 52496BNB Manual

Kichler Lys Florence 52496BNB

Læs gratis den danske manual til Kichler Florence 52496BNB (3 sider) i kategorien Lys. Denne vejledning er vurderet som hjælpsom af 3 personer og har en gennemsnitlig bedømmelse på 4.8 stjerner ud af 2 anmeldelser. Har du et spørgsmål om Kichler Florence 52496BNB, eller vil du spørge andre brugere om produktet?

Side 1/3
For warranty information please visit: kichler.com/warranty
REV 17-FEB-2022
We’re here to help 866-558-5706
Hrs: M-F 9am to 5pm EST
CAUTIONS
CAUTION – RISK OF SHOCK:
Disconnect Power at the main circuit breaker panel or main fusebox before
starting and during the installation.
WARNING:
1. This fixture is intended for installation in accordance with the National
Electrical Code (NEC) and all local code specifications. If you are not familiar
with code requirements, installation by a certified electrician is recommended.
Failure to adhere to these codes and instructions may result in serious injury
and/or property damage and will void the warranty.
CLEANING:
• Always be certain that electric current is turned o before cleaning.
• Only a soft damp cloth should be used. Harsh cleaning products may damage
the finish.
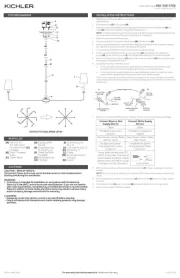
INSTALLATION INSTRUCTIONSFIXTURE DIAGRAM
IS-52496-US
PARTS LIST
[A] Socket (Qty. 3)
[B] Connecting Tube
[C] Outlet Box (not
supplied)
[D] Canopy
[E] Chain
[F] Mounting Screw
(Qty. 2)
[G] Mounting Strap
[H] Strap Mounting
Screw (Qty. 2)
[I] Lock-Up Knob (Qty.
2)
[J] Lock Washer (Qty. 2)
[K] 5.5 inch Threaded
Tube
[L] Decorative Tube
[M] Finial
[N] Lower Connection
[O] Loop (attached to
Canopy)
[P] Coupling
[Q] Candle sleeve (Qty.
3)
[R] Loop (attached to
Connecting Tube)
[S] Open Chain Link
(Qty. 2)
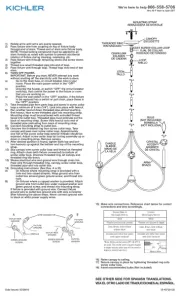
1. Thread connecting tube[B] onto coupling[P]. Tighten to secure.
2. Attach one end of chain[E] to loop[R] using an open chain link[S]. Attach opposite end of chain to
loop[O] using the other open chain link[S].
NOTE: To close an open chain link, place a piece of cloth (not supplied) over the open link and use a
pair of pliers to gently squeeze the link closed.
3. Weave fixture wires through chain links no more than 3 inches apart. Pass fixture wires through
loop[O] and into to canopy[D].
4. Find the appropriate threaded holes on mounting strap[G] that align with hole distance in canopy.
Screw mounting screws[F] into threaded holes starting from the outlet box side.
5. Attach mounting strap to outlet box[C] using the strap mounting screws[H]. Mounting strap can
be adjusted to suit position of fixture.
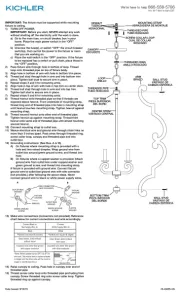
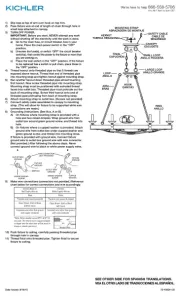
6. Grounding instructions: (See Illus. a or b).
a. On fixtures where mounting strap is provided with a hole and two raised dimples, wrap
ground wire from outlet box around green ground screw, and thread into hole.
b. On fixtures where a cupped washer is provided, attach ground wire from outlet box under
cupped washer and green ground screw, and thread into mounting strap.
If fixture is provided with ground wire, connect fixture ground wire to outlet box ground wire with
wire connector after following the above steps. Never connect ground wire to black or white power
supply wires.
7. Make wire connections. Reference chart below for correct connections and wire accordingly.
Connect Black or Red
Supply Wire to:
Connect White Supply
Wire to:
Black White
*Parallel cord (round &
smooth)
*Parallel cord (square &
ridged)
Clear, Brown, Gold or Black
without Tracer
Clear, Brown, Gold or Black
with Tracer
Insulated wire (other
than green) with copper
conductor
Insulated wire (other
than green) with silver
conductor
*Note: When parallel wire (SPT
1 & SPT 2) are used. The neutral
wire is square shaped or ridged
and the other wire will be round
in shape or smooth (See illus.) Neutral Wire
8. Raise canopy to ceiling, carefully passing mounting screws through mounting screw holes in
canopy.
NOTE: Make sure wires do not get pinched between mounting strap and canopy or canopy and
ceiling.
9. Use lock washers[J] and lock-up knobs[I] to secure fixture to ceiling. Tighten lock-up knobs to
secure.
10. Carefully slip a candle sleeve[Q] over a socket[A] and push sleeve completely down over socket so
that it rests against the socket base. Repeat for remaining candle sleeves and sockets.
11. Thread 5.5 inch threaded tube[K] into lower connection[N]. Tighten to secure.
12. Slip decorative tube[L] over the installed 5.5 inch threaded tube. While holding decorative tube in
place up against the fixture, thread on finial[M] until finial is seated against bottom of decorative
tube. Tighten to secure.
13. Insert recommended bulbs (Not supplied).
GREEN GROUND
SCREW
CUPPED
WASHER
OUTLET BOX
GROUND
FIXTURE
GROUND
DIMPLES
WIRE CONNECTOR
OUTLET BOX
GROUND
GREEN GROUND
SCREW
FIXTURE
GROUND
a
b
C
G
F
H
J
I
E
B
R
P
A
K
L
M
D
N
O
Q
S
S
REV 17-FEB-2022
PRÉCAUTIONS
ATTENTION – RISQUE DE DÉCHARGES ÉLECTRIQUES:
Couper le courant au niveau du panneau du disjoncteur du circuit principal ou de
la boîte à fusibles principale avant de procéder à l’installation.
ATTENTION:
1. Ce luminaire doit être installé conformément aux codes d’électricité nationaux
(NEC) et satisfaire toutes les spécifications des codes locaux. Si vous ne
connaissez pas les exigences de ces codes, il est recommandé de confier
l’installation à un électricien certifié. Ne pas se conformer à ces codes et
directives pourrait provoquer des blessures sérieuses et/ou des dommages
matériels et rendre la garantie non valide.
NETTOYAGE :
• Soyez toujours certain que l’alimentation électrique du luminaire est fermée
avant le nettoyage.
• N’utilisez qu’un chion doux humide. Les produits de nettoyage acides/abrasifs
peuvent endommager le fini.
INSTRUCTIONS D’INSTALLATION
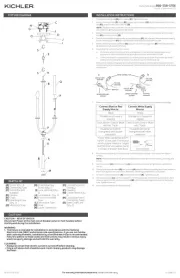
DIAGRAMME D’APPAREILS
IS-52496-CB
INSTRUCTIONS:
For Assembling and Installing Fixtures in Canada
Pour L’assemblage et L’installation Au Canada
Nous sommes là pour vous aider 866-558-5706
Heures : du lundi au vendredi, de 9h à 17h (heure de l’Est)
Pour de plus amples informations sur la garantie, veuillez visiter : kichler.com/warranty
LISTE DES PIÈCES
[A] Douille (Qté 3)
[B] Tube de
Raccordement
[C] Boîte de Sortie (non
fournie)
[D] Cache
[E] Chaîne
[F] Vis de Montage (Qté
2)
[G] Étrier de Montage
[H] Vis de montage de
Létrier (Qté 2)
[I] Bouton de
Verrouillage (Q 2)
[J] Rondelle de Blocage
(Q 2)
[K] Tube Fileté 14 cm
[L] Tube Décoratif
[M] Ornement
[N] Raccordement
Inférieur
[O] Boucle (fixée sur le
Cache)
[P] Accouplement
[Q] Manchon de bougie
(Qté. 3)
[R] Boucle (attachée
au Tube de
Raccordement)
[S] Maillon de Chaîne
Ouvert (Q 2)
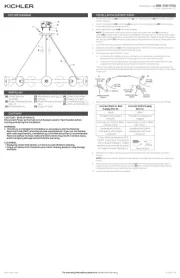
1. Vissez le tube de raccordement[B] sur l’accouplement[P]. Serrez pour fixer.
2. Attachez une extrémité de la chaîne[E] à la boucle[R] en utilisant un maillon de chaîne ouvert[S].
Attachez l’autre extrémité opposée de la chaîne à la boucle[O] en utilisant l’autre maillon de chaîne
ouvert[S].
REMARQUE : Pour fermer le maillon de chaîne ouvert, placer un morceau de tissu (non fourni) sur
le maillon ouvert et à l’aide d’une paire de pinces, serrer le maillon et le fermer.
3. Passez les fils du luminaire par des maillons de la chaîne à un intervalle de 7,5 cm maximum.
Acheminez les fils du luminaire par la boucle[O] et dans le cache[D].
4. Localisez les trous taraudés appropriés, sur l’étrier de montage[G] qui s’alignent sur la distance
de trou dans le cache. Serrez les vis de montage[F] dans les trous taraudés en commençant par la
boîte de sortie.
5. Fixez l’étrier de montage sur la bte de sortie[C] avec les vis de montage de l’étrier[H]. Vous
pouvez régler l’étrier de montage en fonction de la position du luminaire.
6. Connecter les fils. Se reporter au tableau ci-dessous pour faire les connexions.
Connecter le fil noir ou
rouge de la boite
Connecter le fil blanc de
la boîte
A Noir A Blanc
*Au cordon parallèle (rond
et lisse)
*Au cordon parallèle (à
angles droits el strié)
Au transparent, doré,
marron, ou noir sans fil
distinctif
Au transparent, doré,
marron, ou noir avec un til
distinctif
Fil isolé (sauf fil vert) avec
conducteur en cuivre
Fil isolé (sauf fil vert) avec
conducteur en argent
*Remarque: Avec emploi d’un
fil paralléle (SPT 1 et SPT 2). Le
fil neutre est á angles droits ou
strié et l’autre fil doit étre rond ou
lisse (Voir le schéma). Fil Neutre
7. Soulevez le cache en direction du plafond en passant soigneusement les vis de montage par les
trous des vis de montage dans le cache.
REMARQUE : Assurez-vous que les fils ne se coincent pas entre l’étrier de montage et le cache ou
le cache et le plafond.
8. Utilisez des rondelles de blocage[J] et des boutons de verrouillage[I] pour fixer le luminaire au
plafond. Resserrez les boutons de verrouillage pour fixer.
9. Glissez soigneusement un manchon de bougie[Q] sur une douille[A] et poussez le manchon
complètement vers le bas sur la douille afin qu’il repose contre la base de la douille. Répétez
l’opération pour les autres manchons de bougie et les douilles.
10. Vissez le tube fileté de 14 cm[K] dans le raccordement inférieur[N]. Serrez pour fixer.
11. Glissez le tube décoratif[L] sur le tube fileté de 14 cm installé. Tout en maintenant le tube décoratif
en place contre le luminaire, enfilez l’ornement[M] jusqu’à ce que l’ornement repose contre le bas
du tube décoratif. Serrez pour fixer.
12. Installez les ampoules recommandées (non fournies).
C
G
F
H
J
I
E
B
R
P
A
K
L
M
D
N
O
Q
S
S


Produkt Specifikationer

Mærke: Kichler
Kategori: Lys
Model: Florence 52496BNB

Har du brug for hjælp?

Hvis du har brug for hjælp til Kichler Florence 52496BNB stil et spørgsmål nedenfor, og andre brugere vil svare dig