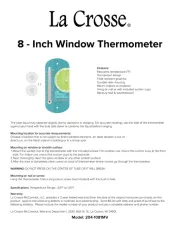
La Crosse Technology CA80987 Manual


Læs gratis den danske manual til La Crosse Technology CA80987 (3 sider) i kategorien Termometer. Denne vejledning er vurderet som hjælpsom af 60 personer og har en gennemsnitlig bedømmelse på 4.6 stjerner ud af 30.5 anmeldelser. Har du et spørgsmål om La Crosse Technology CA80987, eller vil du spørge andre brugere om produktet?

Side 1/3
1
Wireless Temperature Station
with Snooze Alarm
Model: CA80987 | Quick Setup Guide
INTRODUCTION: The Wireless Temperature Station features manual
set time, date, time alarm , indoor and with snooze outdoor temperature
with high and low outdoor temperature alarms. Current temperature at s
your fingertips!
SETUP INSTRUCTIONS STEP BY STEP:
STEP 1:
Remove battery cover from the Temperature Station. Slide tab down
and pull out to remove the battery
cover.
2 Insert NEW AA batteries (not
included) into the back of the
Temperature Station. Observe the
correct polarity (see marking inside the
battery compartment).
The Temperature Station will light up
and show, indoor temperature.
Do Not Mix Old and New Batteries
Do Not Mix Alkaline, Standard,
Lithium or Rechargeable Batteries
STEP 2:
Ensure that the transmitter is within 10 feet of the
Temperature Station.
- Remove battery cover from TX141 BV3 transmitter: Slide
the battery cover down and lift off the front of the
transmitter.
Insert 2 NEW AA batteries into the transmitter. Observe
the correct polarity.
Within 3 minutes the will show readings in the Temperature Station
outdoor temperature area on the LCD.
Note: Allow the Temperature Station and the transmitter to stay
within 10 feet of each other for the first 15 minutes of set up.
SEARCH FOR TRANSMITTER:
After the batteries are inserted, the forecast station will search for
the outdoor temperature transmitter for 3 minutes.
The antenna symbol will flash during reception, and
temperature display will be dashes “---“.
The antenna symbol scroll during RF (radio frequency)
synchronization.
If synchronization fails once, the antenna will lose one bar.
If synchronization fails twice, the antenna will lose two bars.
If reception continuously fails to receive 5 times, the antenna symbol
will be shown as .
The antenna will show full display with successful RF
(radio frequency) reception.
TROUBLESHOOTING:
If the outdoor temperature is not displayed after three minutes, hold
the SENSOR SEARCH button on the temperature station for three
seconds to search for outdoor transmitter.
Next remove the battery cover from the TX141-
BV3 transmitter then press the TX button to
send a signal.
If it still does not receive the outdoor
temperature, remove the batteries from both the temperature station
and the transmitter for 15 minutes repeat setup instructions from
step 1.
TIME/DATE:
The TIME/DATE button will move through the
program menu and confirm settings.
The UP arrow (on back) will increase a selected
value.
The DOWN arrow (on back) will decrease a
selected value.
Set Time and Date:
Hold the TIME/DATE button for three seconds to enter time set mode.
YEAR: The Year will flash, use the ARROW buttons to choose the
year, and press the TIME/DATE button to confirm and move to the
month.
MONTH: The Month will flash, use the ARROW buttons to choose
the month, and press the TIME/DATE button to confirm and move to
the date.
DATE: The Date will flash; use the ARROW buttons to choose the
date. Press the TIME/DATE button to confirm and move to 12/24
hour time format.
12/24-HOUR: The time format 12H will flash, use the ARROW
buttons to choose 12 hour or 24 hour time format and press the - -
TIME/DATE button to confirm and move to hour.
HOUR: The Hour will flash, use the ARROW buttons to choose the
hour, and press the TIME/DATE button to confirm and move to
minutes.
MINUTES: The Minutes will flash, use the ARROW buttons to
choose the minutes, and press the TIME/DATE button to confirm
and move to Fahrenheit/Celsius.
FAHRENHEIT/CELSIUS: °F or °C will flash. Use the ARROW
buttons to select Fahrenheit or Celsius. Press and release the
TIME/DATE button to confirm and exit the program menu.
Note: When no buttons are pressed for ten seconds the Temperature
Station will save the last change and default back to normal mode.
TIME ALARM
The TIME ALARM button moves you through alarm set
mode and confirms settings.
The UP arrow (on back) will increase a selected value.
The DOWN arrow (on back) will decrease a value.
2
Set Time Alarm
In normal mode, press and release the TIME ALARM button once to
show alarm time. Hold the TIME ALARM button for three seconds to
enter alarm set mode.
HOUR: The Hour will flash, use the ARROW buttons to set the hour,
and press TIME ALARM button to confirm. Then press the TIME
ALARM button again switch to minute setting.
MINUTES: The Minutes will flash, use the ARROW buttons to set
the minutes, and press TIME ALARM button to confirm.
Press the TIME/DATE button to return to normal mode
Note: When no buttons are pressed for ten seconds the Temperature
Station will save the last change and default back to normal mode.
Activate/Deactivate Time Alarm
In normal mode, press and release the TIME ALARM button once to
show alarm time.
Press and release the TIME ALARM button repeatedly to turn the
alarm ON/OFF. The alarm icon appears when alarm is activated.
Snooze
When the alarm sounds press the TIME ALARM button to snooze the
alarm for 10 minutes. The snooze option can be repeated three times.
Note: while the alarm sounds press any button except the TIME
ALARM button to turn the alarm off.
LOW BATTERY
When this icon appears in the outdoor (OUT) readings section,
replace the batteries in the outdoor transmitter.
MIN/MAX
The Temperature Station will show the daily minimum and maximum
temperatures each day starting at midnight (12:00 AM). The
Temperature Station automatically resets the min/max temperatures at
midnight (12:00 AM).
View MIN data: Press and release the MIN button to
view the minimum Indoor and Outdoor Temperatures.
3 Reset MIN data: Hold the MIN button for seconds and
the Indoor and all Outdoor Minimum Temperatures will
be reset to current temperatures.
View MAX data: Press and release the MAX button to
view the maximum Indoor and Outdoor Temperatures.
Reset MAX data: Hold the MAX button for 3 seconds
and the Indoor and all Outdoor Maximum Temperatures
will be reset to current temperatures.
TEMPERATURE ALERTS:
Press and release the TEMP ALERTS button to
toggle between the temperature alerts.
Hold the TEMP ALERTS button to set
individual high and low alerts.
The UP ARROW button (on back) will ase temperature incre
alert value in alert set mode (flashing).
Turn alert ON when alert is selected but not flashing.
The decrease values DOWN ARROW button (on back) will
when temperature alert flashes.
T . urn alert OFF when alert is selected but not flashing
The bell icon indicates an alert is active.
One or all the temperature alerts may be set. Range for outdoor
temperature alert: 40°C to 60°- C (-40°F to 140°F)
Select Temperature Alert Values
Hold the TEMP ALERTS button for three seconds alert setting. to enter
OUTDOOR HI alert will flash where the outdoor temperature shows.
Press the ARROW buttons to set the alert the value, and press
TEMP ALERTS button TEMP ALERTS to confirm. Then press the
button again switch to OUTDOOR LOW setting.
OUTDOOR LO alert will flash where the outdoor temperature shows.
Press the ARROW buttons to set the alert value, and press the
TEMP ALERTS button to confirm and exit.
Note: After selecting values temperature alert use the next step to turn
individual alerts ON or OFF.
Temperature Alerts ON/OFF
In normal mode, press and release the TEMP ALERTS button to toggle
between:
o Outdoor HI
o Outdoor LO
P ress the UP ARROW button (Alert ON) to turn the selected alert
ON. The alert icon appears when alarm is activated.
P ress the DOWN ARROW button (Alert OFF) to turn the selected
alert OFF.
Note: When no temperature alerts are set the
Temperature Alert area will show ALERTS OFF.
Temperature alert rings
When temperature alert is ringing, corresponding alert
icon will flash.
The alert will ring for five seconds every minute, until the
temperature is out of alert range.
Press any button to stop alert. The alert icon will still show.
Turn alert OFF: In normal mode, press and release the TEMP
ALERTS button turn oto select the alert to ff. With HI or LO alert
selected, p button to turn that alert OFF.ress the DOWN ARROW
TEMPERATURE TREND ICONS:
The indoor and outdoor temperature trend indicators will update every
30 minutes or less. These trends represent temperature changes over
the past three hours.
Temperature rising more than 1°C/ 2°F in the past three
hours
Temperature has not changed more than 1°C in the /2°F
past three hours.
Temperature falling more than 1°C in the past three / 2°F
hours
POSITION THE TEMPERATURE STATION:
Choose a location for the Temperature Station that is within range of
the outdoor transmitter. The Temperature Station has a
built in base to sit on a table or desk.
Choose a location 6 feet or more from electronics such
as cordless phones, gaming systems, televisions,
microwaves, routers, baby monitors, etc., which can
prevent signal reception.
Be aware of electrical wires and plumbing within a wall.
Best reception is achieved when the front or the back of
the Temperature Station is facing the outdoor
transmitter. This allows a larger portion of the antenna to
receive a signal.
POSITION THE WIRELESS OUTDOOR TRANSMITTER:
Once the Temperature Station shows the outdoor temp place it erature,
and the transmitter in the desired locations and wait approximately 1-
hour before permanently mounting the transmitter to ensure that there
is proper reception. The transmitter should be mounted vertically, in a
shaded, protected area, at least 6 feet from the ground to avoid


Produkt Specifikationer

Mærke: La Crosse Technology
Kategori: Termometer
Model: CA80987

Har du brug for hjælp?

Hvis du har brug for hjælp til La Crosse Technology CA80987 stil et spørgsmål nedenfor, og andre brugere vil svare dig
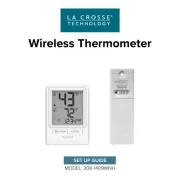
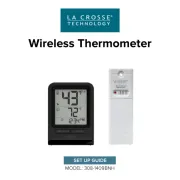
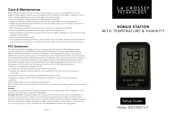