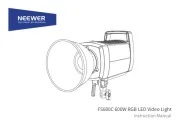
EN
Thanks for purchasing the NEEWER BH-30S RGB Light Wand.
The BH-30S is a handheld RGB light wand used for photography lighting. With
built-in rechargeable batteries and an upgraded charging circuit, the light boasts
an extended operating time of up to 150 minutes. Easily switch between the CCT
mode, HSI mode and Scene mode to provide vibrant colored lights to achieve
your desired lighting effects for photography and videography, both indoors and
out.
About this product
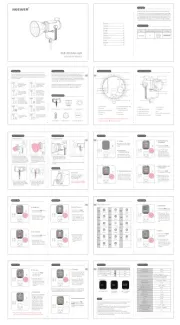
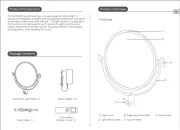
Package Contents
BH-30S RGB Light Wand ×1
USB Charging Cable ×1
Carrying Bag ×1
Handle ×1
01 02 03
05
EN EN EN
EN
EN
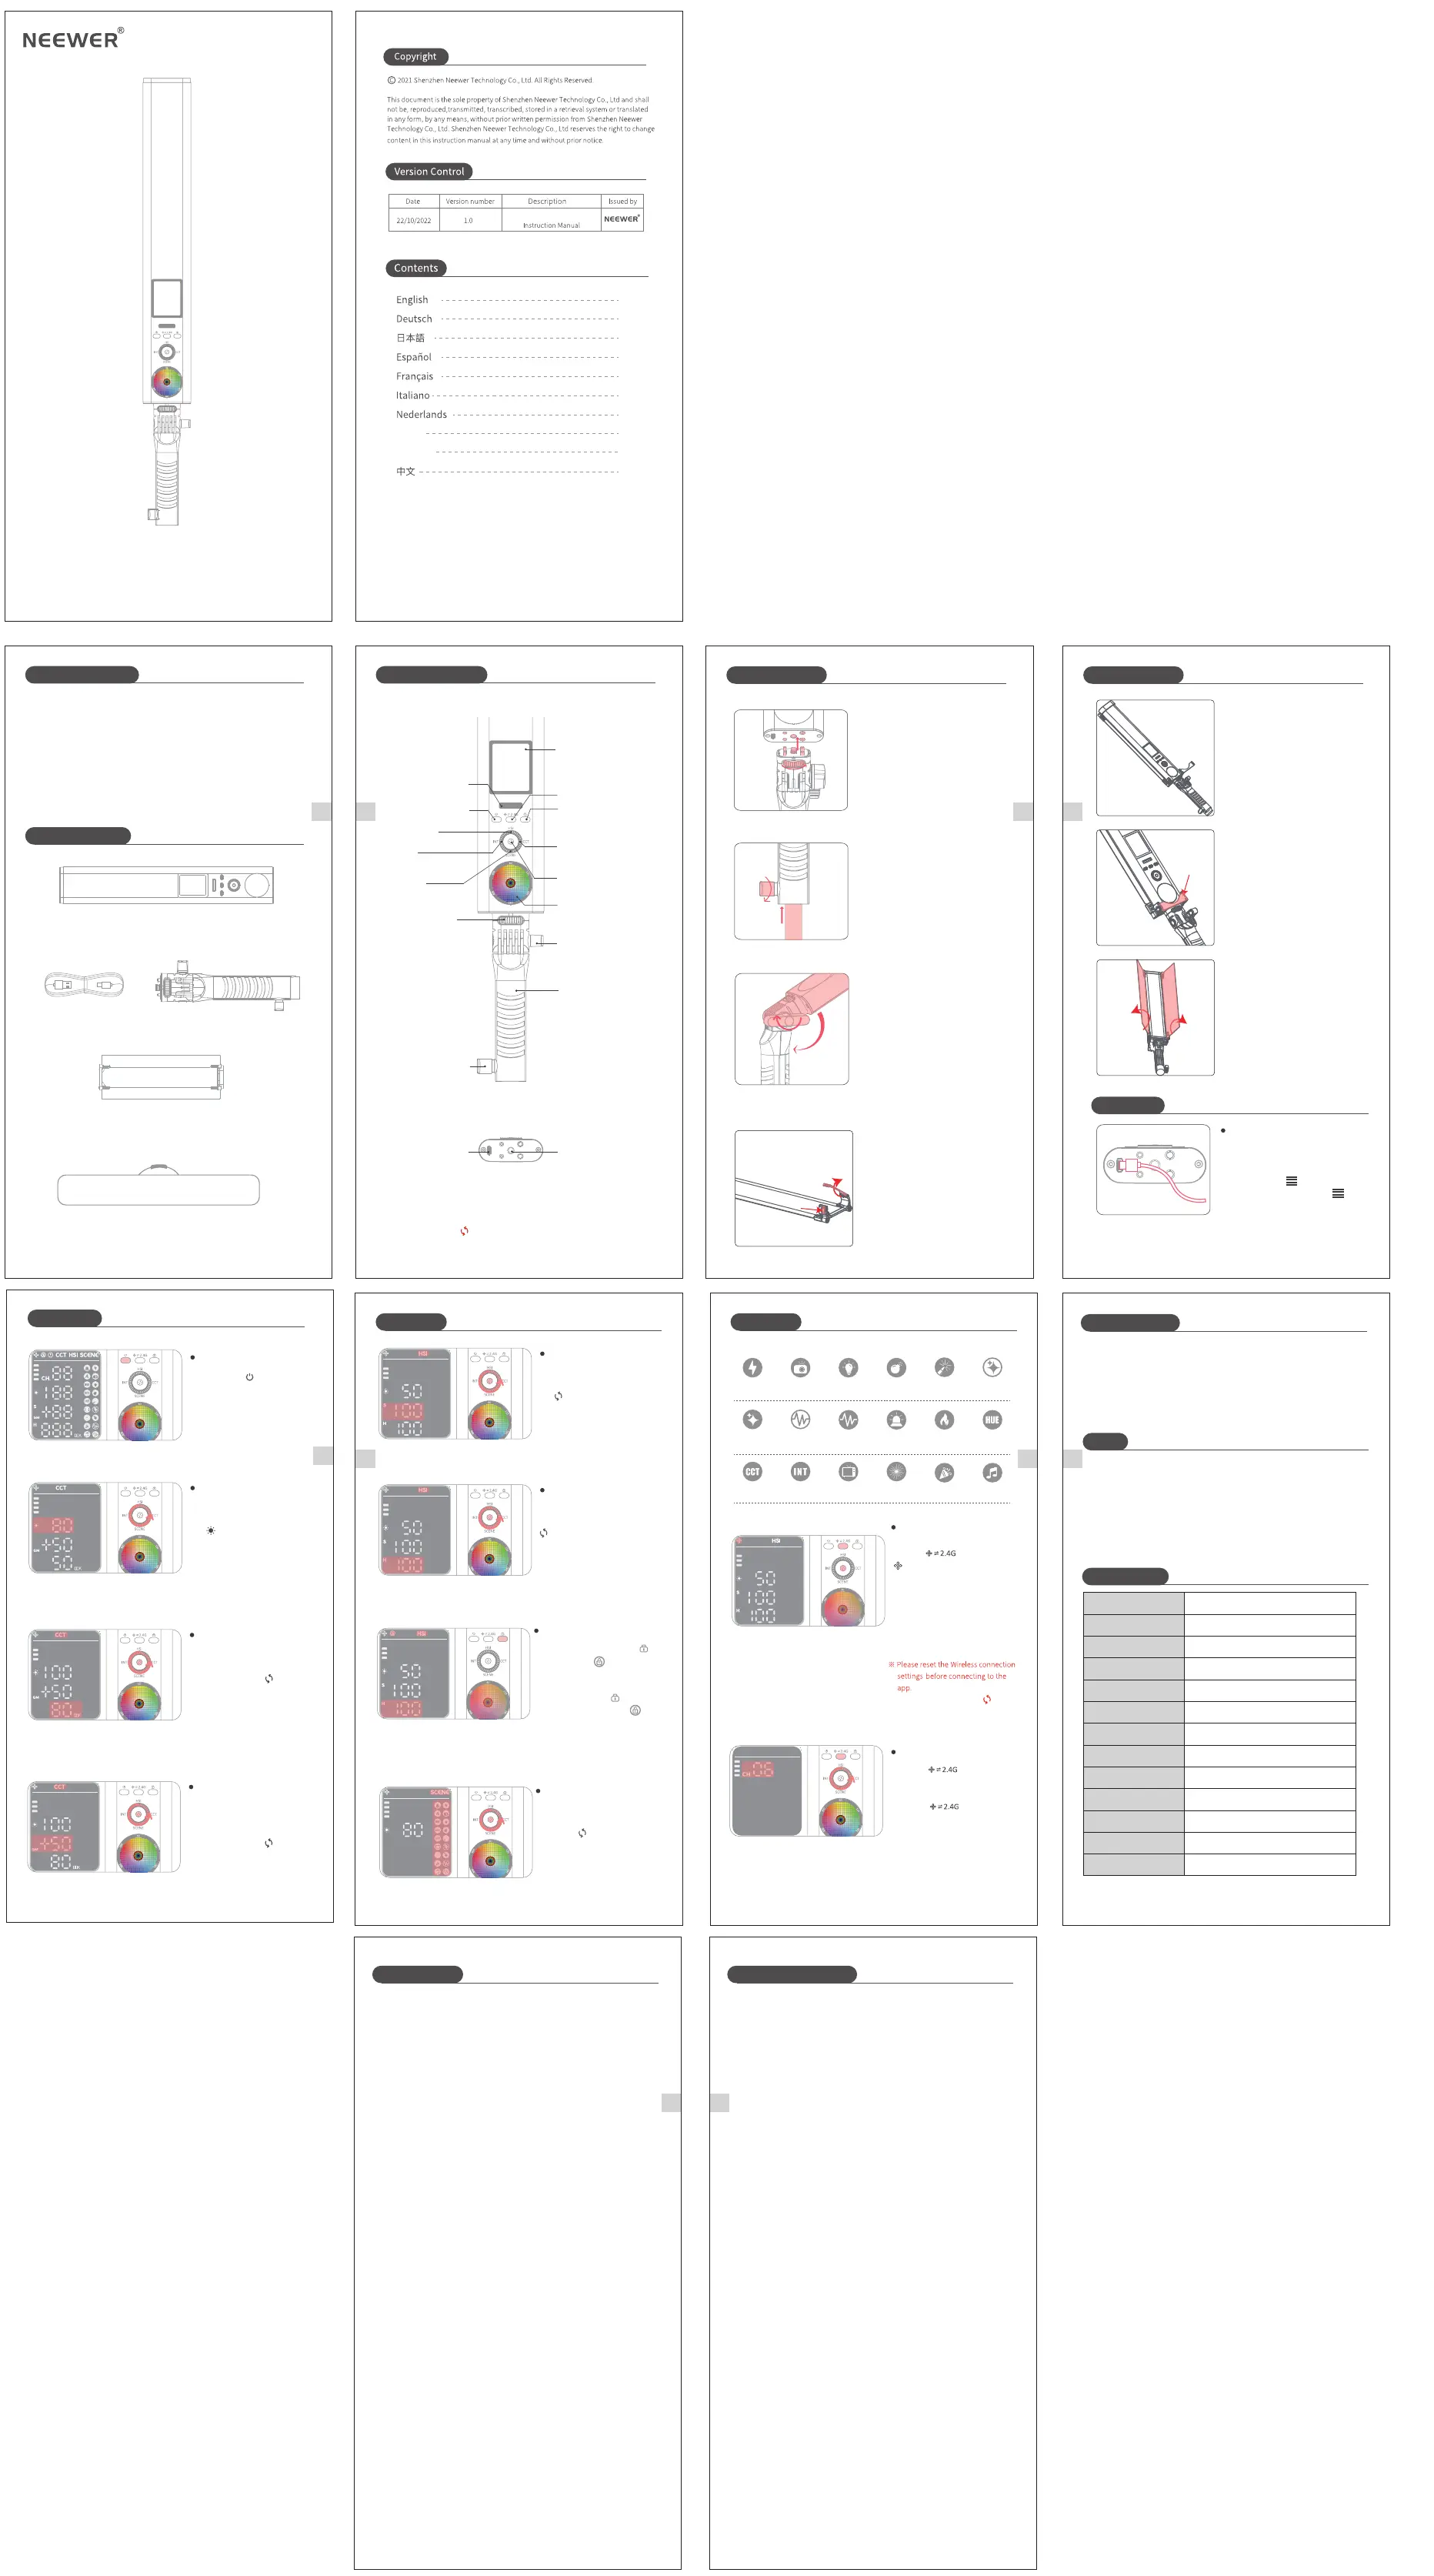
NEEWER
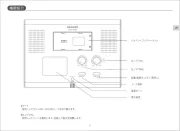
Product Illustration
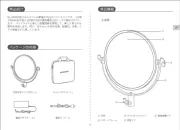
How to Assemble
Installing the handle
Mounting the light on a stand
Insert the top screw of a light stand into the
bottom screw hole of the support bracket,
then rotate the knob to secure.
Insert the 1/4" screw and the four safety tabs
into matching entry points at the bottom of
the light wand, then tighten the Handle
Locking Knob to secure.
※ The light stand mentioned above isn't
included and is available for separate
purchase.
How to Use
Long press the " " Power Button
until the display lights up and the
light wand turns on.
Turning the light on/off
How to Use
07 08
1009
EN
EN EN
Specifications
1. Please avoid dropping the light or subjecting it to a strong impact.
1. Do not attempt to detach, modify, and repair the battery by yourself. Any
unauthorized operation may cause battery leakage, overheating, burning, and
other hazards.
2. Be sure to use the provided or certified chargers to prevent overcharging and
shortcuts.
3. If unusual charging speed and indicator flashing occur, please stop charging
and contact our customer service immediately.
4. Keep away from inflammable and explosive items.
2. When the light wand is on, please do not stare at the LED beads to avoid the risk
of visual impairment.
3. Please keep the light away from inflammable and volatile substances.
4. Please do not use the light in the rain or a humid environment.
5. If left unused for a long period of time, please charge the light wand every three
months.
6. If you use the light when it's being charged by an AC adapter of less than 5V/2A,
the light may go due to receiving insufficient power.
BH-30SModel
80 LEDs (warm white)+80 LEDs (cold white)
+84 LEDs (RGB)
Number of LEDs
15W
Rated Power
97
97
Color Rendering Index
TLCI
6300K@0.5M(1800LX)
Maximum Illuminance
2500K~10000K
Color Temperature Range
0%-100% (in 1% increments)
Brightness Range
0~360°Hue
18Available Scenes
7.7V/4150mAh/32WhBuilt-in Battery
DC 5V/2A, 9V/2A
Type-C
Charging Input
Charging Port
Stand Securing Knob
USB Charging Port
Display
Touchpad Lock button
(short press)
Infinity/2.4G Mode
Illuminated LOGO
Power Button (long press)
RGB Color Mixer
Angle Adjustment Knob
Handle Locking Knob
Integrated Handle
1/4" Screw Hole
Press right dial:
Color Temperature
Rotate the dial:
changes item values
Navigate through items
(short press)
※ Long press the " " button for 5 seconds to reset the Infinity connection.
Press on the adjustment
dial: HSI mode
Press left:
Brightness mode
Press down:
Scene mode
06
EN
How to Use
Battery warning
FCC Statement IC Warning Statements
NEEWER
Adjusting the light angle
Mounting Barndoors
Set the light wand to the required, and tighten
the Angle Adjustment Knob (0°-180° tilt range).
2.4G mode
To enter into Infinity mode, please long
press the " " button until the
" " symbol flashes on the display.
To control the light wand with your
phone, you will need to download and
install the "NEEWER" App to connect
with the light wand. For detailed
instructions, please scan the QR code
on the App leaflet.
Infinity
Press upper dial "HSI" to enter HSI
mode. Next, short press the center
dial " " until the S number flashes
on the display, then rotate the dial
to set saturation value.
Adjusting saturation
Press right dial "CCT" to change to
color temperature screen. Short
press the center dial " " until
the symbol "00K" is flashing on
the display. Rotate the dial to change
color temperature values.
Changing color temperature
In any mode, simply press on the
left dial "INT" until the display shows
the " " symbol flashing, then rotate
the dial to adjust the brightness level.
Adjusting brightness level
Red and green compensation
value adjustment
Press upper dial "HSI" to enter HSI
mode. Next, short press center dial
" " until the H number is flashing
on the display, then rotate the dial
to set hue value.
Adjusting hue (via HSI mode)
Press right dial "CCT" to change into
color temperature screen. Short
press the center dial " " until the
symbol "GM" is flashing on the
display. Rotate the dial to set
red/green color compensation
value.
Notes
Press lower dial "SCENE" to activate
the light's SCENE mode. Short press
center dial " " until light scene
flashes on the display. Rotate the
dial to switch between different
scenes.
Please reset Infinity by pressing
and holding center dial " " for 5
seconds.
Setting special scenes
In any mode, short press the " "
button until the " " icon disappears
on the display. Then move the RGB
Color Mixer with your finger to adjust
hue. Short press the " " button again
until the diaply shows the " "
symbol. This indicates that the RGB
Color Mixer is now locked.
Adjusting hue (via RGB Color Mixer)
Scene modes
Long press " " button until the
display shows the symbol "CH" to
indicate that the light is in 2.4G mode.
Short press " " button to switch
to channel setting, then rotate the dial
to choose a channel.
※ In 2.4G mode, you can set multiple LED lights on the same channel (such as CH8).
When you change light settings on one of the lights, all other lights set on the same
channel will adjust to the same settings.
- English Warning Statement
"This device complies with Industry Canada licence-exempt RSS standard(s).
Operation is subject to the following two conditions: (1) this device may not
cause interference, and (2) this device must accept any interference,
including interference that may cause undesired operation of the device."
The digital apparatus complies with Canadian CAN ICES-3 (B)/NMB-3(B).
This radio transmitter has been approved by Industry Canada to operate
with the antenna types listed with the maximum permissible gain indicated.
Antenna types not included in this list, having a gain greater than the
maximum gain indicated for that type, are strictly prohibited for use with
this device.
The device has been evaluated to meet general RF exposure requirement.
The device can be used in portable exposure condition without restriction.
- French Warning Statement
"Le présent appareil est conforme aux CNR d'Industrie Canada applicables
aux appareils radio exempts de licence. L'exploitation est autorisée aux deux
conditions suivantes : (1) l'appareil ne doit pas produire de brouillage, et (2)
l'utilisateur de l'appareil doit accepter tout brouillage radioélectrique subi,
mêmesi le brouillage est susceptible d'en compromettre le fonctionnement."
Cet appareil numérique de la classe B est conforme à la norme NMB-003 du
Canada.
Le présent émetteur radio a été approuvé par Industrie Canada pour
fonctionner avec les types d'antenne énumérés ci-dessous et ayant un gain
admissible maximal. Les types d'antenne non inclus dans cette liste, et dont
le gain est supérieur au gain maximal indiqué, sont strictement interdits
pour l'exploitation de l'émetteur.
L'équipement a été évalué comme satisfaisant aux exigences générales en
matière d'exposition aux radiofréquences. L'appareil peut être utilisé sans
restriction dans des conditions d'exposition portatives.
04
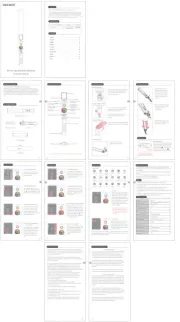
How to Assemble
Connect the light to a power source using
the USB charging cable and a 5V/2A power
adapter. During the charging process, the
bars battery icon " " will pulse. After
reaching a full charge, the icon " "
remains constantly on displaying full bars.
* The USB connector of the charging cable
can be inserted into a power adapter, power
bank, or computer for battery charging.
Charging the light
How to Use
Lightning
Hue flash
CCT loop INT loop TV screen PartyFireworks
CCT Pulse HUE Pulse Cop car Candlelight HUE loop
Paparazzi
Defective
bulb
Explosion Welding CCT Flash
Music
01
11
19
27
35
43
51
59
67
75
BH-30S Light Wand
BH-30S Light Wand With Barndoors
Instruction Manual
NEEWER
This device complies with Part 15 of the FCC Rules. Operation is subject to the
following two conditions: (1) this device may not cause harmful interference, and
(2) this device must accept any interference received, including interference that
may cause undesired operation.
CAUTION: The user is cautioned that changes or modifications not expressly
approved by the party responsible for compliance could void the user's authority
to operate the equipment.
NOTE: This equipment has been tested and found to comply with the limits for a
Class B digital device, pursuant to part 15 of the FCC Rules. These limits are
designed to provide reasonable protection against harmful interference in a
residential installation. This equipment generates, uses and can radiate radio
frequency energy and, if not installed and used in accordance with the instructions,
may cause harmful interference to radio communications.
However, there is no guarantee that interference will not occur in a particular
installation. If this equipment does cause harmful interference to radio or
television reception, which can be determined by turning the equipment off
and on, the user is encouraged to try to correct the interference by one or
more of the following measures:
—Reorient or relocate the receiving antenna.
—Increase the separation between the equipment and receiver.
—Connect the equipment into an outlet on a circuit different from that to which
the receiver is connected.
—Consult the dealer or an experienced radio/TV technician for help.
FCC RF Radiation Exposure Statement:
1. This Transmitter must not be co-located or operating in conjunction with any
other antenna or transmitter.
2. This equipment complies with RF radiation exposure limits set forth for an
uncontrolled environment.
The device has been evaluated to meet general RF exposure requirement.
The device can be used in portable exposure condition without restriction.
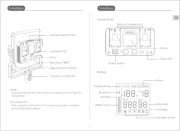
Polish
Sweden
BH30S Barndoors
×1
1. Press the release tab on the
lower piece to open the latch
tab.
2. Insert the BH30S into the
supporting bracket ensuring
that the top of the light aligns
with the top piece, and that
the tab on the bottom section
matches with the bottom of
the light.
3. Press the locking lever and hold
the locking button. The BH30S
fits inside the barn door
retention plate.
4. Depending on the requirements,
both sides of the barndoors can
be unfolded at any angle.